OIL-LESS TURKEY FRYER Product Manual Model 07101366 FOR OUTDOOR USE ONLY CAUTION: Read and follow all safety statements, assembly instructions, and use and care directions before attempting to assemble and cook. INSTALLER/ASSEMBLER: Leave this manual with consumer. CONSUMER: WARNING: Failure to follow all manufacturer’s instructions could result in serious personal injury and/or property damage.
DANGER If you smell gas: 1. Shut off gas to the appliance. 2. Extinguish any open flame. 3. Open lid. 4. If odor continues, keep away from the appliance and immediately call your fire department. Failure to follow these instructions could result in fire or explosion, which could cause property damage, personal injury or death. DANGER 1. Never operate this appliance unattended. 2. Never operate this appliance within 10ft (3m) of any structure, combustible material or other gas cylinder. 3.
TABLE OF CONTENTS For Your Safety . . . . . . . . . . . . . . . . . . . . . . . . . . . . . . . . . . . . . . 2 Grill Service Center. . . . . . . . . . . . . . . . . . . . . . . . . . . . . . . . . . . 2 Installation Safety Precautions . . . . . . . . . . . . . . . . . . . . . . . . . . 2 Safety Symbols. . . . . . . . . . . . . . . . . . . . . . . . . . . . . . . . . . . . . . 2 Product Record Information . . . . . . . . . . . . . . . . . . . . . . . . . . . . 3 Use and Care . . . . . . . . . . . . . . . .
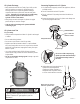
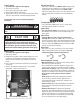
USE AND CARE DANGER • NEVER store a spare LP cylinder under or near the appliance or in an enclosed area. • A disconnected LP cylinder in LP Cylinder Valve storage or being transported must have a safety cap installed (as shown). Do not store an LP cylinder in enclosed spaces such as a carport, garage, porch, covered Safety patio or other building. Never leave an LP cylinder Cap inside a vehicle which may become overheated Retainer Strap by the sun.
LP Cylinder Exchange Connecting Regulator to the LP Cylinder • Many retailers that sell Oil-Less Turkey Fryer's offer you the option of replacing your empty LP cylinder through an exchange service. Use only those reputable exchange companies that inspect, precision fill, test and certify their cylinders. Exchange your cylinder only for an OPD safety feature-equipped cylinder as described in the "LP Cylinder" section of this manual. 1. LP cylinder must be properly secured onto appliance.
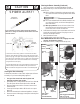
Leak Testing Valves, Hose and Regulator 1. Turn control knob to OFF. 2. Be sure regulator is tightly connected to LP cylinder. Str aig ht 3. Completely open LP cylinder valve by turning hand wheel counterclockwise. If you hear a rushing sound, turn gas off immediately. There is a major leak at the connection. Correct before proceeding. Hold coupling nut and regulator as shown for proper connection to LP cylinder valve. 4. Brush soapy solution onto areas circled below. 6.
WARNING For Safe Use of Your Oil-Less Turkey Fryer and to Avoid Serious Injury: • The use of alcohol, prescription or non-prescription drugs may impair the consumer's ability to properly assemble or safely operate the appliance. • When cooking, the appliance must be on a level, stable noncombustible surface in an area clear of combustible material. An asphalt surface (blacktop) may not be acceptable for this purpose. • Do not leave appliance unattended.
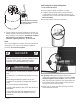
Ignitor Lighting • Do not lean over appliance while lighting. 1. Turn ON LP gas cylinder. 2. Press and turn the control knob to HIGH. 3. Turn ROTARY IGNITOR knob rapidly. 4. If ignition does not occur in 5 seconds, turn the burner control knob OFF, wait 5 minutes, and repeat lighting procedure. Burner Flame Check • Light burner, rotate knob from HIGH to LOW. Looking through viewing hole on top of appliance, you should see the flame height decrease when turning knob from HIGH to LOW.
Cleaning the Burner Assembly (Continued) CAUTION SPIDER ALERT! 7. Clean inner burner as recommended below, shown E. We suggest three ways to clean the burner tube. Use the one easiest for you. (A) Bend a stiff wire (a light weight coat hanger works well) into a small hook. Run hook through burner tube several times. SPIDER AND WEBS INSIDE BURNER TUBE If you notice that your grill is getting hard to light or that the flame isn’t as strong as it should be, take the time to check and clean the venturi’s.
Food Safety Storing Your Appliance Food safety is a very important part of enjoying the outdoor cooking experience. To keep food safe from harmful bacteria, follow these four basic steps: Clean: Wash hands, utensils, and surfaces with hot soapy water before and after handling raw meat and poultry. Separate: Separate raw meats and poultry from ready-to-eat foods to avoid cross contamination. Use a clean platter and utensils when removing cooked foods.
PARTS DIAGRAM – Model No. 07101366 I N T K K J J C H B A S D F U L M E G R Q O P Key Qty A 1 B 1 C 1 D 1 E 1 F 1 G 1 H 1 I 1 J 2 K 2 L 1 Description Part # Outer Body . . . . . . . . . . . . . . . . . . . . . . 55710184 Inner Body . . . . . . . . . . . . . . . . . . . . . . 55710185 Body Top Ring . . . . . . . . . . . . . . . . . . . 55710186 Burner. . . . . . . . . . . . . . . . . . . . . . . . . . 55710187 Heat Shield. . . . . . . . . . . . . . . . . . . . . . 55710188 Ignition Kit. . . . .
ASSEMBLY – Model No. 07101366 1 • Remove lid, roaster basket and cooking pot. • Turn fryer upside down. • Attach legs to body using two #10-24 x 1/2" screws for each leg. Screw on from outside. Assure leg with rating label is attached behind burner tube outlet as pictured. Leg Assembly with Rating Label Qty: 8 #10-24x1/2" Screw #10-24x1/2” Screw Burner 2 • Attach grease tray rails to body with #10-24x3/8" screws and #10-24 keps nuts.
3 • • • • • • A Attach rotary ignitor to control panel using two #8x1/2" self-tap screws (A). Attach round end of ignitor wire to rotary ignitor (A). Attach valve to control panel holding valve in correct position using two #6-32x3/8" threaded screws (A). Make sure valve is inside burner tube. Secure control panel using one #10x3/8” self-tap screw through single tab side (B). Slide heat shield between fryer body and louver side of control panel.
4 • • • Turn fryer upright on its legs. Push on control knob and ignitor knob (A). If not already assembled, slide handle springs onto side handles (B). Attach side handles to fryer body using two #10-24x1/2" screws on each handle (C). B Qty: 4 #10-24x1/2" Screw C A Ignitor Knob Control Knob #10-24x1/2" Screw 5 • Slide grease tray onto grease tray rails.
6 • Place cooking pot and roaster basket into fryer body and storage lid on top. • When cooking hang storage lid on handle as shown. NOTE: Before cooking on your fryer for the first time, refer to the seasoning supplement on how to prepare the fryer for cooking. It is recommended that you season you fryer prior to cooking. • Once seasoning is complete, the fryer is now ready for use. We recommend cooking foods on the “Low” setting, until you get familiar with your fryer.
EMERGENCIES: If a gas leak cannot be stopped, or a fire occurs due to gas leakage, call the fire department. Emergencies Possible Cause Prevention/Solution Gas leaking from cracked/cut/burned hose. • Damaged hose. • Turn off gas at LP cylinder or at source on natural gas systems. If hose is cut or cracked, replace valve/hose/regulator. See LP Cylinder Leak Test and Connecting Regulator to the LP Cylinder. Gas leaking from LP cylinder. • Mechanical failure due to rusting or mishandling.
Troubleshooting (continued) Problem Possible Cause Prevention/Solution Burner will not light using ignitor. • Rotary knob rotates without clicking. • Replace knob. • Sparking between ignitor and electrode. • Inspect wire insulation and proper connection. Replace wire if insulation is broken. • See “GAS ISSUES:” on previous page. • Match will not reach. • Use long-stem match (fireplace match). • Improper method of match-lighting. • See “Match-Lighting” section of Use and Care. • Out of gas.
LIMITED WARRANTY Manufacturer warrants to the original consumer-purchaser only that this product shall be free from defects in workmanship and materials after correct assembly and under normal and reasonable home use for the periods indicated below beginning on the date of purchase. The manufacturer reserves the right to require that defective parts be returned, postage and or freight pre-paid, by the consumer, for review and examination.
Page Intentionally Blank 07101366 • 19
STOP Should you encounter a problem with our product CALL US FIRST Do not return this product to the store. WE CAN HELP GRILL SERVICE CENTER 1-800-241-7548 HOURS 8AM-6PM EST Mon-Fri Please ensure your warranty registration is complete. Oil-Less Turkey Fryer Safety Checklist Read and understand owners manual. Never overfill LP cylinder. Overfilled cylinders may cause freeze-up of regulator. Check tubes for spider webs. Ensure valves are correctly installed in burner tubes.