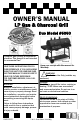
OWNER’S MANUAL LP Gas & Charcoal Grill Duo Model #5050 A propane gas cylinder is required for operation. This gas grill is not intended for commercial use. WARNING: Improper installation, adjustment, alteration, service or maintenance could cause injury or property damage Read the installation, operation and maintenance instructions thoroughly before assembling or servicing this equipment.
! Danger If you smell gas: 1. Shut off gas to the appliance. 2. Extinguish any open flame. 3. Open Lid. 4. If odor continues, keep away from the appliance and immediately call your gas supplier or your fire department. ! Warning Do not store or use gasoline or other flammable liquids or vapors in the vicinity of this or any other appliance. An LP cylinder not connected for use shall not be stored in the vicinity of this or any other appliance.
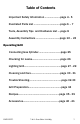
Table of Contents Important Safety Information .…………………page 4 - 5 Illustrated Parts List ……………………………..…page 6 – 7 Tools, Assembly Tips and Hardware List ….page 8 Assembly Instructions …………………………….page 10 – 23 Operating Grill Connecting Gas Cylinder…………………………..page 25 Checking for Leaks………………………………..…page 26 Lighting Grill…...…………………………………….....page 27 - 29 Cleaning and Care……………………………………page 30 - 31 Trouble Shooting……………………………………....page 32-33 Grill Preparation………………………………………..
WARNING FOR YOUR SAFETY 1.DO NOT store or use gasoline or any other flammable vapors and liquids within 25 feet (8m) of this or any other appliance. 2. When cooking with oil/grease, do not allow the oil/grease to exceed 350°F (177°C). Do not store or use extra cooking oil in the vicinity of this or any other appliance. 3. An LP Cylinder not connected for use should be stored a minimum of 10 feet (3m) away from this or any other appliance. Never fill the cylinder beyond 80 percent full.
10. Do not touch metal parts of grill until it has completely cooled (about 45 minutes) to avoid burns, unless you are wearing protective gear (BBQ mittens, pot holders, etc.) 11. Do not alter this grill in any manner 12. Clean and inspect the hose before each use. If there is evidence of abrasion, wear, cuts, or leaks, the hose must be replaced prior to operating the appliance. The replacement hose assembly will be that which is specified by the manufacturer. 13.
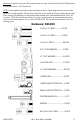
5 14 1 32 6 2 33 34 7 27 16 11 35 8 28 9 3 29 31 4 25 22 23 21 36 18 24 26 24 18 15 13 12 20 30 19 17 OM5050F.3 10 ™ & © Char-Griller / A&J Mfg.
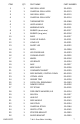
ITEM QTY PART NAME PART NUMBER 1 1 GAS GRILL HOOD 30-0009 2 1 CHARCOAL GRILL HOOD 30-0013 3 1 GAS GRILL BODY 30-0010 4 1 CHARCOAL GRILL BODY 30-0014 5 2 THERMOMETER 55-0088 6 2 HOOD HANDLE 55-0009 7 2 WARMING RACK 20-0001 8 2 BURNER (short wire) 80-0007 9 1 BURNER (long wire) 80-0006 10 1 BASE 20-0037 11 3 FLARE-UP SHIELD 10-0001 12 2 LONG LEG 10-0031 13 2 SHORT LEG 10-0032 14 2 BEZEL 10-0358 15 2 LEG CROSS BAR 10-0033 16 6 COOKING GRATE 10-
Assembly: Requires 2 people. Get another person to help. Tools Needed: Pliers, Phillips Head Screwdriver and a 7/16” Nut Driver. NOTE: Do Not tighten any bolts unless instructed to do so. Tightening too soon may prohibit parts from fitting together. All Hex Nuts should be on the inside of the grill unless stated otherwise. Unpack all contents in a well cleared and padded area. Estimated Assembly Time: 45 minutes STOP! Do Not Return to Store.
Page intentionally left blank for notes OM5050F.3 ™ & © Char-Griller / A&J Mfg.
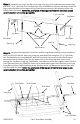
Step 1: Assemble the Leg Cross Bar, Short Leg, Long Leg, and Leg Braces then secure them with four 2 1/4” Hex Bolts, four Flat Washers, four Lock Washers, and four Hex Nuts. Orient the Leg so that the holes on the Legs and Leg Cross Bar are pointing in the direction of the Leg Braces Side, see Below. NOTE: The orientation of the Legs are critical for later steps so pay careful attention to how they go together.
Holes on Leg Cross Bars Correct Orientation Top View of Assembly Step 3: Place Bottom Shelf between the four legs and secure it to the legs with four Lock Washers and four 1/2” Hex Bolts. The Hex Bolt should goes on the top hole on the Bottom Shelf Base. Then slightly bend the “U” Shape wire on the Wire Shelf and insert it into the slots on the Bottom Shelf. Hex Bolts Lock Washers Hex Bolts Wire Shelf Bottom Shelf OM5050F.3 ™ & © Char-Griller / A&J Mfg.
Step 4: Install one Flat Washer, Cotter Pin, and Hub Cap onto the Axle then slide the Axle through the Wheels, Legs, and Bottom Shelf as shown below. Finish by attaching 2nd Washer, Cotter Pin and Hub Cap. Wheels Hub Cap Flat Washer Flat Washer Cotter Pin Axle Hub Cap Cotter Pin Bottom Shelf Step 5: Attach two Slider Brackets and one Stopper Bracket onto the bottom of the Gas Grill Body with six #10-24 x 0.40” Bolts. (NOTE: Oriented The Slider and Stopper Brackets as shown below.
Step 6: Attach the Grill Bodies to the previous assembly cart using four Lock Washers, four Flat Washers, and four 1/2” Hex Bolts per Grill Body from the inside of the Grill Bodies. The Gas Grill Body should be on the Wheel side see below. NOTE: The orientation of the Grill Body should be as shown Below. Charcoal Grill Body Hex Bolts Gas Grill Body Flat Washers Lock Washers Hex Bolts Lock Washers Flat Washers OM5050F.3 ™ & © Char-Griller / A&J Mfg.
Step 7: Install the Catch Pan onto the bottom of the Gas Grill Body by sliding the Catch Pan underneath the Grill Body bottom. Making sure that the Brackets on the Catch Pan rest on top of Slider Brackets. Slid the Catch Pan all the way till you can hang the Catch Pan side bracket onto the Stopper Bracket. Gas Grill Body Catch Pan Slider Bracket Stopper Bracket Step 8: Install Side Burner Body/Control Panel Assembly onto the Gas Grill Body.
Step 9: Install the Burners into the Gas Grill Body by inserting the IGNITER WIRES and Burners through the open holes at the front of the Grill Body from inside of the Grill Body, see figure 9A. (NOTE: IGNITER MUST BE ON BOTTOM SIDE OF BURNER). The BURNER with the longer wire goes on the right side of the GRILL BODY. Making sure that the Valve goes inside each burner, see figure 9B. Then secure the Burners to the Grill Body with the screws provided, see figure 9C.
Step 10: Connect the Igniter Wires to the receptors on the Electronic Igniter underneath the Control Panel. Any Wire can goes into any of the three receptors on the Electronic Igniter. Electronic Igniter Control Panel Igniter Wires Step 11: Install the Condiment Basket to the Charcoal Grill Body using four Lock Washers and four 1/2” Hex Bolts. The Bolts should go from inside the Charcoal Grill Body Condiment Basket Lock Washers Hex Bolts Charcoal Grill Body OM5050F.3 ™ & © Char-Griller / A&J Mfg.
Step 12: Install the Damper Circle to the side of the Charcoal Grill Body using one 1/2” Bolt, two Flat Washers, one Lock Washer, and on Hex Nut see below. Flat Washers Hex Nut Lock Washer Damper Circle Hex Bolt Step 13: Attach the Side Handle to the side of the Charcoal Grill Body using two 1/2” Hex Bolts, and two Lock Washers. Side Handle Charcoal Grill Body Hex Bolts Lock Washers Gas Grill Body OM5050F.3 ™ & © Char-Griller / A&J Mfg.
Step 14: Attach the Hood Handles to the Gas Grill Hood and Charcoal Grill Hood with two Lock Washers and two Wing Nuts per handle. Then attach the Thermometer and Bezels to the Grill Hoods. The Thermometer goes through the Bezel then the Grill Hood and secure with a Wing Nuts.
Step 16: Attach the Grill Hoods to the Grill Bodies using Shoulder Bolts, Clevis Hinge, and Hinge Pins. First Place the Gas Grill Hood on the Gas Grill Body in the closed position and screw the left side hinge with a Shoulder Bolt. Place the Charcoal Grill Hood in the closed position and screw the right side hinge with a Shoulder Bolt. Then have your helper carefully open the Charcoal Grill Hood while you insert the Clevis Hinge through the Charcoal Grill Body and Hood Hinge.
Step 17: To install the Warming Racks first attach the eight 1 1/2” Hex Bolts and eight Hex Nuts onto the Grill Bodies and Grill Hoods. Then Position the Warming Racks onto the Hex Bolts and Secure them with eight more Hex Nuts, one on each bolt. Hex bolts Hex Nuts Hex Nuts Hex Bolts Hex Bolts Hex Bolt Hex Nuts Hex Nuts Hex Nuts OM5050F.3 ™ & © Char-Griller / A&J Mfg.
Step 18: Set the Pot Stand in place over the Side Burner. Next place the three Flare-Up Shields in place over the Main Burner Tubes then hang Ash Pan/Fire Grate Hangers on the hanger tabs on the side of the Charcoal Grill Body. Pot Stand Flare-Up Shields Fire Grate Hangers Ash Pan Hang Tabs Step 19: Place Cooking Grates in place inside Grill Bodies. Cooking Grates Cooking Grates OM5050F.3 ™ & © Char-Griller / A&J Mfg.
Step 20: Slide one Grease Tray into place on the guide rails underneath the Side Burner Body and the other Grease Tray underneath the Catch Pan. Side Burner Body Grease Trays Catch Pan Step 21: Insert and screw in the Wing Bolt into the hole on the side of the Bottom Shelf. And insert the Utensils Hooks into the holes on the front of Side Burner Body. Side Burner Body Utensils Hooks Wing Bolt Bottom Shelf OM5050F.3 ™ & © Char-Griller / A&J Mfg.
Step 22: Unscrew the Igniter Push Button and insert a “AA” battery into the hole, making sure that the negative side of the battery going in first. Then screw back the Igniter Push Button. Igniter Push Button “AA” Battery Step 23: Tighten all NUTS and BOLTS. OM5050F.3 ™ & © Char-Griller / A&J Mfg.
Fully Assembled Caution: Use only the regulator provided! If a replacement is necessary, please call our customer service department, 912638-4724. Do NOT use replacement parts that are not intended for this grill. Hint: The paper label that is affixed to the hood is more easily removed when the hood is warm. Any remaining glue residue can be cleaned off with a spray lubricant like WD-40 . Do NOT use any other type of solvent or cleaner because this will damage the finish/paint/coating on the grill.
Connecting Gas Cylinder: The propane gas supply cylinder to be used must be constructed and marked in accordance with the Specifications for propane gas Cylinders of the U.S. Department of Transportation (DOT), or the National Standard of Canada, CAN/CSA B339, Cylinders, Spheres and Tubes for Transportation of Dangerous Goods; and Commission, as applicable. Only cylinders with a listed overfill prevention device (OPD) and marked “propane” may be used.
Stand in front of the grill to operate the controls. Note: Before starting the grill, check for leaks. Make sure the regulator valve is securely fastened to the burner and the cylinder. To prevent fire or explosion hazard when testing for a leak: 1. Always perform the “leak test” as described below before lighting the grill or each time the cylinder is connected for use. 2. Do not smoke or allow other sources of ignition in the area while conducting a leak test. 3.
Lighting Your Grill Danger: Failure to open hood while igniting the grill or not waiting 5 minutes to allow the gas to clear if the grill does not light, may result in an explosive flare-up which can cause serious bodily injury or death. Before cooking on this grill for the first time, operate the grill for about 15 minutes with the lid closed and the gas turned on “high”. This will “heat clean” the internal parts and dissipate odor from the manufacturing processes and painted finish. Main Burners: 1.
Side Burner 1. Open lid during lighting. Lid must be open when burner is on. 2. Burner valves must be in the “off” position. 3. Open cylinder valve. 4. Push in side burner valve knob fully and rotate slowly about ¼ turn counterclockwise until a click is heard. If the burner does not light, immediately turn the valve knob to OFF. Wait 5 minutes for the gas to clear and repeat the procedure. After burner ignites, adjust valve knob to desired cooking setting. Shutting Off Burners: 1.
Lighting Burner With a Match: 1. Place a match in the end of the match holder that is installed on the side of Grill Housing. Once lit, immediately place the flame through the cooking grates as shown near the burner ports. 2. Press in knob and rotate counter-clockwise to the High setting and burner should light immediately. 3. Adjust burners to desired cooking settings Cooking Grate Match Holder OM5050F.3 Chain ™ & © Char-Griller / A&J Mfg.
Cleaning and Care Caution: All cleaning and maintenance should be done when grill is cool and with the gas supply turned off at the propane cylinder. DO NOT clean any grill part in a self cleaning oven. The extreme heat will damage the finish. Cleaning Burning-off the grill after every use (approx. 15 minutes) will keep excessive food residue from building up.
Cleaning the Burner Assembly • Remove grease collector. • Remove cooking grates and heat shield. • Remove burner by unscrewing nut from beneath burner “foot” using a screwdriver and pliers. • Lift burner up and away from gas valve orifice. • Clean inlet (venturi) of burner with small bottle brush or compressed air. • Remove all food residue and dirt on outside of burner surface. • Clean any clogged ports with a stiff wire (such as an opened paper clip) • Inspect burner for any damage (cracks or holes).
Gas Grill Trouble Shooting Problem Possible Cause Burner will not light Wires/or electrode covered with cooking resiusing knobs due. Electrode and burners are wet. Prevention/Cure Clean wire and/or electrode, with rubbing alcohol Wipe dry with cloth Electrode cracked or broken -sparks at crack Wire loose or disconnected Replace electrode No gas flow. Check if propane tank is empty. If propane tank is not empty. Refer to "Sudden drop in gas flow or reduced flame height". If empty, replace or refill.
Gas Grill Troubleshooting, continued Possible Cause New burner may have residual Manufacturing oils. Prevention/Cure Insect nests in venturi. Clean venturi. Food residue, grease or seasoning salt on burner. Clean burner. Poor alignment of valve to burner venturi. Assure burner venturi is properly engaged with valve. High or gusting winds Turn front of grill to face wind or increase flame height.
GRILL PREPARATION & CHARCOAL GRILL OPERATING INSTRUCTIONS PLEASE NOTE: NO RETURNS ON USED GRILLS Read all safety warnings and instructions carefully before assembling and operating your grill. 1. Note: The interior of the grills are not painted, they are coated with vegetable oil. DO NOT remove this coating. Gas and Charcoal Grill: Cure grills prior to cooking to protect the interior and exterior finishes and prevent adding unnatural flavors to your food.
GRILLING RECIPES DIRECT METHOD STEAK (& ALL MEATS): Cook food directly above coals/heat. Generally speaking, to grill meats, raise fire grate to high position (hot) and sear for one minute on each side with the lid open to seal in flavor and juices. Then lower fire grate to medium position with lid closed and cook to desire doneness. Control heat with dual dampers and adjustable fire grate.
KABOBS: Alternating on skewers any combination of meat, onions, tomatoes, green peppers, mushrooms, zucchini, circular slice of corn-on-the-cob, or pineapple. Meat could consist of chunks of shrimp, scallops, lobster, chicken, sausage, pork, beef, etc. Marinate the meat in refrigerator for several hours. Grill each side approximately 7 minutes turning occasionally while basting with marinade. Leave a small amount of room between pieces in order to cook faster.
SMOKIN’ RECIPES: using the Charcoal Grill side of the Duo with a WATER PAN (also called INDIRECT METHOD). Pan not included. Disposable bread pan is recommended. SMOKE BY COOKING SLOWLY (See chart on page 27 for smoking times). 1) Place water/drip pan on left side of fire grate. 2) Place hot coals on right side (damper end) of fire grate. The charcoal basket accessory helps confine coals to one side. 3) Place meat above water pan. 4) Place fire grate in low position.
SMOKED HOT DOGS STUFFED: Slit hot dogs lengthwise, within 1/4 inch of each end. Stuff hot dogs with cheese and relish and wrap in bacon. Place on cooking grid over drip pan and smoke 15-20 minutes or until bacon is crisp. SMOKED CHICKEN PARTS AND HALVES: Rinse pieces in cold water and pat dry with paper towels. Brush each piece with vegetable oil and season to taste with salt and pepper. Brown pieces directly above coals with lid open and grate in high or medium position for several minutes.
CHICKEN MARINADE: Combine 1/2 cup soy sauce, 1/4 cup vegetable oil, 1/4 cup red wine vinegar, 1 teaspoon oregano, 1/2 teaspoon sweet basil, 1/2 teaspoon garlic powder with parsley, 1/4 teaspoon pepper. Pour over chicken pieces in nonmetal dish. Cover and refrigerate overnight, turning occasionally. Use marinade to baste chicken while cooking.
Duo 5050 ACCESSORIES ORDER FORM Professional Accessories™ Branded with Char-Griller® Logo ALL TOOLS: STAINLESS STEEL & HARDWOOD HANDLES Cover #8080 TO ORDER Visit: www.chargriller.com or CALL: 912-638-4724 or FAX: 912-638-2580 or MAIL: P.O.
ACCESSORIES Duo 5050 ORDER FORM Warming Rack Increase Grill Area Keeps food warm TO ORDER Visit our online store at: Charcoal Basket Confines coals to one side for smoking Indirect cooking www.chargriller.com or CALL: 912-638-4724 or FAX: 912-638-2580 or MAIL: P.O.
Page intentionally left blank for notes OM5050F.3 ™ & © Char-Griller / A&J Mfg.
P.O. Box 30864 Sea Island, GA 31561 912-638-4724 www.CharGriller.com Warranty Information – Gas Grill Char-Griller® will repair or replace any defective part of its Grills for a period of up to one year from the date of purchase. Char-Griller® will also repair or replace the charcoal grill body (lid and bottom half) and gas grill lid of its grillers/smokers if the metal is rusted through or burned through for a period up to five years from date of purchase.
P.O. Box 30864 Sea Island, GA 31561 912-638-4724 www.CharGriller.com Service@CharGriller.com OM5050F.3 ™ & © Char-Griller / A&J Mfg.