OWNER’S MANUAL Flavor Pro™ Model #7400 PATENTED & PATENTS PENDING Keep your receipt with this manual for warranty. CUSTOMER SERVICE 1-912-638-4724 Service@CharGriller.com Contents of this manual are Trademarked and Copyrighted by Char-Griller | A&J Manufacturing. Using the information contained in this manual without consent of Char-Griller and/or A&J Manufacturing is strictly prohibited. OM_7400_ED_ B.
TABLE OF CONTENTS Safety Warnings & Warranty............................... A-1 Assembly Instructions ..................................... B-1 Product Usage .................................................. C-1 Recipes .............................................................. D-1 Accessories ....................................................... E-1 Danger Warning If you smell gas: 1. Shut off gas to the appliance. 2. Extinguish any open flame. 3.
IMPORTANT SAFETY WARNINGS A propane gas cylinder is required for operation. This gas grill is not intended for commercial use. SAVE THESE INSTRUCTIONS FOR FUTURE REFERENCE. IF YOU ARE ASSEMBLING THIS UNIT FOR SOMEONE ELSE, GIVE THIS MANUAL TO HIM OR HER TO SAVE FOR FUTURE REFERENCE. For use outdoors and in well-ventilated areas, only. WARNING: Improper installation, adjustment, alteration, service, or maintenance could cause injury or property damage.
Read the following instructions carefully and be sure your barbecue is properly assembled, installed and maintained. Failure to follow these instructions may result in serious bodily injury and/or property damage. If you have any questions concerning assembly or operation, consult your dealer or LP gas company. • When used, always place the appliance and gas bottle on flat level ground. Grill can be used with 20lb gas cylinder. Grill will perform better if propane or LPG mixtures are used.
• When assembling the grill, position the connection flexible tube so that it is protected against twisting. • Stay away from any source of ignition when changing gas container. • When assembling the grill, do not obstruct ventilation openings of grill’s container compartment. We reserve the right to make minor technical adjustments to the device. • When cooking with oil/grease, do not allow the oil/grease to exceed 350°F (177°C).
WARNING • This grill is for outside use only, and should not be used in a building, garage, or any other enclosed area. • The use of alcohol, prescription or non-prescription drugs may impair the operator’s ability to properly assemble or safely operate the grill. • Always open grill lid slowly and carefully as heat and steam trapped within the grill can burn you severely. • Always place grill on a hard, level surface far away from combustibles.
• Do not allow charcoal and/ or wood to rest on the walls of grill. Doing so will greatly reduce the life of the grill. • CAUTION: Exposed metal dampers on air vents and/or metal handles are hot during usage. Again, always wear oven mitts when adjusting air flow to protect hands from burns. • When opening lid, make sure it is pushed all the way back so it rests against the lid support brackets. Use extreme caution as hood could fall back to a closed position and cause bodily injury.
*** STOP! CALL FIRST! *** Do NOT Return Product to Store. This grill has been made according to the highest of quality standards. If you have any questions not addressed in this manual or if you need parts please call our Customer Service Department at 1-912638-4724 (USA) or email Char-Griller at: Service@CharGriller.com and have your serial number handy. REGISTER YOUR GRILL: To take full advantage of the Char-Griller warranty be sure to register your grill by visiting www.CharGriller.
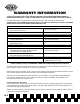
WARRANTY INFORMATION A COPY OF THE DATED PROOF OF PURCHASE (RECEIPT) IS REQUIRED WHEN REGISTERING OR SUBMITTING A WARRANTY* CLAIM. PLEASE RETAIN A COPY OF THE RECEIPT FOR YOUR RECORDS. Char-Griller will replace any defective part of its grillers/smokers, under warranty, as outlined below. PLEASE READ THIS INFORMATION IN DETAIL AND IF YOU HAVE ANY QUESTIONS CONTACT CUSTOMER SERVICE AT 912-638-4724 OR SERVICE@CHARGRILLER.COM.
PARTS LIST 1 56 2 3 43 4 42 41 5 40 6 37 36 7 39 8 38 9 35 10 34 46 33 44 45 11 12 13 32 44 14 15 31 30 16 19 29 17 18 53 47 20 28 48 52 49 21 55 50 51 24 54 19 57 27 26 22 25 7400_OM_B.
PARTS LIST Item QTY Item QTY 1 1 HOOD 31 1 IGNITOR 2 1 LOGO PLATE 3 4 HANDLE CAP 32 1 CONTROL PANEL 4 1 HOOD HANDLE 33 1 HOSE/VALVES/REGULATOR ASSEMBLY 5 1 DRAWER HANDLE 34 1 HEAT SHIELD 6 4 BURNER SUPPORT BRACKET 35 1 GRILL BODY 7 4 BURNER 36 4 COOKING GRATE 8 4 ELECTRODE WITH WIRE 37 1 WARMING RACK 9 1 DRAWER FASCIA 38 1 LEFT SIDE SHELF FASCIA 10 1 RIGHT SIDE SHELF CAP 39 1 LEFT SIDE SHELF CAP 11 1 RIGHT SIDE SHELF 40 1 LEFT SIDE SHELF 12
HARDWARE AND TOOLS NEEDED Assembly: Requires 2 people. Tools Needed: Pliers, Phillips Head Screwdriver and a 7/16” Nut Driver. NOTE: Do Not tighten any bolts unless instructed to do so. Tightening too soon may prohibit parts from fitting together. All Hex Nuts should be on the inside of the grill unless stated otherwise. Unpack all contents in a well cleared and padded area.
ASSEMBLY Step 1 Install Caster Wheels onto Bottom Shelf with four Lock Washers and four ½” Hex Bolts per Caster Wheel. Position the caster wheel as shown on the picture below. Fixed Locking Caster Wheel Lock Washer Swivel Caster Fixed Caster Wheel Wheel Hex Bolt Lockable Caster Wheel 7400_OM_B.
Step 2 Install Left and Right Cart onto Bottom Shelf with four Lock Washers and four ½” Hex Bolts per side cart. Then install the Back Panel onto the Left and Right Cart with five #10-24 Screws. Left Cart Hex Bolt Right Cart Lock Washer Screw 7400_OM_B.
Step 3 Install Cart Front Brace onto the Left and Right Cart at the front with eight #10-24 Screws. Screw 7400_OM_B.
Step 4 Install the Tank Exclusion Wire inside of the cart with one ½” Hex Bolt. Tank Exclusion Wire Hex Bolt 7400_OM_B.
Step 5 Install Left Door with handle to Cart. Insert Door Support Pin at the bottom of the Front Door on the Bottom Shelf, then push in the Door Pin on top of the door and slide the door into position. Repeat process for right door. Door Pin Door Pin 7400_OM_B.
Step 6 Insert the Thermometer through the Thermometer Bezel then through the hole in Grill Hood (from outside) and secure with a Flat Washer and a Wing Bolt. NOTE: Thermometer hardware is included with Thermometer. Thermometer Thermometer Bezel Flat Washer Wing Bolt 7400_OM_B.
Step 7 Place Grill Body and Hood onto Cart and secure it with four ¼-20 Hex Bolts. Hex Bolt Hex Bolt 7400_OM_B.
Step 8 Install Left-Side Shelf Assembly to Grill Body. First, loosen the top bolt on the Drawer Fascia; and loosely install three ½” Hex Bolts into side mounting holes on the Grill Body. Align keyhole on the Left-Side Shelf Assembly with the Hex Bolts on the Grill Body and push the Side Shelf down. Hex Bolt Secure the Side Shelf Fascia to the Side of the Drawer Fascia with one ½” Hex Bolt. Then tighten all Hex Bolts. Repeat the same process for the Right-Side Shelf.
Step 9 Open the Hood and install Hood Handle to Hood with two Flat Washers, two Lock Washers, and two Wing Bolts. Then install Drawer Handle to Drawer with two Flat Washers, two Lock Washers, and two Wing Bolts. Flat Washer Lock Washer Wing Bolt Drawer Handle 7400_OM_B.
Step 10 Install Adjustable Smokestack on Grill Hood. Insert Smokestack Body through the hole on the Grill Hood and secure it with two Hex Bolts per Smokestack. Then screw on the Smokestack Cap to the Smokestack Body so that there is only 0.20” between the damper body and the damper cap as seen in the picture below. Smokestack Body Smokestack Cap 0.20" Hex Bolt Smokestack Body 7400_OM_B.
A Step 11 11A: Install the Grease Cup Lid to the Grease & Ash Tray using two (2) #10-24 screws. Grease Cup Lid 11B: Slide the Grease & Ash Tray on guide rail underneath the Grill Body from the back of the grill. Grease & Ash Tray 7400_OM_B.1 B-14 Grease & Ash Tray 11C: Open Right-Side Front Door and slide the Grease Cup on guide rail underneath the Grease & Ash Tray.
Step 12 Install the Knobs on the Control Panel. 7400_OM_B.
Step 13 Place Cooking Grates inside Grill Body. Then Install Warming Rack onto Grill Hood and Body. First attach two ¼-20 x 1 3/4” Hex Bolts and two ¼-20 Hex Nuts to Grill Hood. Align the loop on the Warming Rack onto the Hex Bolts. Cooking Grate Bend the Warming Rack Support Bracket inward slightly and slide the end of the Warming Rack Support Bracket into the Warming Rack Support on the Grill Body. Hex Bolt Hex Bolt Hex Nut Warming Rack Warming Rack Support Bracket Warming Rack Support 7400_OM_B.
Step 14 Unscrew the Ignitor Cap and insert a “AA” Battery into the Ignitor Body then screw the Ignitor Cap back on. Screw on the Tank Bolt. Battery Ignitor Cap Tank Bolt Step 15 Go back through Steps 1-13 and tighten all Bolts and Nuts. 7400_OM_B.
Fully Assembled 7400_OM_B.
OPERATING INSTRUCTIONS Cooking with the Flavor Pro™ The Flavor Pro™ can use both LP gas and charcoal as fuel sources and may be employed for either direct or indirect cooking. In order to save time, charcoal cooking may also be accelerated by utilizing the gas burners to shorten the time required to prepare coals. The Flavor Drawer™ may be used to enhance flavor with wood chips, chunks, logs and pellets.
Connecting the Hose to the Appliance Before connection, ensure that there is no debris caught in the head of the gas cylinder, regulator, burner, and burner ports. Spiders and insects can nest within and clog the burner/venturi tube at the orifice. A clogged burner can lead to a fire beneath the appliance. Clean burner holes with a heavy-duty pipe cleaner. If the hose is replaced it must be secured to the appliance and regulator connections with hose clips.
Leak Test 1. In a spray bottle mix 6-9ml. solution, 1 part dish washing soap, 3 parts water. 2. Ensure control valves/burner knobs are in the off position and that regulator is securely connected. 3. Open LP cylinder valve completely by turning wheel counterclockwise. 4. Apply the solution to the hose, gas valve, and regulator, and cylinder. 5. If bubbles form and grow on any of the tested components, there is a leak in the component. No bubbles means no leak. 6.
Lighting Burner with a Match 1. Open grill hood. 2. Push in and rotate knob counterclockwise to HI position. 3. Place match in match holder installed on the side of the grill housing. Once lit, place flame through cooking grates near burner ports, as shown. Burner should light immediately. 4. Adjust knobs to desired cooking settings. Observe Flame Height When Lit Open Flavor Drawer™ so that you can see burner flames below. Flame should be blue and yellow in color and approximately 1/2 in. - 3/4 in. (1.
Cylinders must be stored outdoors in an upright position and out of the reach of children. The cylinder must never be stored where temperatures can reach over 122°F (50° C). Do not store the cylinder near flames, pilot lights or other sources of ignition. DO NOT SMOKE NEAR A GAS CYLINDER. Again, this appliance is designed for use outdoors, away from any flammable materials.
FLAVOR DRAWER™ OPERATING INSTRUCTIONS CHARCOAL OPERATION Gas-Assisted Charcoal Lighting Instructions 1. To start a gas-assisted charcoal fire, place up to 3 lbs. (approx. 50-60 briquettes) of charcoal in the Flavor Drawer™, divided equally between each of the Wood Product Zones. Only place charcoal in the three Wood Product Zones (Identified below). Do not place briquettes in the space on the far edges of the drawer. Wood Product Zones 2. 3. 4. 5.
Traditional Charcoal Lighting Instructions 1. To start a charcoal fire, place up to 3 lbs. (approx. 50-60 briquettes) of charcoal in the Flavor Drawer™, divided equally between each of the 3 Wood Product Zones. Do not place briquettes in the space on the far edges of the drawer (see illustration on page C-5). 2. Place a fire starter in each Wood Product Zone. NOTE: Do not use gasoline, kerosene or alcohol for lighting charcoal.
Cooking with Gas/Charcoal/Wood Your Flavor Pro™ grill allows you to cook with both gas and charcoal and may be used to smoke, char-grill or sear your food. By using temperature zones, charcoal, gas burners and wood flavor, you can customize your culinary experience as desired. The following descriptions provide 3 of the most common ways you can cook with your Flavor Pro™ grill. WOOD TYPE QUANTITY GAS TEMPERATURE Chips Chunks Logs Pellets 5 ounces 16 ounces 3 in.
Sear Quickly cook with direct heat at high temperatures (500°F+). SEAR (HI-TEMP DIRECT HEAT) - 500°F+ Up to 3 lbs. Charcoal (50-60 Briquettes) 1. Prepare up to 3 lbs (approximately 50-60 briquettes) of charcoal spread evenly across all 3 Wood Product Zones. 2. Using the Flavor Drawer™ Operation instructions, follow the steps for lighting the charcoal and bring to temperature. You may also use the gas burners as necessary to assist in controlling the desired temperature. Charcoal 3.
ENHANCE FLAVOR Wood Pairing Guide Different wood varieties possess different flavors and Char-Griller recommends pairing your woods with the meats you intend to cook.
FLAVOR PRO™ TIPS • Control heat by adjusting the gas burner knobs, the amount and type of fuel as well as the adjustable smokestacks. Wood burns hotter than coals. More airflow helps generate more heat. Open smokestacks by rotating counterclockwise, close smokestacks by rotating clockwise. CAUTION: Smokestack caps will be hot. Only touch using gloves or mitts. • Additional charcoal and/or smoking woods may be added to the Flavor Drawer™ while cook is in progress.
This Page Intentionally Left Blank
GRILLING RECIPES Direct Heat Direct Heat is a high heat method used to cook foods that take less than 25 minutes to cook. Typically, this means foods that are relatively small or thin, such as steaks, chops, boneless chicken breasts, fish fillets, hamburgers, etc. • Cooking with a MEAT THERMOMETER ensures food is fully cooked. Insert thermometer into the thickest part of the meat, not touching bone, and allow 1 to 1 1/2 minutes to register temperature.
QUAIL OR DOVES: • • • • • Cover birds in Italian dressing (Good Seasons or Kraft Zesty) and marinate overnight. Pour remaining dressing and cover with preferred hot sauce. Marinate for 6 hours. Wrap birds in thick bacon, and secure with a toothpick. Place on grill. Keep turning until bacon is charred. Grill for 20 minutes. Sear on high with lid open for 1 minute on each side before lowering heat and closing lid.
HAMBURGERS: See Meat Marinade on previous pages. You may also marinate by allowing to stand in marinade for 1 or 2 hours at room temperature before cooking, or let stand in covered dish in refrigerator up to 24 hours. • • • • • • Bring to room temperature before cooking. Mix in chopped onions, green peppers, salt, sear 3/4 inch patties on each side. Cook over medium heat with lid down to avoid flare-ups. Cook each side 3 to 7 minutes according to desired temperature.
SMOKING RECIPES Indirect Heat Pan not included. SMOKE BY COOKING SLOWLY. 1. 2. 3. 4. Place water pan in the middle of the grill. Light the left-most or right-most burner which will serve as your heat source. Place solid fuels in the Flavor Drawer’s™ wood product zone above that burner. Add meat on the opposite side of your heat source. Tip: Check the water level when cooking more than 4 hours or when you can’t hear the water simmering. Add water when necessary.
SMOKED BAKED HAM: You can smoke fully cooked canned ham or smoked and cured whole ham or shank or butt portion. Glaze 1 cup of Light Brown Sugar, firmly packed 1/2 cup Orange Juice 1/2 cup Honey • • • • • • • Combine sugar, juice and honey. Let glaze sit for at least 4 hours. Remove rind and score fat diagonally to give a diamond effect. Insert a whole clove into the center of every diamond. Place ham with fat side up in center of cooking grate. Close lid.
Bacon Marinade (for Smoked Venison with Bacon Recipe) 2 oz. Red Wine Vinegar 2 oz. Worcestershire 4 dashes Tabasco • • • • Place leg of venison in a container and marinate for 2-4 days, turning daily. Leave bacon to marinate overnight. Remove leg from refrigerator at least an hour before cooking. Season generously with seasoned salt and coarse ground black pepper. Wrap 1 lb. bacon over the top of the leg, and smoke 20-25 minutes per pound, or until tender. Do not overcook.
CHICKEN MARINADE: Combine 1/2 cup Soy Sauce 1/4 cup Olive Oil 1/4 cup Red Wine Vinegar 1 teaspoon Oregano 1/2 teaspoon Sweet Basil 1/2 teaspoon Garlic Powder with Parsley 1/4 teaspoon Pepper • • Pour over chicken pieces in non-metal dish Cover and refrigerate overnight, turning occasionally. Use marinade to baste chicken while cooking.
ACCESSORIES Custom Fit Cover Weather Resistant Protects Grill Finish Cover Accommodates Side Shelf or Side Fire Box Tank Cover Weather Resistant Nylon Velcro Elastic at Top and Bottom Cover Only Tank Not Included Folding Probe Thermometer Stainless steel fast-read probe accurately measures temperature Easily switch from °F to °C Auto ON/OFF feature for extended battery life Apron Machine Washable Two Front Pockets Adjustable Straps Char-Griller® Trucker Hat Cotton-poly blended front Nylon mesh back Adj
For pricing or to order accessories visit: www.CharGriller.com OR CALL: 912-638-4724 P.O. Box 30864 Sea Island, GA 31561 912-638-4724 www.CharGriller.com Service@CharGriller.
MANUAL DEL PROPIETARIO Flavor Pro™ Modelo #7400 PATENTADO Y PATENTES PENDIENTE MANTENGA SU RECIBO JUNTO CON ESTE MANUAL PARA FINES DE LA GARANTÍA. SERVICIO AL CLIENTE 1-912-638-4724 Service@CharGriller.com El contenido de este manual está registrado y los derechos de autor son propiedad de Char-Griller | A&J Manufacturing. El uso de la información contenida en este manual sin el consentimiento de Char-Griller y/o A&J Manufacturing está estrictamente prohibido. OM_7400_SPD_ B.
TABLA DE CONTENIDO Advertencias de seguridad y garantía ............ A-1 Instrucciones de montaje ................................. B-1 Uso del producto ............................................... C-1 Recetas ............................................................... D-1 Accesorios ......................................................... E-1 Peligro Si siente olor a gas: 1. 2. 3. 4. Cierre el gas al aparato. Apague cualquier llama abierta. Abra la tapa.
ADVERTENCIAS IMPORTANTES DE SEGURIDAD Se necesita un tanque de gas propano para operar. Esta parrilla a gas no está diseñada para uso comercial. GUARDE ESTAS INSTRUCCIONES PARA CONSULTARLAS EN EL FUTURO. SI ESTÁ MONTANDO ESTA UNIDAD POR OTRA PERSONA, ENTRÉGUELE ESTE MANUAL PARA QUE LO GUARDE Y PUEDA CONSULTARLO EN EL FUTURO. Únicamente para usar al aire libre y en áreas bien ventiladas.
Lea las siguientes instrucciones atentamente y asegúrese de que su parrilla esté montada, instalada y se lleve a cabo el mantenimiento correctamente. No seguir estas instrucciones puede dar lugar a lesiones corporales graves y/o daños a la propiedad. Si tiene alguna pregunta sobre el montaje o la operación, consulte a su distribuidor o compañía de gas LP. • Siempre ponga el aparato y el tanque de gas en una superficie plana y nivelada al usarlos. La parrilla se puede usar con un tanque de gas de 20 lb.
• Para evitar quemaduras, no toque las partes metálicas de la parrilla hasta que se haya enfriado por completo (aproximadamente 45 minutos), a menos que esté usando equipo de protección (guantes para parrilla, manoplas, etc.). • Tenga en cuenta que las piezas selladas por el fabricante o su agente no deben modificarse. • Al montar la parrilla, ponga el tubo flexible de conexión de forma que esté protegido contra torsiones.
ADVERTENCIA • Esta parrilla es únicamente para ser usada afuera y no debe usarse en un edificio, garaje o cualquier otra área cerrada. • El consumo de alcohol, medicamentos recetados o no recetados puede afectar la capacidad del operador para montar u operar la parrilla de forma segura. • Siempre abra la tapa de la parrilla lenta y cuidadosamente ya que el calor y el vapor que están atrapados adentro de la parrilla pueden causar quemaduras severas.
• No permita que el carbón y/o la madera toquen las paredes de la parrilla. Esto extremamente minimiza la vida útil de la parrilla. • PRECAUCIÓN: Los amortiguadores de metal expuestos en las rejillas de ventilación y/o los mangos de metal están calientes durante el uso. Una vez más, siempre use guantes para horno cuando ajuste el flujo de aire para proteger las manos contra las quemaduras.
*** ¡DETÉNGASE! ¡LLAME A PRIMERO! *** NO Devuelva El Producto A La Tienda. Esta parrilla se ha creado siguiendo las normas de calidad más altas. Si tiene preguntas que este manual no aborda o si necesita piezas, llame a nuestro Departamento de Atención al Cliente al 1-912638-4724 (EE.UU.) o escríbale un correo electrónico a Char-Griller al: Service@CharGriller.com y tenga su número de serie a mano.
INFORMACIÓN DE GARANTÍA SE NECESITA UNA COPIA DEL COMPROBANTE DE COMPRA CON FECHA (RECIBO) PARA REGISTRARSE O PRESENTAR UN RECLAMO DE GARANTÍA*. CONSERVE UNA COPIA DEL RECIBO PARA SUS REGISTROS. Char-Griller reemplazará cualquier pieza defectuosa de sus parrillas/ahumadores, bajo garantía, según se describe de abajo. LEA ESTA INFORMACIÓN DETENIDAMENTE Y COMUNÍQUESE CON EL DEPARTAMENTO DE SERVICIO AL CLIENTE MARCANDO 912-638-4724 O ESCRIBIENDO A SERVICE@CHARGRILLER.COM. SI TIENE ALGUNA PREGUNTA.
LISTA DE PIEZAS 1 56 2 3 43 4 42 41 5 40 6 37 36 7 39 8 38 9 35 10 34 46 33 44 45 11 12 13 32 44 14 15 31 30 16 19 29 17 18 53 47 20 28 48 52 49 21 55 50 51 24 54 19 57 27 26 22 25 7400_OM_B.
LISTA DE PIEZAS Elemento Cant.
FERRETERÍA Y HERRAMIENTAS NECESARIAS Montaje: Se necesitan 2 personas. Herramientas necesarias: Pinzas, destornillador Phillips y un destornillador de tuerca de 7/16”. NOTA: No ajuste ningún perno a menos que se le indique que lo haga. Ajustar demasiado pronto puede prevenir que las piezas encajen bien. A menos que se indique lo contrario, todas las tuercas hexagonales deben estar en el interior de la parrilla. Desempaquete todo el contenido en un área bien despejada y acolchada.
MONTAJE Paso 1 Instale las Ruedas al Estante inferior usando cuatro Arandelas de bloqueo y cuatro Pernos de cabeza hexagonal de ½” por cada Rueda. Ponga la rueda giratoria como se muestra en la imagen de abajo. Rueda giratoria de bloqueo fijo Arandela de bloqueo Rueda fija Rueda giratoria Perno de cabeza hexagonal Rueda bloqueable 7400_OM_B.
Paso 2 Instale el carrito izquierdo y derecho al Estante inferior usando cuatro Arandelas de bloqueo y cuatro Pernos de cabeza hexagonal de ½” por cada carrito lateral. Luego use cinco Tornillos #10-24 para instalar el Panel trasero al carro izquierdo y derecho. Carrito izquierdo Perno de cabeza hexagonal Carrito derecho Arandela de bloqueo Tornillo 7400_OM_B.
Paso 3 Use ocho tornillos #10-24 para instalar la Abrazadera delantera del carrito en el Carrito Izquierdo y Derecho en la parte delantera. Tornillo 7400_OM_B.
Paso 4 Instale el alambre de exclusión del tanque dentro del carrito usando un Perno de cabeza hexagonal de ½”. Alambre de Exclusión de Tanque Perno de Cabeza Hexagonal 7400_OM_B.
Paso 5 Instale la Puerta izquierda con mango al carrito. Inserte el Pasador de soporte de la puerta en la parte inferior de la Puerta delantera en el Estante inferior, luego empuje el pasador de la puerta en la parte superior de la puerta y deslice la puerta para que esté en su posición. Repita el proceso para la puerta derecha. Pasador de la puerta Pasador de la puerta 7400_OM_B.
Paso 6 Inserte el Termómetro a través del Engaste para Termómetro y luego a través del hueco en la Tapa de la Parrillera (desde afuera), con una Arandela Plana y asegúrelo con Perno de Aletas. NOTA: Los elementos de sujeción del Termómetro están incluidos con la misma. Termómetro Engaste para Termómetro Arandela Plana Perno de Aletas 7400_OM_B.
Paso 7 Coloque el Cuerpo de la parrilla y la cubierta en el Carrito y asegúrelo usando cuatro pernos de cabeza hexagonal de ¼-20. Perno de cabeza hexagonal Perno de cabeza hexagonal 7400_OM_B.
Paso 8 Instale el Montaje conjunto del estante del lado izquierdo al Cuerpo de la parrilla. Primero, afloje el perno superior del Panel de control e instale tres Pernos de cabeza hexagonal de ½” a los orificios de montaje laterales del Cuerpo de la parrilla de forma que estén flojos. Alinee el ojo de la cerradura en el Montaje del estante del lado izquierdo con los Pernos de cabeza hexagonal en el Cuerpo de la parrilla y empuje el Estante lateral hacia abajo.
Paso 9 Abra la Cubierta e instale el Mango de la cubierta en la Cubierta usando dos Arandelas planas, dos Arandelas de bloqueo y dos Pernos de aleteas. Luego instale el Mango del Cajón a Cajón usando dos Arandelas planas, dos Arandelas de bloqueo y dos Pernos de aleteas. Arandela plana Arandela de bloqueo Pernode aleteas Mango del cajón 7400_OM_B.
Paso 10 Instale la Chimenea ajustable a la Cubierta de la parrilla. Inserte el Cuerpo de la chimenea a través del orificio en la Cubierta de la parrilla y asegúrelo usando dos Pernos de cabeza hexagonal por Chimenea. Luego, atornille la Tapa de la chimenea al Cuerpo de la chimenea para que solo quede 0,20 ”entre el cuerpo del amortiguador y la tapa del amortiguador como se ve en la imagen a continuación.. Cuerpo de la chimenea Tapa de la chimenea 0.
A Paso 11 11A: Instale la Tapa de la taza de grasa en la Bandeja de grasa y cenizas con dos (2) tornillos # 10-24. Tapa de taza de grasa 11B: Deslice la Bandeja para grasa y cenizas en el carril de guía debajo del Cuerpo de rejilla desde la parte trasera de la parrilla. Bandeja de grasa y cenizas 7400_OM_B.1 B-14 Bandeja de grasa y cenizas 11C: Abrir del lado derecho de la puerta principal y deslice la Taza de grasa en el carril de guía por debajo de la Bandeja para grasa y cenizas.
Paso 12 Instale las Perillas al Panel de control. 7400_OM_B.
Paso 13 Coloque las Rejillas para cocinar dentro del Cuerpo de la parrilla. Luego instale la Rejilla de calentamiento a la Cubierta y al Cuerpo de la parrilla. Primero adjunte dos Pernos de cabeza hexagonal de ¼-20 x 1 ¾” y dos Tuercas hexagonales de ¼-20 a la Cubierta de la parrilla. Alinee el bucle de la Rejilla de calentamiento con los Pernos de cabeza hexagonal.
Paso 14 Desenrosque la Tapa del encendedor e inserte una pila “AA” en el Cuerpo del encendedor, luego vuelva a atornillar la Tapa del encendedor. Atornille el Perno del tanque. Pila Tapa del encendedor Perno del tanque Paso 15 Repase los pasos 1 a 13 y ajuste todos los Pernos y Tuercas. 7400_OM_B.
Totalmente Montada 7400_OM_B.
INSTRUCCIONES DE OPERACIÓN Cómo Cocinar Usando Flavor Pro™ Flavor Pro™ puede usar tanto gas LP como carbón vegetal como fuentes de combustible y puede usarse para cocinar directa o indirectamente. Para ahorrar tiempo, es posible acelerar la cocción al carbón usando las hornillas a gas para minimizar el tiempo que se necesita para preparar las brasas. Puede usarse el Cajón de sabor para realzar el sabor con astillas de madera, trozos de madera, troncos y pellets.
Conexión de la Manguera al Aparato Antes de conectar, asegúrese de que no haya desechos atrapados en el cabezal del tanque de gas, el regulador, la hornilla y los puertos de la hornilla. Las arañas y los insectos pueden anidar adentro y tapar el tubo de la hornilla/venturi en el orificio. Una hornilla tapada puede dar lugar a que se encienda la parte de abajo del aparato. Limpie los orificios de la hornilla con un limpiador de tuberías para trabajos pesados.
Prueba de Fugas 1. En una botella rociadora, mezcle una solución de 6 a 9 ml, que sea 1 parte de jabón para lavar platos, 3 partes de agua. 2. Asegúrese de que las válvulas de control/perillas de las hornillas estén en la posición de apagado y que el regulador esté bien conectado. 3. Abra la válvula del tanque de LP completamente girando la rueda en sentido contra las manecillas del reloj. 4. Aplique la solución a la manguera, la válvula de gas, el regulador y el tanque. 5.
Cómo Apagar Las Hornillas 1. Gire la(s) perilla(s) en el sentido de las manecillas del reloj a la posición HI, luego presiónela(s) y gírela(s) a la posición APAGADA. Nunca fuerce la perilla sin presionarla, ya que puede causarle daño a la válvula y a la perilla. 2. Cierre la válvula del tanque de gas inmediatamente. 3. Cierre la cubierta de la parrilla. Cómo Encender la Hornilla on un Fósforo 1. Abra la cubierta de la parrilla. 2.
Almacenamiento De Aparatos Únicamente se puede almacenar un aparato en un área interior si el tanque se desconecta y se quita del aparato. Cuando el aparato no está en uso, debe taparse y almacenarse en un ambiente seco y sin polvo. Use un cobertor Char-Griller hecho a medida para maximizar la vida útil de la parrilla. (Modelo #7455). Tanque De Gas ¡El tanque de gas no debe caerse ni manipularse bruscamente! Si el aparato no está en uso, el tanque debe estar desconectado.
INSTRUCCIONES DE FUNCIONAMIENTO DE CAJÓN DE SABOR (FLAVOR DRAWER™) USO CON CARBÓN Instrucciones Para Encender Carbón Asistido Por Gas 1. Para prender un fuego de carbón asistido por gas, ponga hasta 3 libras (aprox. 50 a 60 briquetas) de carbón en el Cajón de sabor, dividiéndolas en partes iguales entre cada una de las Zonas para productos de madera. Únicamente ponga carbón en las tres Zonas para productos de madera (que se identifican abajo).
Instrucciones Para Encender Carbón Tradicional 1. Para prender un fuego de carbón, ponga hasta 3 libras (aprox. 50 a 60 briquetas) de carbón en el Cajón de sabor, dividiéndolas en partes iguales entre cada una de las Zonas para productos de madera. No ponga las briquetas en el área de los bordes exteriores del cajón (consulte la ilustración en la página C-5). 2. Ponga un iniciador de fuego en cada Zonas para productos de madera. NOTA: No use gasolina, queroseno o alcohol para encender el carbón.
Cocinar Con Gas/Carbón/Madera Su parrilla Flavor Pro™ le permite cocinar tanto con gas como con carbón y puede usarla para ahumar, asar a la parrilla o soasar comidas. Usar las zonas de temperatura, el carbón, las hornillas de gas y el sabor a madera le permite personalizar su experiencia culinaria a su gusto. A continuación, se describen 3 de las formas más comunes en las que puede cocinar con su parrilla Flavor Pro™.
Soasar Cocine rápidamente a calor directo a altas temperaturas (500°F o +). SOASAR (CALOR DIRECTO A ALTA TEMPERATURA) - 500°F+ Hasta 3 libras Carbón (50 a 60 briquetas) 1. Prepare hasta 3 libras (aproximadamente de 50 a 60 briquetas) de carbón, distribuyéndolas uniformemente entre todas las Zonas para productos de madera más adecuadas. 2. Siga las instrucciones para el Cajón de sabor y los pasos para encender el carbón y alcanzar la temperatura deseada.
RESALTAR EL SABOR Guía De Combinación De Sabores De Madera Las diferentes variedades de madera tienen distintos sabores y Char-Griller recomienda combinar las maderas con las carnes que piensa cocinar.
CONSEJOS DE FLAVOR PRO™ • Controle el calor ajustando las perillas de las hornillas de gas, la cantidad y el tipo de combustible, al igual que las chimeneas ajustables. La madera arde más caliente que las brasas. Mientras más flujo de aire allá, más calor se generará. Abra las chimeneas girando en sentido contra las manecillas del reloj, cierre las chimeneas girando en sentido de las manecillas del reloj. PRECAUCIÓN: Las tapas de la chimenea estarán calientes.
Esta Página Ha Sido Intencionalmente Ha Dejado En Blanco
RECETAS PARA LA PARRILLA Calor Directo El Calor directo es un método de calor alto que se usa para cocinar aquellas comidas que tardan menos de 25 minutos en cocinarse. Por lo general, esto se refiere a aquellas comidas que son relativamente pequeñas o delgadas, como bistec, chuletas, pechugas de pollo sin huesos, filetes de pescado, hamburguesas, etc. • Usar un TERMÓMETRO DE CARNE al cocinar garantiza que las comidas estén completamente cocidas.
CODORNIZ O PALOMAS: • • • • • Cubra las aves con aderezo italiano (Good Seasons o Kraft Zesty) y permita que se adobe durante la noche. Vierta el aderezo restante y cubra con la salsa picante que prefiera. Permita que se adobe por 6 horas. Envuelva las aves en tocino grueso y asegúrelas con un escarbadientes. Póngalo a la parrilla. Siga rotando hasta que el tocino esté carbonizado. Ase por 20 minutos.
HAMBURGUESAS: Vea el Adobo para carne en las páginas anteriores. Además, puede adobar permitiendo que repose en el adobo por 1 o 2 horas a temperatura ambiente antes de cocinar, o permitir que repose en un recipiente cubierto en el refrigerador por hasta 24 horas. • • • • • • Permita que alcance la temperatura ambiente antes de cocinar. Mezcle las cebollas picadas, los pimientos verdes, la sal, y soase los patis de ¾ de pulgada de cada lado.
RECETAS PARA AHUMAR Calor Indirecto TIEMPOS DE AHUMADO Alimento Peso Ahumado de la bandeja de agua Asado de Carne/Pecho de Res Asado de Ternera, Carne de Venado Cortes Grandes de Presa Asado de Cerdo Costillas de Cerdo/Res Chuletas de Cerdo 3 a 4 libras 5 a 7 libras 7 a 9 libras 3 a 4 libras 5 a 8 libras Toda la Parilla Toda la Parilla 1 a 1½ horas 1¾ a 2½ horas 2½ a 3½ horas 1½ a 2½ horas 2½ a 3 horas 1½ a 2 horas ¾ a 1¼ horas 140° crudo 160° a punto 170° bien cocido 170° 170° Cuando la carne se
JAMÓN AL HORNO AHUMADO: Puede ahumar jamón enlatado completamente cocido o jamón entero o ahumado y curado, pata o una porción de culata. Glaseado 1 taza de azúcar morena clara, bien apretada ½ taza de jugo de naranja ½ taza de miel de abeja • • • • • • • Combine el azúcar, jugo y miel. Permita que el glaseado repose por al menos 4 horas. Quite la corteza y corte la grasa de forma diagonal para dar un efecto de diamante. Inserte un diente entero en el centro de cada diamante.
Adobo Para Tocino (para la receta de carne de venado ahumada con tocino) 2 onzas de vinagre de vino tinto 2 onzas de Worcestershire 4 raciones de Tabasco • • • • Ponga la pata de venado en un recipiente y permita que se adobe por 2 a 4 días, rotándola diariamente. Deje adobar el tocino durante la noche. Quite la pata del refrigerador al menos una hora antes de cocinar. Sazone generosamente con sal condimentada y pimienta negra molida gruesa.
ADOBO PARA POLLO: Combine ½ taza de salsa de soja ¼ de taza de aceite de oliva ¼ de taza de vinagre de vino tinto 1 cucharadita de orégano ½ cucharadita de albahaca dulce ½ cucharadita de ajo en polvo con perejil ¼ de cucharadita de pimienta • • Vierta sobre los trozos de pollo en un plato que no sea de metal Cubra y refrigere durante la noche, volteando ocasionalmente. Use el adobo para lardear el pollo mientras lo cocina.
ACCESORIOS Cubierta a la Medida Resistente al Clima Protege el Acabado La Cubierta se Adapta al Estante Lateral o la Parrillera Lateral Delantal Lavable a Máquina Dos Bolsillos Delanteros Tiras Ajustables Cobertor para el tanque Resistente a la intemperie Velcro de nylon Elástico en la parte superior e inferior Cobertor solamente El tanque no viene incluido Gorra Char-Griller® Frente hecho en mezcla de algodón y poliéster con malla de nylon en la parte posterior Cierre ajustable a presión Un tamaño q
Para obtener precios o hacer un pedido de accesorios, visite: www.CharGriller.com O LLAME AL: 912-638-4724 P.O. Box 30864 Sea Island, GA 31561 912-638-4724 www.CharGriller.com Service@CharGriller.