
Owner's Manual


5
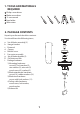
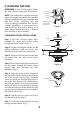
CLOSE-TO-CEILING INSTALLATION
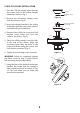
1. Pass the 120-volt supply wires through
the center hole in the ceiling hanger
bracket as shown in Fig. 5.
2. Remove the decorative canopy cover
from the canopy. (Fig. 8)
3. Secure the hanger bracket to the ceiling
outlet box with the screws and washers
provided with your outlet box.
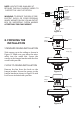
4. Remove three of the six screws and lock
washers (every other one) from the
collar of top motor. (Fig. 9)
5. Place the ceiling canopy over the collar
at the top of the motor. Align the
mounting holes with the holes in the
motor and fasten using the screws and
lock washers provided. (Fig. 9)
6. Tighten the mounting screws securely.
WARNING: Failure to completely tighten
the three screws in step 5 could result in
fan loosening and possibly falling.
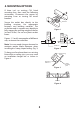
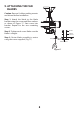
7. Hang the fan on the hook of the hanger
bracket. Be certain that the canopy is
fully locked into hook as shown in Fig.
10. This will allow you to make the
electrical connections.
Figure 9
Figure 8
Figure 10
Hook
Canopy
Canopy
Decorative canopy
cover
Collar
Screw and lockwasher
(3 of 6 places)