USER’S MANUAL MANUEL D’UTILISATION BENUTZERHANDBUCH GEBRUIKSHANDLEIDING GB
CHAP. I Introduction Dear Customer, You have just taken possession of your new CAMPING-CAR We thank you for your order and congratulate you on your choice. We suggest that you get to know your new camping car by reading this manual, and hope that you are fully satisfied with it. This user’s manual gives you all the information you need about the equipment in the living compartment and precautions to be taken and instructions to be followed in using it.
Summary Chap. I INTRODUCTION Chap. II PREPARATION BEFORE LEAVING P. 1 P. 3 Carrier preparation Preparing the living compartment (outside) P. 3 Preparing the living compartment (inside) P. 4 Chap. III CARRYING PASSENGERS P. 5 Chap. IV LOADS P. 6 Chap. V P. 7 WINDOWS AND SKYLIGHTS Chap. VI DRIVING P. 10 Chap. VII !"##$!"%&'yres( P. 11 Chap. VIII SIGNALING, lights P. 12 Chap. IX "$!)*!"+,-#%#','-). P. 14 Chap. X P. 15 PARKING MANOEUVRES Chap. XI THE CAMPING CAR DRIVER’S CHARTER Chap.
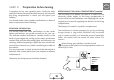
CHAP. II Preparation before leaving A camping car has two separate parts ; firstly the basic vehicle or carrier that provides the transport, and secondly the living compartment in which you will spend your holidays. You should make a few standard verifications on both of these components before leaving. % !" ,!-./%'0"%+-1-./%2)3 ,!'3".'%&outside( The first thing to do before you leave is to switch on the electricity power supply to the living compartment.
CHAP. II Préparation avant le départ !" ,!-./%'0"%+-1-./%2)3 ,!'3".'%&outside(%(continued) % !" ,!-./%'0"%+-1-./%2)3 ,!'3".'%&-.#-4"(5 The first thing to do is to switch on the electrical circuit on the control panel. The clean water tank is filled through an external orifice marked by a specially identifiable pictogram to distinguish it from the fuel tank on your basic vehicle. Any covers or plugs on air intakes or orifices on all household appliances should be removed.
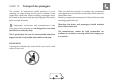
CHAP. III Transport des passagers The number of authorized seated positions in your camping car when driving on the road is marked on the registration certificate. When travelling, passengers must be seated in the places indicated (pictograph) with safety belts securely fastened. Their use while the vehicle is in motion may contravene road regulations and introduce risks about which the user should be aware. Similarly, unexpected movements of the vehicle can make standing people fall over.
CHAP. IV Chargements kg The camping car is a mobile home so everyone can lay it out as he or she wishes, but some rules have to be respected ; these can be summarized as two main rules. load on each of the front and rear axles, as well as a left/ right distribution that is an balanced as possible with respect to the vehicle axis (loaded vehicle with, of course, passengers included). The maximum permitted loads on each axle are given on the living compartment identification plate.
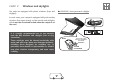
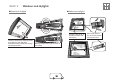
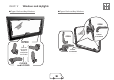
CHAP. V Windows and skylights Our units are equipped with plastic windows (bays and skylight). «SKYROOF» front panoramic skylight In most cases, your camper is equipped with push-out bay windows that open directly to the outside and skylights, which must be closed and locked when the camper is on the road. It is strongly recommended not to use aerosols near the bay windows and skylights (risk of ring formation). These windows must be cleaned exclusively with water and mild soap.
CHAP. V Windows and skylights !Panoramic skylight ! !!!!! !Bathroom skylights Open Close Tourner à as fond Turn the crank far asla manivelleto pour possible obtain obtenir optiune closing fermeture optimale mal Vérifiertolesee bonthat verrouillage par locked une Check it is properly poussée d'ouverture sur la vitre. by pushing to open the pane. S'il y apane ouverture manœuvre If the opens,refaire repeatlathe closing / de fermeture / verrouillage clocking procedure.
CHAP. V Windows and skylights !Type 1 Push-out Bay Windows !Type 2 Push-out Bay Windows OPEN OUVERT OUVERT OPEN OUVERT OPEN Appuyer Push on le thesur center Bouton buttonpour to central manipulate manœuvrer la poignée the handle.
CHAP. VI Driving Precautions - Signaling !General - overtaking Avoid the following dangers: - Underground car parks. - Some service stations, which may have superstructures that are too low. - Shop signs that project over the road. - Tree branches that hang over the road. - Passages under porches. - Narrow roads. - Bridges and narrow passageways - etc. and do not forget speed humps and level crossings. A camping car is driven in much the same way as a car.
CHAP. VII Pressure Spare tyre !Tyres Verification of pressure should be done when the motor home is loaded (cold tires). The Fix and Go Kit system has been adopted in place of the spare tyre. Tire pressure is given by the carrier manufacturer in the maintenance booklet and is also found on the front door frame. In case of a flat tire, please do the following: - completely remove the vehicle from the traffic area. If you are on the highway, pull off on the emergency stop area or onto a rest area.
CHAP.
CHAP. VIII Signaling !Lights 1a 6789:%;<=>?@%A%?@%A%FE=%;<=>?@5 - Remove the fixation screws 2a - Remove the bulb from its housing - Turn the bulb support in the direction of the arrow to remove the bulb 3a - Replace the bulb and reassemble the mounting, being careful to maintain the joint position 1b .
CHAP. IX Euro-relais station These stations are provided specially for camping car enthusiasts. It is fairly easy to find them, since all specialized press magazines print frequently updated guides telling you where to find them. You can fill up with water in these stations, and also and especially you can empty your waste water and the WC cassette. Please leave the area in a clean condition for the next user.
CHAP. X Parking manoeuvres When you find a place to park, you will settle for operating using your mirrors, but do not hesitate to get help for reversing. Some of our models are fitting with a parking detector, an ideal aid for demanding motor caravanners. The parking detector informs the driver of the distance of an obstacle by means of an audible signal, which makes parking safer. The system is automatically activated as soon as reverse gear is engaged.
CHAP. X Parking manœuvres !parking To ensure perfect stability of your rear (*) jacks, remember to take along at least two wooden wedges to place on the ground under the jack shoe. The jacks serve only to stabilize your motorhome and keep it from moving when you walk around on the inside; they should never be used to correct a slant or as for changing a tire.
CHAP. XI The camping car driver’s charter As with all types of vehicles, you need to follow the highway code when driving a camping car. You must respect traffic rules applicable to private cars. In town centers or suburban areas, you should park your camping car: - in areas with low population density - where it will not obstruct visibility and access to shops - so that it does not hinder traffic.
CHAP. XI Operation of appliances ELECTRICITY POWER SUPPLY General The electrical energy necessary for your lighting and for operation of all household appliances, water pump, WC, etc. in your living compartment is provided by a 12 volt battery (2 on certain models). All extra batteries are installed in addition to the basic vehicle battery. A coupling relay is installed between the two batteries: - when traveling, this relay couples the two batteries together so that they are recharged simultaneously.
Operation of appliances BATTERIE The natural phenomenon by which batteries discharge slowly and regularly means that they are often in a deep discharge situation. Battery level alarm A buzzer is installed on certains models. It has been observed that only a very small percentage of batteries are capable of accepting charge and therefore operating satisfactorily, starting from this deep discharge condition.
Operation of appliances Battery under the passenger seat Bride de fixation Batterie sousstrap siège Attachment passager Battery on the floor Battery Cache cover Batterie (Forme Variable suivant modèle) Tuyau de dégazage Through the floor (Batterie au Plomb) degassing tube.
? Operation of appliances LCD CONTROL AND INSTRUMENTATION PANEL Our different models are equipped with different types of control panels; these are usually situated near the cooking unit. !"#$%&'%() to ensure all functions, battery charging, sensor, pump, etc.. It is essential that the control panel is turned on (Table 5 PC 150 TR Button, Button 152 NE Table 1). Model PC 150 TR Mark 1: Button to check the leisure battery (B2) and the car battery (B1).
? Operation of appliances Modele PC180 reference 1: Main ON / OFF button for controlling uses and safety relays, the flashing of the LED indicates that the battery is flat and that the low-voltage control device is about to be activated. NB: when on, the panel carries out a function test on all the LEDs except for ref. 14 and 15. reference 2: Light control button LCD reference 3: Water pump control button; it controls the pump relay.
? Operation of appliances MODEL PC 150 TR AND PC 180 TR FUNCTIONS *+(,-./-,(0122,34(15136) When the engine battery reaches a voltage below 12V, the self-discharged battery alarm is automatically activated and the symbol ref. 9 flashes. *+(,-./-,(0122,34(7813./-.) Function not available. &9:/5/134(0122,34(15136) When the auxiliary battery reaches a voltage below 11V, the self-discharged battery alarm is automatically activated and the symbol ref. 8 PC150TR / ref.10 PC180TR flashes.
? Operation of appliances LCD ! CONTROL AND INSTRUMENTATION PANEL MODEL PC 150 TR LOW VOLTAGE CONTROL An electronic device cuts off all 12V power supplies when the service battery drops to the minimum voltage of 10V. It is possible to manually re-establish functioning for roughly one minute by shutting off the overall power switch and turning it on again. The refrigerator, the electrical step-plate and the functions supplied directly by B2 (unit battery) are excluded from this arrangement.
? Operation of appliances ! FOOD SAFETY <13-/-.(10>92(28,(9B,(>E(4>93(3,E3/.,312>3) When storing your food, be particularly carefui about the special conditions of use of a refrigerator located in a vehicle. The conditions inside the vehicle are indeed changing a lot depending. on: - The weather conditions - The high temperature inside the vehicle especially if the vehicle is parked in the sun. The temperature may then reached 50°C. - The use of the 12 V source during a long trip.
? Operation of appliances REFRIGERATOR Our products are fitted with several different refrigerator models. The following is an overview of their operation. If you would like further information, please refer to the instructions written by the manufacturer of the refrigerator located inside your vehicle. Common rules and instructions Refrigerator start-up - Before using the fridge, we recommend that you clean the inside.
? Operation of appliances Switching OFF 1) Set energy selector switch (A) to position “0” (OFF). The device is completely stopped. 2. Secure the door open by means of the door stop. The door will be slightly. This is to prevent mould from forming inside the appliance. Switching off gas operation! If the refrigerator is to be taken out of service for an extended period of time, the on-board shut-off valve and the cylinder valve must be closed.
? Operation of appliances BEWARE! - Flammable material should be kept well away from the refrigerator. - The gas cylinder must be changed outside, away from any ignition source. - It is forbidden to run the refrigerator on gas when travelling. If there should be a fire following an accident this could cause an explosion. - It is also forbidden to run it on gas in the vicinity of service stations.
? Operation of appliances !Energy 1) 12 V - operation (DC) The refrigerator should only be used while the motor is running, otherwise the on-board-battery would be discharged within a few hours! 2) Mains power This option should only be selected where the supply voltage of the connection for power supply corresponds to the value specified on the data plate. Any difference in values may result in damage the appliance 3) Gas operation 1)/*)!'!&-.$&/-0 1. Open the valve on the gas cylinder and the gas valves.
? Operation of appliances !DOMETIC refrigerator !THETFORD refrigerator LED control panel 1 Dometic 1 2 3 4 5 6 7 8 9 1) ON / OFF button 2) 230V power selection button 3) Gas power selection button 4) 12V power selection button 5) AUTOMATIC power selection button (depending on model) 6) Frame heating (depending on model) 7) Temperature threshold control button 8) Temperature threshold display 9) GAS FAULT fault / reinitialisation 23430''it is essential to consult the manual for your refrigerato
? Operation of appliances ! GAS OVEN (optional mounting on certain models only). The appliance can only be used for cooking and must never be used as a heater. Use of this appliance can generate heat and humidity. This means that proper ventilation of the kitchen must be provided. Use !To light the oven or grill, the door must be completely open. !!"#$!%&'#!(&))*+!,&')!($!%-$''$.!/$+)01!)#$+!)&-+$.!)*! the left to the lighting position.
? Operation of appliances ! MINI GRILL (UK mobile home version only) Manual lighting of the oven-grill: Push slightly on the control knob and turn it to the lighting position. Push the button all the way in, then light the burner with a match or a gas lighter. Maintain pressure on the knob for 5-10 sec. Release the oven knob and turn it to the desired setting. N.B. Manual lighting must be done only by an adult. Automatic lighting of the oven-grill: To light the oven or the grill, open the door completely.
? Operation of appliances ! HEATING PLATE Various brand-name heating plates are installed in our different models. !Operation: Open the valve of the gas tank, as well as the safety lock of the cooking plate. On the cooking plate, turn the corresponding knob from the closed position (position 0) to the maximum position (full flame), push the knob in and maintain it in this position while igniting the burner with a match or lighter.
? Operation of appliances ! @98 7'A 98 7'B46<: 7C Our different models are equipped with different types of appliances: simple boilers for heating water only and combined appliances for heating both water and the mobile home unit. If there is any risk of frost, drain the boiler. The guarantee does not cover any damage caused by frost. The following describes the user instructions for this appliance.
? Operation of appliances Security/drainage valve (FrostControl) FrostControl is an autonomous security/drainage valve that operates without electrical current. If there is a risk of freezing, the valve automatically evacuates the contents of the boiler via a purge hose. Automatic pressure compensation by pulsations takes place via the safety valve in case of excess pressure in the system.
? Operation of appliances Filling the water heater Before starting your water heater for the first time and after draining: 1. Check to see that the security/drainage valve (14) is closed (a). 2. Switch the water pump on (main switch or pump switch) (b). position) until the water heater is full of water, all air has escaped and water is running freely. 4. If there has been a frost, it is possible that filling will not take place due to an ice plug formed in remaining water.
? Operation of appliances Switching off Maintenance Use control knob (a) to switch your water heater off (fig. A). Fit the chimney cover. Empty the water heater if there is any danger of frost. If the heater will be shut down for a long period, close the fast closing valve in the gas pipe. Close the gas cylinder valve. Red « failure » indicating light The red indicating light comes on if there is a failure. Possible reasons include no more gas, air in gas pipes, fault in safety element, etc.
? Operation of appliances !COMBI TRUMA DIESEL D4 / D6 / D6E A specific user manual for this model is provided with the camper living compartment. Description du fonctionnement The Combi D diesel heater is a warm air heater with a built-in water heater (10 litre volume). Burner operation is fan-assisted which ensures trouble-free operation even when on the move. In winter operation, the heater heats the living compartment whilst simultaneously heating the water.
? Operation of appliances Control panel type 1 : a = rotary switch to adjust the temperature (1-5) b = green LED lit «operation» green LED blinking: «shutdown timeout» to lower the unit’s temperature is operational.
? Operation of appliances !Summer operation : (water heater only) Move the rotary switch on the control panel to position (c - summer operation) 40°C or 60°C. The green (b) and yellow LEDs (g) light up. The burner shuts down and the yellow LED (g) is extinguished once the set water temperature is reached (40°C or 60°C). !Winter operation: (Heating with controlled water temperature). Move the rotary switch to operational setting «e». Turn the rotary switch (a) to the desired thermostat setting (1-5).
? Operation of appliances !Shutting down: Shut the heater down with the rotary switch (position f). The green LED (b) goes out. SIf the green LED (b) blinks i after the power is switched off, this means that a shutdown timeout to lower the unit temperature is running. This stops after a few minutes and the green LED (b) goes out. Always drain the heater if there is a risk of frost! Maintenance : It is mandatory to use original Truma parts for all maintenance or repair work.
? Operation of appliances !AIR HEATER RUNNING ON DIESEL Some different makes of heater are used. No more gas-oil for heating is supplied once the reserve level of the carburant reservoir has been reached (alarm on the control panel). Therefore, do not wait for this alarm to go off before refilling if you intend to use this type of heating. Turn the knob to the maximum position to start off and when it has regulated turn to the required position (about half-way for a temperature of 20ºC).
? Operation of appliances There is no known drawback to utilisation of additives. If Upkeep and safety instructions Servicing relative to the warranty concerning these devices must be done only by repair shops that have been approved by the manufacturer. Warranty claims are accepted only if it is possible to verify that the plaintiff has respected the upkeep and safety instructions. Because of risk of explosion, heating must be turned off at service stations and during filling of the vehicle gas tank.
? Operation of appliances ! EBERSPÄCHER HEATER Switching on Selecting the temperature on the control panel The indicator lamp in the control panel lights on start-up. The glow pin is switched on and the fan starts to turn slowly. !Monitor this! The fan comes on by itself at first (cold air) if there is too much residual heat from a previous heating operation in the heat exchanger. Once the residual heat has been eliminated start-up commences.
? Operation of appliances Fan operation Under fan operation, the “heater/ventilation” changeover switch must firstly be activated before the heater is triggered. !!=$5)3+/! 5)! 5+! 50)3)&.$! 5(*?$! AB::! ,! &%! )*! C:::! ,! maximum: - Short stay (crossing a pass or stopping for a break), heating is possible in principle. - Longer stays (e.g. camping in winter), heating is not possible. Switching off When the heater is switched off the indicator lamp goes out and the fuel no longer flows.
? Operation of appliances ! GAS CIRCUIT Supply to appliances Recommendations - Check that the valves to the various appliances are closed, - Open the gas cylinder. - Then open the valves supplying each appliance. - Ignite the various appliances. - Ignition may take some time because air in the pipes has to be purged. All appliances operating on gas must not be used unless the vehicle is stopped. (parked vehicle). Make sure that the cylinder(s) is or are properly closed before starting to drive.
? Operation of appliances ! WATER CIRCUIT Your camping car is equipped with: Internal power supply - a clean water tank, - a waste water tank (2 on certain models) Filling I$)/J)%J'0 The clean water tank is filled through an opening with a screwon stopper located on the unit exterior and indicated with a pictogram. K+*L!"'0 One of our models is equipped with a traditional filling system inside the living unit in the kitchen block area and another specific system outside the unit.
? Operation of appliances Waste water Insulation Be careful where you discard waste water. The wastewater reservoir is evacuated with the help of a knifegate valve that allows quick draining of the reservoir. Certain of our models feature specific insulation of the wastewater reservoirs, which are found under the vehicle chassis.
? Operation of appliances !CIRCUIT 230 V 230V power supply connector The mains power supply is connected to an EEC 230 V connector (2 pins + earth) on the right or left side of your camping car. Lift the protective cover when you want to access it and insert the standard plug (Differential protection). 230 V internal power outlets There are one or more 230 V power outlets in your living compartment. 230 V protection A Circuit breaker protects your camping car during 230 V voltage.
? Operation of appliances ! PANORAMIC SKYLIGHTS Suggested precautions !!E0*'$! )#$! -**;! 03/#)'! ;&001! ($;*-$! .-3?3+/! )#$! ?$#370$! (make sure they are locked). !!G*! +*)! 0$5?$! )#$! -**;! 03/#)'! *%$+! 6#$+! 5('$+)! ;-*,!! the vehicle. !G*!+*)!*%$+!)#$!-**;!03/#)'!3+!#3/#!63+.'!*-!#$5?1!-53+< !!9$,*?$! '+*64! 37$! *-! 5+1! .3-)! ;-*,! )#$! -**;! 03/#)'! before opening them. !!H#$+!)#$!'&+!3'!'#3+3+/4!)#$!'#5.$!;*-!)#$!'8103/#)I'J! must be closed at two-thirds maximum. !K+!75'$!*;!.
? Operation of appliances ! BEDS Above the driver Fold the pivoting board down to the horizontal position, if there is one in your chosen model. Remember to lift it up again to increase your driving space before you start driving. A label indicates this normative obligation. In the dinette area !!!M&)!)#$!)5(0$!($)6$$+!)6*!'$5)'!*-!3+!;-*+)!*;!)#$!'$5)4! depending on the model. !!M&)! )#$! '03.3+/! $F)$+'3*+'! 3+)*! %*'3)3*+! I3;! )#$-$! 5-$! any) at each end of the bench. !!N5')014!%&)!)#$!.
? Operation of appliances 2) Manual adjustment: some models have this type of adjustment, which is done by raising the mattress and placing the adjustment wedge at the desired height. A small safety strap ensures that the wedge stays in place. (Do not forget the safety strap: we decline all responsibility for accidents that might happen in case this strap has not been properly positioned).. Electrically controlled central bed Bedding on certain models is a central bed..
? Operation of appliances A consulting ! ELECTRIC TABLE SUPPORT Do not hesitate to ask your distributor / vendor to demonstrate all these operations when you collect your camping car HE IS A SPECIALIST! Certain of our models have an electrically driven table support. For safety reasons, this support cannot operate unless it has been switched on by moving the key a quarter-turn to the right. Never force an element to put it into place.
? WC Operation of appliances ! CHEMICAL WC MODEL 0250 Watch out for the air pressure when opening the WC cassette trap, especially when travelling in the mountains. Open it then with the WC bowl lid closed. You will find below a short description on using this equipment. Specific documentation is supplied with the camper. The toilet has two parts: a permanently-fixed part and a waste-holding tank accessible from the outside.
? WC Operation of appliances To open the blade, slide the blade handle under the toilet bowl sideways. After use, open the blade (if it is still closed) and flush the toilet by pressing the flush button for several seconds (if necessary re-activate the control panel). Close the blade after use. Important notice! Please do not travel with a flush-water tank, if fitted, that is too full. Similarly, do not travel with water in the toilet bowl.
? WC Operation of appliances Storage 8+&!"$'L+F!0 - Squirt a few drops of Thetford bathroom cleaner into the toilet. - Flush the bowl with water and wipe the rest with a damp cloth. - Clean the seat and the lid. The seat and the cover can be removed easily. - To keep your toilet fresh and prevent deposits from forming in the bowl, add a suitable amount of Aqua Rinse into your toilet’s flush water tank (if appropriate). Tip! For a really shining toiler, wipe with a soft dry cloth after cleaning.
CHAP. XIII Moving the swivelling seats in the driver’s cab Some of our models feature swivelling cab seats which can be used to form an inviting front sitting area. Having said that, rotating the driver’s seat could in some circumstances require releasing the handbrake to make it easier to install the living room. 57 ? For safety reasons and before carrying out any operation, you must make sure that you can proceed in all safety. 1) Proceed with the engine off.
CHAP. XIV SAFETY (Ventilation – Fire Extinguisher) Fire Extinguisher Ventilation Your motorhome unit is equipped with safety ventilation in compliance with current legislation. These gratings, which are usually found under the refrigerator and furniture elements and in the gas box, as well as in the access step to the unit door must never be blocked. For your safety, it is essential to clean these grills at least once a year (blowing and brushing from outside).
CHAP. XV ? Winter use !PRECAUTIONS AND RECOMMENDATIONS For winter driving, and particularly for driving on snow, you should use the same rules for a camping car as for a private car, in other words drive very smoothly without sudden acceleration or braking. In any case, your camping car will tend to hold the road better than a car, simply because it is heavier, and therefore grips the road better.
? CHAP. XVI Cleaning External cleaning To clean the body, never use a system with rollers since you run he risk of deteriorating or tearing off the ventilation structures of your mobile home. High-pressure cleaning systems should never be used. Internal cleaning Do not use sponges with abrasive bands to clean the furniture because the furniture covering is of the “paper” type. Using wallpaper is, of course, strictly forbidden. Consequently, do not allow it to enter the living compartment at all costs.
? CHAP. XVII Winter storage This is the period during which you no longer use your camping car. Like any other vehicle, it tends to age much more quickly when it is not being used. Therefore, take appropriate precautions : 1) Drain all water circuits (clean water, waste water, WC toilet cassette), and your distributor / vendor will help you the first time since you need to be thoroughly familiar with your vehicle. Refer to the paragraph on the pump operation (page 48) to bleed the water pump.
? INFO CHAP. XVIII Models presentation ! TECHNICAL CHARACTERISTICS DIAGRAM Largeur Hors Tout Cellule Hauteur Hors Tout Capucine porteur Ford Empattement Porte à faux M-*O0P!%*-)$&-!Q*-. Longueur Hors Tout Capucine porteur Fiat Fourgon porteur Fiat - The optional «towing/motorcycle carrier» equipment can in certain cases change the number of passengers on the car registration papers. - Accessories and equipments fitted as an option are not included when determining the weight empty.
? INFO Models presentation !"# $%&' +%$% #!$()#( ) %$$(!$ +%))() #()*+),+-&*./*0 &*./*0-1230, !"#$%&'()&%"* !"#$ !"#$ !"#$ !"#$ #%&&' #%&&' #%&&' !"# .234 %567 ""!9:9;! !"$ .234 %567 ""!9:9;! $"# .234 %587 "869:9<$ $%$ .234 %587 "869:9<$ &'() .234 %587 "869:9<$ *'+',.234 %587 "869:9<$ .'/)01 .234 %587 "869:9<$ 8!66 8!66 8!66 8!66 8!66 8!66 8!66 !5<$ !5<$ $5<$ $5=$ $5$< =58< =58< %33456789:;'
? INFO Models presentation !"##$ %&'()$!* !"#$ +"'" ,*'$#,$ # "''$*' +"##$# !" $%&' ()"* !! +,+- #*+,-+.-/&,01,2 &,01,2/3452. %&!'()& !" $%&' ()"* !! +,+- !"#$ !# $%&' ()"* !! +,+- %&!'()& !# $%&' ()"* !! +,+- !"#$ ! $%&' ()"* !! +,+- %&!'()& ! $%&' ()"* !! +,+- "33456789:;%<*$=+, &63*7/52108*/.2+-7/94./:;2 )+L16:6/*2@8,1@+<<7 +<<45+B<2/<4+- 4<<451,0/ =>=#$/+,-/)4-2
? INFO Models presentation !"##$ %&'()$!* !"#$ +"'" ,*'$#,$ # "''$*' +"##$# !" $%&' ()*+ !*,-.-/ #*+,-+.-/&,01,2 &,01,2/3452. %&!'()& !" $%&' ()*+ !*,-.-/ !"#$ !# $%&' ()*+ !*,-.-/ %&!'()& !# $%&' ()*+ !*,-.-/ !"#$ %&!'()& ! $%&' ()*+ !*,-.-/ ! $%&' ()*+ !*,-.-/ "33456789:;%<*$=+, &63*7/52108*/.2+-7/94./:;2 )+L16:6/*2@8,1@+<<7 +<<45+B<2/<4+- 4<<451,0/ =>=#$/+,-/)4-2
? INFO Models presentation !"##$ %&'()$!* !"#$ +"'" ,*'$#,$ # !""#$" %!&&#& !" &'() $*+, !+-./.0 !"#$"%$&'#()#* '#()#*&+,-*% %&!'()& !" &'() $*+, !+-./.0 !"#$ !# &'() $*+, !+-./.0 %&!'()& !# &'() $*+, !+-./.0 !"#$ %&!'()& $% &'() $*+, !+-./.0 $% &'() $*+, !+-./.0 !33456789:;-<$#=%1 '#()#*&+,-*% 3"F)969&!*8;#)8"//7 "//,-"=/*&/,"$ .,//,-)#(&.
? INFO Models presentation !"##$ %&'()$!* !"#$ +"'" ,*'$#,$ # "''$*' +"##$# %&!'()& ! #$%& '()* !)+,-,./ #*+,-+.-/&,01,2 &,01,2/3452. ! #$%& '()* !)+,-,./ !"#$ !" #$%& '()* !)+,-,./ %&!'()& !" #$%& '()* !)+,-,./ "33456789:;%<*$=+, 499451,0/ 6G6#$/+,-/)4-29H/722/.20B9+*4.C/-4AB>2,*/3.4<1-2- &,01,2/3452. )+I1>B>/*2A8,1A+99C +9945+:92/94+- )0++ )0++ )0++ )0++ ()/ ()/ (1/ (1/ '()0 '()0 '()0 '()0 '(". 1(+) '()" '(". 1(+) '()" '(". 1(+) '(1" '(".
Personnal notes …………………………………………………………………………………………………………………………………….. …………………………………………………………………………………………………………………………………….. …………………………………………………………………………………………………………………………………….. …………………………………………………………………………………………………………………………………….. …………………………………………………………………………………………………………………………………….. …………………………………………………………………………………………………………………………………….. …………………………………………………………………………………………………………………………………….. …………………………………………………………………………………………………………………………………….. ……………………………………………………………………………………………………………………………………..
Personnal notes …………………………………………………………………………………………………………………………………….. …………………………………………………………………………………………………………………………………….. …………………………………………………………………………………………………………………………………….. …………………………………………………………………………………………………………………………………….. …………………………………………………………………………………………………………………………………….. …………………………………………………………………………………………………………………………………….. …………………………………………………………………………………………………………………………………….. …………………………………………………………………………………………………………………………………….. ……………………………………………………………………………………………………………………………………..
Personnal notes …………………………………………………………………………………………………………………………………….. …………………………………………………………………………………………………………………………………….. …………………………………………………………………………………………………………………………………….. …………………………………………………………………………………………………………………………………….. …………………………………………………………………………………………………………………………………….. …………………………………………………………………………………………………………………………………….. …………………………………………………………………………………………………………………………………….. …………………………………………………………………………………………………………………………………….. ……………………………………………………………………………………………………………………………………..
Personnal notes …………………………………………………………………………………………………………………………………….. …………………………………………………………………………………………………………………………………….. …………………………………………………………………………………………………………………………………….. …………………………………………………………………………………………………………………………………….. …………………………………………………………………………………………………………………………………….. …………………………………………………………………………………………………………………………………….. …………………………………………………………………………………………………………………………………….. …………………………………………………………………………………………………………………………………….. ……………………………………………………………………………………………………………………………………..
The technical information and maintenance recommendations in this publication were correct at the time of going to press. However, with a view to continuously improving our products, our company reserves the right to modify at any time and without warning the characteristics, design or the equipment without incurring any obligation. This maintenance and service manual should not be reproduced nor translated, as a whole or in part, without our company’s prior consent. E&OE. All rights reserved.