
User manual


Page 8 of 12 D-Fi™ Hub User Manual Rev. 1
4. OPERATION
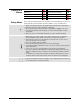
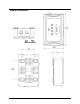
Control Panel
Operation
To access the control panel functions, use the four buttons located around the display.
Please refer to the Product Overview to see the buttons location on the control panel.
Button Function
<MENU>
Press to find an operation mode or to back out of the current menu
option
<UP>
Press to scroll up the list of options or to find a higher value
<DOWN>
Press to scroll down the list of options or to find a lower value
<ENTER>
Press to activate a menu option or a selected value
<AUTO>
Detects the D-Fi™ signal for synchronization of products
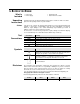
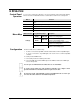
Menu Map
Main Function Programming Steps Description
Settings
Receive
Mode
CH01-016
Allows selection of a specific D-Fi™
channel for receiving signal
Transmit
Mode
CH01-016
Allows selection of a specific D-Fi™
channel for transmitting signal
Receive Auto
Triggers the D-Fi™ Hub to auto-select a
channel for receiving signal
Transmit Auto
Triggers the D-Fi™ Hub to auto-select a
channel for transmitting signal
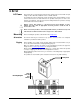
You can sync an unlimited amount of Receivers to one Transmitter.
To ensure strong signals, the units should be
elevated 5 feet or higher off the
ground and remain in an unobstructed line of sight of each other.
For the best results, add individual receivers using Manual mode to ensure you
can select the same channel for the additional products.
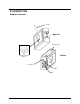
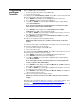
Configuration
The D-Fi™ Hub can be used two ways:
• It can be connected to any DMX controller and transmit to D-Fi™-compatible lights.
• It can be connected to any DMX lights and receive from a D-Fi™-compatible
controller.
To set this product in DMX mode:
1. Connect this product to a suitable power outlet.
2. Connect a DMX cable from the DMX output of the DMX controller to the DMX input
socket of this product.