
User manual


Operation
Stand-Alone Operation (Sound-Active, Auto Mode):
This mode allows a single unit to run to the beat of the music, or the unit will auto change in Auto
Mode.
1) Set dipswitches position to Sound Active or Auto Mode.
Mode Dipswitches
Sound Active 1 = Off, 10 = On
Auto Mode 1 = On, 10 = On
2) The unit will react to the low frequencies of music via the internal microphone in Sound Active
mode, or th
e unit will auto change in Auto Mode.
3) Use the audio sensitivity knob on the back of the unit to make the unit more or less sensitive in
Sound-Active mode. Tur
ning the knob counterclockwise decreases the sensitivity; turning the
knob clockwise increases the sensitivity.
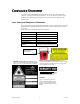
Master-Slave Operation (Master Sound, Master Auto):
This mode will allow you to link up to 32 units together without a controller.
1) Use standard DMX cables to daisy chain your units together via th
e DMX connector on the rear
of the units. For longer cable runs we suggest a terminator at the last fixture. For more
information about terminators, see page 14.
2) Choose a unit to function as Master mode. Turn
dipswitches to the Master position on the unit.
The unit must be the first unit in line. Then simply chain the units together using DMX cable.
Mode
Dipswitches
Master Sound 1 = Off, 10 = On
Master Auto 1 = On, 10 = On
3) Turn switch to the Slave position on the slave units, and they will react the same as the Master.
Mode Dipswitches
Slave
1-10 = Off
OUT
IN
POWER
1: MASTER
2: SLAVE
3, 4, 5, etc.: SLAVE
OUT
IN
Note! System doesn’t use a DMX controller in Master-Slave Mode.
System cannot have two Master units in Master-Slave Mode.
It is recommended that you perform a hard reset after making
changes to the dipswitches. To perform a hard reset: turn off
the power to the fixture, wait 10 seconds, and turn on the
power to the fixture.
LG-40 User Manual 12 11/3/2006/14:01