
Installation User guide


www.chenbro.com
13
ES34169 Chassis User’s Manual Rev. A1
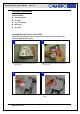
Installing 2.5” HDD
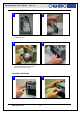
Connecting Devices
z Four SATA-II cables for Hot-swap hard drive (HDD)
z Power cables for M/B
z Front panel I/O cables
z USB 2.0 cable
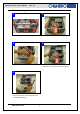
Connecting SATA-II Cables
Note: If there is no enough SATA port on M/B, users can either remove or keep the
bundled P3/P4 SATA cable.
1 2
■ Check the bundled cable with number tag ■ Connect the SATA cables to the M/B properly
1 2
■ Place 2.5” HDD underneath the Slim ODD ■ Fix the 2.5” HDD with attached screws
Note: To install 2.5” HDD, disassemble the M/B cage is required.