
User's Manual


Model: PAC-500 Installation Instructions
6
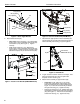
Figure 6: Attach Upper Bracket
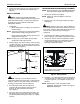
6. Attach lower bracket (30):
• MWR/PWR mount: Using key (170), attach lower
bracket (30) to mount assembly with screws (80)
and washers (130) (See Figure 7). Tighten
securely.
• PNR mount: Using key (170), attach lower
bracket (40) to mount assembly with screws (90)
(See Figure 8). Tighten securely, and then install
adhesive felt pad (140) to each screw head (90).
Figure 7: Attach Lower Bracket (MWR/PWR Mount)
Figure 8: Attach Lower Bracket (PNR Mount)
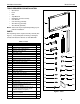
7. Tilt and insert upper portion of mount assembly into
upper bracket (20), then tilt and insert lower portion of
mount assembly into housing (10) (See Figure 9).
Figure 9: Insert Mount
8. To gain access to fastener holes for next steps, hold
lower mount bracket (30 or 40) and pull mount
faceplate out from housing (10).
9. Attach mount assembly to upper bracket (20):
• MWR/PWR mount: Using key (170), install
screws (80) and washers (130) through inner
holes of bracket (20) into mount assembly (See
Figure 10). Ensure mount assembly is offset to
the right of housing (10). Tighten securely.
• PNR mount: Using key (170), install screws (80)
and washers (130) through outer holes of bracket
(20) (See Figure 11). Ensure mount assembly is
centered in housing (10). Tighten securely.
20
MWR/PWR
PNR
70 (2 places)
120 (2 places)
110 (2 places)
Mount
Mount
MWR/PWR
30
130
80
(2 places)
(2 places)
(2 places)
PNR
40 (2 places)
90 (2 places)
140 (2 places)
20
10
PNR shown;
MWR/PWR similar