
User Manual

6
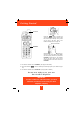
Connecting Your Phone
This section is a reference guide to the basic functions and operations of your cordless
telephone. For more detailed descriptions of the operations and features of this telephone, refer
to the Contents on page 1.
1. Carefully remove your cordless telephone from its shipping carton. If there is any visible
damage, do not attempt to operate this equipment. Return it to the place of purchase.
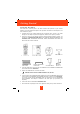
2. Check to be sure you have all items that come with this cordless telephone system. You
should have two HANDSETS, BASE UNIT, two AC ADAPTER, MOUNTING BRACKET, one
CHARGER UNIT, TELEPHONE LINE CORD, SHORT TELEPHONE LINE CORD, two
BELT CLIP, and an Owner’s Manual.
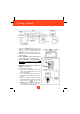
3. Insert the small plug on the end of the AC ADAPTER into the POWER-IN CONNECTION
JACK at the back of the BASE UNIT.
4. Plug the AC ADAPTER into a 120V AC wall outlet.
USE ONLY WITH CLASS 2 POWER SOURCE 9V DC, 500 mA.
5. Insert one plug of the TELEPHONE LINE CORD into the house TELEPHONE JACK and the
other end into the TELEPHONE LINE CONNECTION JACK at the back of the BASE UNIT.
(If you have an older 4-prong TELEPHONE JACK, you will need an RJ-11C TELEPHONE
JACK ADAPTER. This adapter is available at the same place you purchased your
telephone.)
6. Connect the other AC ADAPTER to CHARGER UNIT.
7. We recommend not placing this unit next to appliances. Doing so may cause interference.
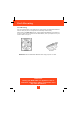
Getting Started
TELEPHONE
LINE CORD
SHORT TELEPHONE
LINE CORD
MOUNTING
BRACKET
BELT CLIP X 2
AC ADAPTER X 2
BATTERY
PACK X 2
HANDSET X 2
BASE UNIT
!