
Operation Manual

6) For speakers which are to be placed at long distances apart, sometimes it is necessary to “time align”
the signals from these so that the sound wave from each arrives at the listener at the same moment.
This can be achieved by pressing the “DELAY” button and applying a delay to the speaker output
nearest to the listener, avoiding the “doubling” effect that can result from distant speakers. Sound
travels at 340m per second, so a speaker 170m further away than the nearest speaker would need a
half second delay to be time-aligned.
7) When 2 speakers directly face each other, their sound waves can cancel each other out. This can be
solved by reversing the polarity of one speaker using the “POLARITY” parameter. This can also be a
useful tool for avoiding various other phase-cancelling problems.
8) The “LIMITER” function allows the user to limit the output of the amplifier by controlling the volume
as it reaches a certain amount, creating a “ceiling” level. Applying the limiter to the output can help
protect amps and speakers from overload.
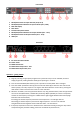
9) When all CH1 settings are completed, press and hold the MUTE/EDIT button (7) for outputs CH2
through to 6 and repeat the process (channels and parameters may be edited in any desired order)
10) Likewise, certain parameters for input channels A and B can be edited as desired
11) Select each output in turn and decide if it is to be a left, right or mono output and select the
appropriate input to suit
12) When all channels are set to the required values, press the “SAVE” button and store to an unused
program memory and rename if required – the option to password lock the program will also be
offered at this stage. The “LOAD” button allows the user to recall any of the saved programs at will.
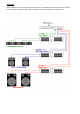
Example setup
Press and hold MUTE/EDIT button for CH1 and press the GAIN button
… set Gain to 0dB and select input A
… press the X-OVER button and select the HPF to L-R filter type 24dB/oct at 120Hz
(LPF remains unset at 20kHz)
Press and hold MUTE/EDIT button for CH2 and press the GAIN button
… set Gain to 0dB and select input B
… press the X-OVER button and select the HPF to L-R filter type 24dB/oct at 120Hz
(LPF remains unset at 20kHz
Press and hold MUTE/EDIT button for CH3 and press the GAIN button
… set Gain to +6dB and select input A+B
… press the X-OVER button and select the LPF to L-R filter type 24dB/oct at 120Hz
(HPF remains unset at 20Hz)
Press and hold MUTE/EDIT button for CH4 and press the GAIN button
… set Gain to +6dB and select input A+B
… press the X-OVER button and select the LPF to L-R filter type 24dB/oct at 120Hz
(HPF remains unset at 20Hz)
… the result is a standard 2-way crossover where CH1 and CH2 are the mid-high L & R outputs and
CH3 and CH4 are a pair of identical sub outputs (mono to keep in phase and boosted by 6dB to
balance the mid-highs).
Depending upon the required sub-bass style, the cut-off frequency may be varied – lower cut-off
frequencies filter out more of the input and consequently may need more gain boost to “make up”
for the reduction of input.
Typically, outputs CH5 and CH6 may be full range (without crossover filtering) for surround or
background speaker L + R feeds.
From this basic 2-way crossover, a more sophisticated program may be derived with EQ settings to
compensate for room resonances and speaker characteristics or even to suit a particular music type.