
Use and Care Manual


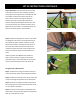
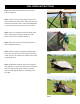


Photo 3
Photo 4
Step 1: Unzip the storage bag completely and remove
the shelter. Use care not to misplace the instructions
and the stake and rope pouch. It is advised to store your
stakes, ropes and pouch in the carry bag until they’re
needed.
Step 2: Pick the tent up directly from the carry bag and
stand it on the center metal hub. (Photo 2)
Step 3: With the screen tent standing up on the black
center hub hold one corner of the material and let the
screen fall open until you see the roof lying flat with the
Clam logo facing up. If it does not fall open naturally,
unfold the tent until you can see the roof panel lying
flat. At this point the poles should be on the inside of
the tent with the roof facing up. (Photo 3)
Step 4: With the poles on the inside, reach for the
handle at the center of one wall and pull until the
section pops out. Hold the roof line with the opposite
hand. (Photo 4)
Step 5: Continue around the shelter repeating the
previous step until all wall panels are erect.
Step 6: Enter through the door and push up on the
center ceiling hub until the ceiling pops up. (Photo 5)
SET UP INSTRUCTIONS CONTINUED
Photo 1
Photo 2