Owner’s manual Mode d’emploi Manual de instrucciones CX609 2-DIN Bluetooth® CD/USB/MP3/WMA/AAC RECEIVER WITH CeNET CONTROL LECTEUR CD/USB/MP3/WMA/AAC 2 DIN Bluetooth® AVEC COMMANDE CeNET RECEPTOR CD/USB/MP3/WMA/AAC TAMAÑO 2-DIN, CON Bluetooth® Y CONTROL CeNET
CLARION PRODUCT REGISTRATION INFORMATION For USA and Canada only www.clarion.com Dear Customer: Congratulations on your purchase of a Clarion mobile electronic products. We are confident that you’ll enjoy your Clarion experience. There are many benefits to registering your product. We invite you to visit our website at www.clarion.com to register your Clarion product. We have made product registration simple with our easy to use website. The registration form is short and easy to complete.
English Thank you for purchasing this Clarion product. Please read this owner’s manual in its entirety before operating this equipment. Check the contents of the enclosed warranty card and keep it carefully with this manual. Contents 1. FEATURES ...................................................................................................................................... 3 2. PRECAUTIONS ................................................................................................................
English 2. PRECAUTIONS This equipment has been tested and found to comply with the limits for a Class B digital device, pursuant to Part 15 of the FCC Rules. These limits are designed to provide reasonable protection against harmful interference in a residential installation. This equipment generates, uses, and can radiate radio frequency energy and, if not installed and used in accordance with the instructions, may cause harmful interference to radio communications.
English 3. CONTROLS Names of the Buttons and Their Main Functions [DIRECT] [CD SLOT] [ ] [SCN] [RPT] [DIRECT] [RDM] [IR RECEIVER] [ ] [DISP] [BND] [SRC] [AUX] [ ] [ROTARY] [ [ISR] [w], [z] [x], [v] ] button • Perform preset scan while in the radio mode. • Play or pause a track while in CD/MP3/WMA/ AAC/USB/iPod mode. [IR RECEIVER] [DISP] button • Switch the display indication. [BND] button • Change bands, or select seek tuning or manual tuning while in the radio mode.
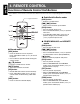
English 4. REMOTE CONTROL Functions of Remote Control Unit Buttons Some buttons on the remote control unit have different functions from the corresponding buttons on the main unit. Signal transmitter ● Radio/Satellite Radio modes [BND] button • Switches reception band. [x], [v] buttons [SRC] [BND] [MUTE] [DISP] [ISR] [RDM] [SCN] [RPT] • Moves preset channels up and down. [SCN] button • Press to perform preset scan. • Press and hold the button (2 sec.) to perform auto store.
Functions of Remote Control Unit Buttons [RDM] button [BND] button • Press to perform random play. • Press and hold the button (1 sec.) to perform disc random play. • Press to switch to next disc in ascending order. [x], [v] buttons • Press to move the tracks up and down. • Press and hold the button (1 sec.) to perform fast-forward/fast-backward. [ ] button • Switches between playback and pause. [SCN] button • Press to perform scan play. • Press and hold the button (1 sec.
English 5. OPERATIONS Note: • Be sure to read this chapter referring to the front diagrams of chapter “3. CONTROLS” on page 5. Basic Operations CAUTION Be sure to lower the volume before switching off the unit power or the ignition key. The unit remembers its last volume setting. Turning on/off the power Note: 1. Press the [SRC] button to turn on the power. 2. Press and hold the [SRC] button (1 sec.) to turn off the power for the unit.
Basic Operations 3-1. Press the [ ] button. 3-2. Press the [x] or [v] button to select the “BASS, MID” or “TREBLE” mode to adjust. 3-3. If you want to set the flat, press the [ ] button to return to the “CUSTOM” mode, then press and hold the [ ] button (1sec.), bass/mid/treble characteristics become flat and switch to the “CUSTOM” mode. When “EXCITE/IMPACT/B-BOOST” is set: 3-1. Press the [ ] button. 3-2. Press the [w] or [z] button to adjust the setting in the range of –3 to +3.
Basic Operations English 3-1. Each time press the [w] or [z] button to select the setting, the setting changes in the following order: “THROUGH” ↔ “60” ↔ “90” ↔ “120” The factory default setting is “THROUGH”. ● Adjusting the subwoofer output volume You can adjust the volume output from the unit’s subwoofer output terminal. This adjustment can be performed only when the “REAR/S-W” is set to “S-WOOFER”. 2-1. Select “S-W VOL”. 3-1. Press the [w] or [z] button to increases or decreases the subwoofer volume.
Radio Operations Auto store 1. Press the [SRC] button and select the radio mode. 2. Press the [BND] button and select the radio band. Each time the button is pressed, the radio reception band changes in the following order: FM1 ➜ FM2 ➜ FM3 ➜ AM ➜ FM1... Auto store is a function for storing up to 6 stations that are automatically tuned in sequentially. If 6 receivable stations cannot be received, a previously stored station remains unoverwritten at the memory position. 1.
XM Satellite Radio Operations English This unit can control the satellite radio receiver (XM Mini-Tuner). Note: • When the function is differ depending to the connected receiver, they are distinguished by the following notations: “XM”: for an XM Satellite Radio Selecting a Satellite Radio mode 1. Press the [SRC] button. The system changes to the specified Satellite Radio mode. Selecting a band 1. Press the [BND] button to select a band. This changes the reception band as follows: XM1 ➜ XM2 ➜ XM3 ➜ XM1 ..
XM Satellite Radio Operations There are two channel selection modes: quick tuning mode and step tuning mode. Quick tuning 1. Press and hold the [x] or [v] button for 1 second or longer. 2. Press the [ ] button to switch to another channel. Step tuning 1. Press the [x] or [v] button. 2. Press the [ channel. ] button to switch to another Recalling a preset station A total of 18 satellite radio stations can be stored.
CD/MP3/WMA/AAC Operations English MP3/WMA/AAC ● To disable DRM (Digital Rights Management) 1. When using Windows Media Player 9/10/11, click on TOOL ➜ OPTIONS ➜ MUSIC RECORD tab, then under Recording settings, unclick the Check box for RECORD PROTECTED MUSIC. Then, reconstruct files. Personally constructed WMA files are used at your own responsibility. 2.
CD/MP3/WMA/AAC Operations As long as the ignition key is turned to the ON or ACC position, this function allows you to turn the power to the unit and start playing the disc automatically when the disc is inserted even if the power is not turned on. CAUTION • Do not try to put your hand or fingers in the disc insertion slot. Also never insert foreign objects into the slot.
CD/MP3/WMA/AAC Operations English Fast-forward/fast-reverse ● Folder repeat play ● Fast-forward 1. Press and hold the [v] button (1 sec.). ● Fast-reverse 1. Press and hold the [x] button (1 sec.). This function allows you to play a track currently being played in the MP3/WMA/AAC folder repeatedly. 1. Press and hold the [RPT] button (1 sec.) to perform folder repeat play. For MP3/WMA/AAC discs, it takes some time until the start of searching and between tracks.
Bluetooth Operations Notes: • Do not leave the microphone of Bluetooth handsfree in the places with wind passing such as air outlet of the air conditioner, etc. This may cause a malfunction. In addition, if leave it in the places subjected to direct sun, high temperature can cause distortion, discoloration which may result in a malfunction. • This system will not operate or may operate improperly with some Bluetooth audio players.
Bluetooth Operations English 4. Press the [ phone No. ] button to call the mobile ● Redial a call You can call a redial phone No. 1. Press the [BND] button to select “REDIAL”. 2. Press and hold the [ ] button (1 sec.) to call the redial phone No. Press the [ ] button to end the call. To change Bluetooth adjustment setting 1. Press and hold the [DISP] button (1 sec.) to switch to the Bluetooth adjustment selection display. 2. Press the [x] or [v] button to select the “item name”.
Bluetooth Operations This option is used to add one of the phone No. 2-1. Select “ADD PHONE BOOK”. 3-1. Press the [ ] button (1 sec.), then the “RECEIVING” appears in the display. At the same time the phone No. from the paired phone book list is sent out, then there is a prompt on the mobile phone if it is successful. Some mobile phones cannot transfer the phone book to this unit because of the less word and the language type.
Bluetooth Operations English ● AUTO ANS ● Bluetooth Firmware version This is a setting to determine whether any incoming call will be automatically or manually answered. This will display the Firmware version of the Bluetooth. 2-1. Select “BT FW”. The Bluetooth Firmware version appears in the display. The factory default setting is “OFF”. 2-1. Select “AUTO ANS”. 3-1. Press the [w] or [z] button to select “ON” or “OFF”. ON: Any incoming call is automatically answered in 5 seconds.
Operations Common to Each Mode 1. Press and hold the [DISP] button (1 sec.) to switch to the adjustment selection display. 2. Press the [x] or [v] button to select the “item name”. “CLOCK” ↔ “CONTRAST” ↔ “SETTINGS” ↔ “COLOR” ↔ “CODE” ↔ “XM SRC” ↔ “SCRN SVR” ↔ “MESSAGE INPUT” ↔ “SCROLL” ↔ “DIMMER” ↔ “BLINKLED” ↔ “A-CANCEL” ↔ “REAR/S-W” ↔ “SYSTEM CHECK” 3. Press the [w] or [z] button to select the “desired setting value”.
Operations Common to Each Mode English 5-1. Press and hold the [ ] button (2 sec.) The entered Personal Code will be set, and it will return to the previous screen. Note: • Write down your Personal Code in case you forget it. • Erasing the Personal Code 2-1. Select “CODE”. 3-1. Press the [ ] button. The ERASE PERSONAL CODE screen appears. 4-1. Enter the Personal Code currently. 5-1. Press and hold the [ ] button (2 sec.) or longer. Enter a Personal Code mode is cancelled.
Operations Common to Each Mode cancel the input message. Then press and hold the the [ ] button (2 sec.) to store the message and the message return to default setting. ● Setting the method for title scroll Set how to scroll in CD-TEXT, MP3/WMA/AAC title. The factory default setting is “ON”. 2-1. Select “SCROLL”. 3-1. Press the [w] or [z] button to select “ON” or “OFF”. • ON: To scroll automatically. • OFF: To scroll just 1 time.
Operations Common to Each Mode English 10.Press and hold the [ ] button (2 sec.) to store the title into memory. Clearing titles 1. Select and play a CD in the CD changer or tune in to or Radio for which you want to clear the title. 2. Press and hold the [DISP] button (1 sec.). 3. Press the [x] or [v] button to select “TITLE INPUT”. 4. Press the [ ] button. The display switches to the title input display. 5. Press and hold the [BND] button (1 sec.). All characters in the title disappear. 6.
English 6. ACCESSORIES USB/MTP Operations USB memory/MTP device operation Note: • The following operations are the same as for CD mode: Pause Track selection Fast-forward/fast-backward (Except DRM file) Top function List search Scan play Repeat play Random play Folder selection See “CD/MP3/WMA/AAC Operations” (page 1416) for details. • • • • through a USB hub device are also not supported. When a USB memory device is composed of two or more drives, only one of the drives will be detected.
USB/MTP Operations English • Do not turn on vehicle ignition when the MTP device is connected, since it may result in loss or damage to data on the MTP device. Connect the MTP device to the USB cable after vehicle ignition is turned on. Connecting a USB memory/MTP device 1. Connect the USB memory/MTP device to the USB cable. Playback will begin from the first file recorded on the device. If the device is not recognized, press the [SRC] button to switch the source to the device.
iPod Operations Notes: • See the iPod Owner’s Manual for details regarding operation conditions. • The unit will not operate, or may operate improperly with unsupported versions. • For a list of compatible Apple iPod unit with the this model, please contact your Clarion dealer or www.clarion.com. • “Made for iPod” means that an electronic accessory has been designed to connect specifically to iPod and has been certified by the developer to meet Apple performance standards.
iPod Operations English ● All random play Play all tracks within a selected category, in random order. (Corresponds to “Shuffle (Songs)” command on iPod.) 1. Press and hold the [RDM] button (1 sec.). ● To cancel play 1. Press the same play button once again. Notes: • When the repeat play mode is canceled, after play all tracks within a selected category, playback will begin from the first track in the selected category.
iPod Operations English 3. When the track name display is showing, press the [v] button. Playback will begin from the first track in the selected category, and the iPod menu mode will be canceled. Use the [w] and [z] buttons to select a track within a category. iPod menu list back In the iPod menu operation mode: If press the [BND] button, it will return to the previous subfolder list mode. If press and hold the [BND] button (1 sec.), it will return to the category list mode.
SIRIUS Satellite Radio Operations English This function is available when a Satellite Radio Receiver is connected through the CeNET cable. This unit can control the following satellite radio receivers: • SIRIUS Satellite Radio Receiver : SIRCL3 • SIRIUS Satellite Translator Adapter : CLA-SC1 (which needs Sirius universal Tuner sold separately.
SIRIUS Satellite Radio Operations Satellite Radio allows you to select broadcast channel category (contents). 1. Press and hold the [BND] button (1 sec.) to select the category selection mode. It press once again, return to the channel selection mode. 2. Press the [w] or [z] button to change the category item. 3. Press the [x] or [v] button to tune in a station. Notes: • When the category selection mode is entered, the category of the last received channel is displayed first.
CD Changer Operations English Note: • The following operations are the same as for CD mode: Pause Track selection Fast-forward/fast-reverse Scan play Repeat play Random play See “CD/MP3/WMA/AAC Operations” (page 1416) for details. CD changer functions When an optional CD changer is connected through the CeNET cable, this unit controls all CD changer functions. This unit can control a total of 2 changers. Press the [SRC] button and select the CD changer mode to start play.
General Problem Cause Measure Power does not turn on. (No sound is produced.) Fuse is blown. Replace with a fuse of the same amperage. If the fuse blows again, consult your store of purchase. Incorrect wiring. Consult your store of purchase. No sound output when operating the unit with amplifiers or power antenna attached. Power antenna lead is 1. Turn the unit off. shorted to ground or 2. Remove all wires attached to the power antenna excessive current is required lead.
Problem English CD/MP3/WMA/AAC No sound heard Cause Measure MP3/WMA/AAC files are absent in a disc. Write MP3/WMA/AAC files onto the disc properly. Files are not recognized as an MP3/WMA/AAC file. Use MP3/WMA/AAC files encoded properly. File system is not correct. Use ISO9660 level 1, 2 or JOLIET or Romeo or APPLE ISO file system. Sound skips or is noisy. Compact disc is dirty. Clean the compact disc with a soft cloth. Compact disc is heavily scratched or warped.
English 8. ERROR DISPLAYS If an error occurs, one of the following displays is displayed. Take the measures described below to eliminate the problem. USB/MTP/iPod CD changer CD/MP3/WMA/AAC Error Display Cause Measure ERROR 2 A CD is caught inside the CD This is a failure of CD deck’s mechanism and consult deck and is not ejected. your store of purchase. ERROR 3 A CD cannot be played due to scratches, etc. ERROR 6 A CD is loaded upside-down Eject the disc then reload it properly.
English 9. SPECIFICATIONS FM Tuner Audio Frequency Range: 87.9 MHz to 107.
English 10.OTHERS WMDRM 10 for devices • This product is protected by certain intellectual property rights of Microsoft. Use or distribution of such technology outside of this product is prohibited without a license from Microsoft. • Content owners use Windows Media digital rights management technology (WMDRM) to protect their intellectual property, including copyrights. This device uses WMDRM software to access WMDRM-protected content.
Clarion Co., Ltd. 2008/12 All Rights Reserved. Copyright © 2008: Clarion Co., Ltd.
Printed in China I lmprimeen Chine/_'m.:;.''''-''''''-'-oo_C;.."_;n;... iii • __ - - --' - .111 •••• . ....:::20"'0;::81.;;12=--- --=2:::84-::...,:.14"'5::3:.;-00:::.; ..., InstallationlWire Connection Guide Manuel d'installation et de connexion Guia de instalacionlconexion de cables - .... . . . . BIm -1. BEFORE STARTING I PREPARATIFS I ANTES DE COMENZAR 2. Read these instructions carefully. 1.
• Installing the Source Unit in a TOYOTA Vehicle Install by using parts attached to the vehicle. (Screws marked attached to the vehicle.) * are .Installation de I'appareil pilote dans un vehicule TOYOTA * Iinstaller avec les pieces fixee"s au vehicule. (Les vis indiquees par sont fixees au vehicule.) • Instalacion de la unidad fuente en un automovii TOYOTA Instalaci6n de la unidad utilizando las plazas fijadas al autom6vil. (Los tornillos marcados con 8slan fijados al autom6vil.
® To .xtltmlll ampUfier ....... cAunoN:~~.:.~::.:re~;:...~:~r.i~~..=t=:;:~!c::::=:e~~~h~~r Vers un amplificateur externe ATTENTION: Lorsque vous raccorde~ un ampU de puissance ._Ierne, faites bien attention iii mettre correctemenll'ampllfleateur la masse sur Ie chassis de la ...olture. Sinon, '10US risquez d'endommager gravement I'appareil pilote. a ~~~cT~~~emoconect.un ampllticador de potencla extemo, Cfi'Ci6rese de ponefIO en eI chi! ala de au aut0m6vll.SI no 10 hie..... 18 unldad mente.
....... -6. SYSTEM EXAMPLE I EXEMPLE DE SYSTEME I EJEMPLO DESISTEMA • Example of the system using an external amplifier (Audio Visual) • Exemple de systeme utilisant un amplifieateur exterieur.
IPFi!i¥'h clarion GARANTIE LIMITEE DE 2 ANS CLARION Pour Ie Canada et les Etats-Unis seulement Ce produit Clarion vendu par marchand autorise Clarion est garanti contre tous defauts de materiel et de mise en
281-0640-00 2007/9 clarion CLARION 2 YEAR LIMITED WARRANTY For USA and Canada only This Clarion product purchased from an authorized Clarion dealer are warranted against all defects in materials and workmanship for a period of two (2) years from the date of original purchase, when purchased from AND installed by an authorized Clarion dealer.