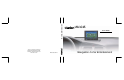
N.I.C.E. User's Guide Clarion Corporation of America 661 West Redondo Beach Blvd. Gardena, California 90247-4201 www.clarion.com NICE31805 Rev1.0 N.I.C.E.
PRINT-Clarion_NICE_Guide.book Page 3 Monday, March 21, 2005 1:08 PM 3 N.I.C.E. Dear Customer Congratulations on your purchase of the world’s finest brand in the electronic industry. At Clarion we are committed to quality and are confident that you will be pleased with your purchase. Clarion’s Navigation In-Car Entertainment system (N.I.C.E.
PRINT-Clarion_NICE_Guide.book Page 4 Monday, March 21, 2005 1:08 PM 4 User’s Guide This Guide FCC Notice If you’re an experienced electronics owner, read “Quick Start” on page 9 to get started quickly. This unit complies with the interference limits relative to a Class B digital device, applicable under Part 15 of the FCC Rules regarding installation in a residential environment.
PRINT-Clarion_NICE_Guide.book Page 5 Monday, March 21, 2005 1:08 PM N.I.C.E. Frequently-asked questions ..................... 23 Navigation.............................................. 23 SIRIUS radio.......................................... 25 Entertainment options............................ 25 Contents 1 This Guide .................................................. 4 Copyright and Trademarks ......................... 4 Quick Start ................................................. 9 Check contents .
PRINT-Clarion_NICE_Guide.book Page 6 Monday, March 21, 2005 1:08 PM 6 User’s Guide Traveling to your destination ..................... 47 Visually tracking your route.................... 48 Recovering from a wrong turn................ 48 Controlling automatic recalculation ........ 49 Which way is up ..................................... 49 Changing map perspective .................... 50 Zooming in and out ................................ 50 Viewing an intersection close up............
PRINT-Clarion_NICE_Guide.book Page 7 Monday, March 21, 2005 1:08 PM N.I.C.E. Basic Operations ...................................... 79 Direct tuning by channel ........................... 80 Tuning by category ................................... 81 Tuning by previewing ................................ 81 Previewing by category.......................... 81 Previewing all channels ......................... 82 Tuning by favorites ................................... 82 Storing favorites.......................
PRINT-Clarion_NICE_Guide.book Page 8 Monday, March 21, 2005 1:08 PM 8 8 User’s Guide Care and updating .........................103 Cleaning the unit ..................................... 103 Updating the map database .................... 103 Copying files ........................................... 103 Removing the unit ................................ 104 Connecting to your PC......................... 105 Copying files ........................................ 106 Disconnecting from the PC ..............
PRINT-Clarion_NICE_Guide.book Page 9 Monday, March 21, 2005 1:08 PM N.I.C.E. 9 Check contents 1. Quick Start If anything is missing, contact your dealer immediately.
PRINT-Clarion_NICE_Guide.
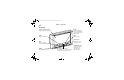
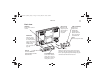
PRINT-Clarion_NICE_Guide.book Page 11 Monday, March 21, 2005 1:08 PM N.I.C.E. 11 Back view GPS antenna Rotates at 90 degree angle to unit to improve GPS signal reception VIDEO IN Connects to rearview camera AUDIO OUT Connects to the stereo AUX input on a vehicle stereo system. To connect without cable, see “Audio through your car stereo” on page 30 EXT. I/O Connects to Clarion’s NAVSIR SIRIUS Satellite Radio interface USB 2.
PRINT-Clarion_NICE_Guide.book Page 12 Monday, March 21, 2005 1:08 PM 12 Chapter 1: Quick Start Getting started 1. Navigation or entertainment Press the POWER button. The Clarion logo appears; if the speaker is on you hear two beeps, and the navigation caution screen appears after a brief pause. 2. Read the caution and press the Press-to-accept button. Note Press onscreen buttons firmly and slowly for best performance. You’re ready to use the N.I.C.E. as a navigation tool and entertainment center.
PRINT-Clarion_NICE_Guide.book Page 13 Monday, March 21, 2005 1:08 PM N.I.C.E. 13 Modes of operation NAVIGATION Corresponds to the NAVI button below the LCD and launches navigation mode. For details, see “Navigation” on page 33. SIRIUS Corresponds to button of the same name and launches satellite radio mode. For details, see “SIRIUS Satellite Radio” on page 74. PHOTO Launches photo viewing mode. For details, see “Video mode” on page 98.
PRINT-Clarion_NICE_Guide.book Page 14 Monday, March 21, 2005 1:08 PM 14 Chapter 1: Quick Start Start navigation Satellite Green when satellite found; light green when signal is weak; gray when satellite not found 2 1 Display area Used to view maps and navigation menus. Navigation button (F3) Start navigation here Exit button (F1) Cancels current NOTE: The big step numbers in this example shows how to begin defining the destination by defining the state first.
PRINT-Clarion_NICE_Guide.book Page 15 Monday, March 21, 2005 1:08 PM N.I.C.E.
PRINT-Clarion_NICE_Guide.
PRINT-Clarion_NICE_Guide.book Page 17 Monday, March 21, 2005 1:08 PM N.I.C.E.
PRINT-Clarion_NICE_Guide.book Page 18 Monday, March 21, 2005 1:08 PM Chapter 1: Quick Start 18 Music player controls Portable memory storage button Displays contents of a portable memory storage device connected to the USB 1.
PRINT-Clarion_NICE_Guide.book Page 19 Monday, March 21, 2005 1:08 PM N.I.C.E. 19 Photo viewer controls Portable memory storage button Displays contents of a portable memory storage device connected to the USB 1.
PRINT-Clarion_NICE_Guide.
PRINT-Clarion_NICE_Guide.book Page 21 Monday, March 21, 2005 1:08 PM N.I.C.E. Using the remote The wireless remote control supplied with N.I.C.E. operates most features from a remote location. The buttons on the remote control function the same way their equivalents do on the unit. 21 For optimal operation, always aim the remote control toward the infrared sensor on the N.I.C.E. front panel. Infrared sensor Front of N.I.C.E.
PRINT-Clarion_NICE_Guide.
PRINT-Clarion_NICE_Guide.book Page 23 Monday, March 21, 2005 1:08 PM N.I.C.E. Turning the unit off Press the POWER button. The unit stores the current mode and turns off. When you turn the power on again, the unit returns to the mode you were in when you powered off. Frequently-asked questions The questions in this section are often asked by people who are learning to use N.I.C.E. For troubleshooting help, see “Troubleshooting” on page 113.
PRINT-Clarion_NICE_Guide.book Page 24 Monday, March 21, 2005 1:08 PM 24 Chapter 1: Quick Start Can I get rid of all the information icons and boxes so I can see more of the map? Does the unit show me how many miles are left to the destination? • Yes. In Setup, Display Options, press GPS Icon Display, Status Bar Display, etc. to turn them off. • Yes. The unit displays miles (or kilometers) remaining in the box at the lower right of the screen.
PRINT-Clarion_NICE_Guide.book Page 25 Monday, March 21, 2005 1:08 PM N.I.C.E. 25 SIRIUS radio Entertainment options Can I listen to SIRIUS satellite radio while I navigate? Can I play music files while I navigate? • Yes. While in navigation mode, press SIRIUS and the unit overlays the top portion of the screen with the SIRIUS controls. Voice guidance always overrides the radio. • Yes.
PRINT-Clarion_NICE_Guide.book Page 26 Monday, March 21, 2005 1:08 PM Chapter 2: Installation 26 2. Installation Install the unit in a vehicle 1. This chapter explains how to install the unit in a vehicle and use it at home. Using the screws supplied, mount the N.I.C.E. onto the on-glass mounting bracket. Suction cup Vehicle Precautions Latch Compression button Follow these precautions to avoid serious auto accident or personal injury: • • Adjustment knobs Do not mount the N.I.C.E.
PRINT-Clarion_NICE_Guide.book Page 27 Monday, March 21, 2005 1:08 PM N.I.C.E. 2. Place the on-glass mounting bracket in position with the suction cup touching the glass. Make sure it does not obstruct the driver’s view of the road from any angle, but still has a direct path through the windshield to the GPS satellite. If you are not sure consult a professional installer for help. 3. Press and hold the compression button. 4.
PRINT-Clarion_NICE_Guide.book Page 28 Monday, March 21, 2005 1:08 PM 28 Chapter 2: Installation 2. Plug the other end of the cord into the cigarette lighter socket of your vehicle. 3. Turn the power on and your ready to use N.I.C.E. for navigation. 1. Connect one end of the NAVSIR cable to the external I/O port on the back of the N.I.C.E. Connecting the radio receiver If you also have the NAVSIR satellite radio receiver installed, follow these steps to connect it to the N.I.C.E.
PRINT-Clarion_NICE_Guide.book Page 29 Monday, March 21, 2005 1:08 PM N.I.C.E. See the NAVSIR documentation for where to connect this cable. Note 29 Connect to a rearview camera If your vehicle is equipped with a rearview camera for backing up, connect the camera to the N.I.C.E.: NAVSIR receives power through the N.I.C.E. Reverse positive trigger Camera video input Camera connection For connecting to the reverse gear, consult a professional installer.
PRINT-Clarion_NICE_Guide.book Page 30 Monday, March 21, 2005 1:08 PM Chapter 2: Installation 30 Audio through your car stereo As the N.I.C.E. is a portable device and designed to travel with you, it comes with its own internal speaker. N.I.C.E. mounted in your car Follow these steps to activate the FM transmitter: 1. Press the onscreen mode button (F6 in navigation mode). 2. Press SETUP on the menu grid.
PRINT-Clarion_NICE_Guide.book Page 31 Monday, March 21, 2005 1:08 PM N.I.C.E. 1. The Unit displays the SETUP menu. FM frequency and internal speaker button 3. 31 Press FM Transmitter on the touch-sensitive screen. The unit displays a list of frequencies. Mode button N.I.C.E. SETUP menu 2. Press the FM Frequency and Internal Speaker button. The unit displays the FM Frequencies and Internal Speaker menu.
PRINT-Clarion_NICE_Guide.book Page 32 Monday, March 21, 2005 1:08 PM Chapter 2: Installation 32 select any frequency that is not in use by a radio station. 4. Press one of the frequencies. The unit automatically begins transmitting and returns to the SETUP menu. Note Turn this option off if you are using low level audio outputs in your particular application.
PRINT-Clarion_NICE_Guide.book Page 33 Monday, March 21, 2005 1:08 PM N.I.C.E. 3. Navigation This chapter explains how to navigate using the N.I.C.E. If this is the first time you’ve used the unit, read this chapter from beginning to end. Later, use it to refer to specific procedures. 33 include nearby buildings, high terrain, parking garages and tunnels. Satellite How global positioning works N.I.C.E.
PRINT-Clarion_NICE_Guide.book Page 34 Monday, March 21, 2005 1:08 PM Chapter 3: Navigation 34 The unit starts up in the mode that was running when you turned the power off. If this is the first time you’ve used the unit, it starts in navigation mode. Otherwise: 1. A caution screen appears. Press the NAVI button below the LCD. Navigation button OR Press the onscreen mode button, then press the onscreen NAVIGATION button. Navigation caution screen 2.
PRINT-Clarion_NICE_Guide.book Page 35 Monday, March 21, 2005 1:08 PM N.I.C.E. If the unit is within site of a satellite, the GPS automatically locates you on the map. 35 Define your destination Warning Always define your destination while parked. Do not attempt to define a destination while driving. 1. GPS signal strength indicator Current position Main navigation screen The red pointer identifies your position. Press the navigation button (F3).
PRINT-Clarion_NICE_Guide.book Page 36 Monday, March 21, 2005 1:08 PM Chapter 3: Navigation 36 The Navigation menu appears. Current location Navigation button (F3) Navigation menu The status bar, located just above the onscreen buttons at the bottom of the screen displays your current location and system status information, such as the active menu name. 2. The unit displays several ways to select a destination.
PRINT-Clarion_NICE_Guide.book Page 37 Monday, March 21, 2005 1:08 PM N.I.C.E. 3. Press one of the method options. If you scrolled down and chose Map, you can define your destination by touching the map, See “Pointing to your destination” on page 45. If you chose any of the other options, the unit prompts you to choose items from one or more lists. • Address or intersection For more on this method, continue reading the next topic.
PRINT-Clarion_NICE_Guide.book Page 38 Monday, March 21, 2005 1:08 PM Chapter 3: Navigation 38 The unit displays the names of four lists Navigating in an unfamiliar city Point of interest lets you define a destination when you don’t know its address. This method is especially useful when traveling in an unfamiliar city. It can save time and the expense of driving around when you need to find, for example, a gasoline station or a grocery store.
PRINT-Clarion_NICE_Guide.book Page 39 Monday, March 21, 2005 1:08 PM N.I.C.E. After selecting Point of interest, the unit offers five options: 1. Four of the point of interest options • State/Province Name limits all other lists (postal code, phone, and first few letters). See “Scrolling through lists” on page 41. • By Category displays a list of categories. • By Postal Code and Phone go directly to the onscreen keyboard. See “Using the onscreen keyboard” on page 42.
PRINT-Clarion_NICE_Guide.book Page 40 Monday, March 21, 2005 1:08 PM Chapter 3: Navigation 40 For State/Province Name, By Postal Code, By Phone and By First Few Letters, see “Using the onscreen keyboard” on page 42. The unit prompts you to choose how to display the locations. The following screen displays when you choose By Category. Sort point of interest locations options 4. Categories list 3. Select the type of place you’re looking for, such as a bank or ATM.
PRINT-Clarion_NICE_Guide.book Page 41 Monday, March 21, 2005 1:08 PM N.I.C.E. 41 Continue with “Traveling to your destination” on page 47. • Scroll through the menu one item at a time, using the menu’s up and down scroll buttons. Scrolling through lists • Scroll through the menu options up to four items at a time, using the onscreen multi-item scroll buttons (F2 and F4) at the bottom of the screen. There are two ways to scroll through a long list, such as the list of city names.
PRINT-Clarion_NICE_Guide.book Page 42 Monday, March 21, 2005 1:08 PM Chapter 3: Navigation 42 Using the onscreen keyboard 1. State/Province Name, City Name, Street Name, By Postal Code, By Phone, and By First Few Letters display a list. If you’re viewing a long list, such as all the streets in California, press the keyboard button (F5). The unit displays the onscreen keyboard.
PRINT-Clarion_NICE_Guide.book Page 43 Monday, March 21, 2005 1:08 PM N.I.C.E. Only keys for valid letters appear in green. The rest are grayed out. The letters you type appear in the box at the top of the keyboard. If you’ve defined your state and are entering a postal code the unit fills in the beginning digit based on the system database. This helps avoid typing errors. 5. 43 After typing one or more characters, press the accept button (check mark).
PRINT-Clarion_NICE_Guide.book Page 44 Monday, March 21, 2005 1:08 PM Chapter 3: Navigation 44 The next example is a short list of streets. When you select the street, the unit gives you the option of specifying a specific house/ building number or an intersection. Short list of streets Above this list the unit displays the address range for all the streets in the list. A quick check with the address you’re seeking should confirm that you are in the right area. 6. Press an item to select it.
PRINT-Clarion_NICE_Guide.book Page 45 Monday, March 21, 2005 1:08 PM N.I.C.E. If you choose Address, the unit displays the valid range of addresses at the top of the onscreen keyboard. 45 Pointing to your destination Rather than enter an address, you can use your finger to touch a location on the map. 1. Press the navigation button (F3) followed by Start Route Guidance, then scroll down to Map and press it.
PRINT-Clarion_NICE_Guide.book Page 46 Monday, March 21, 2005 1:08 PM Chapter 3: Navigation 46 Crosshairs appear at your current location. 3. Press the push pin button (F5). The unit displays the selected destination as a list item. 4. Press the name to confirm the location. If you started by pressing the navigation button, continue with the next topic. If you just pointed to the destination, the unit prompts you to select how to use the location.
PRINT-Clarion_NICE_Guide.book Page 47 Monday, March 21, 2005 1:08 PM N.I.C.E. 5. Press Use as Destination and continue with the next topic. Traveling to your destination Once you select a destination, N.I.C.E. calculates your route, based on any preferences you set (See “Customizing” on page 63). Route calculation progress appears on the status bar. Note The longer your journey, the longer the system takes to calculate your route.
PRINT-Clarion_NICE_Guide.book Page 48 Monday, March 21, 2005 1:08 PM Chapter 3: Navigation 48 Visually tracking your route Distance to next maneuver Next maneuver Next street to turn on located just above the buttons at the bottom of the screen. A close-up of your next maneuver displays in the upper left corner of the screen. The name of the next street to turn onto appears in the bar at the top of the screen and the distance to the next maneuver appears in the upper right corner.
PRINT-Clarion_NICE_Guide.book Page 49 Monday, March 21, 2005 1:08 PM N.I.C.E. 49 Controlling automatic recalculation Which way is up If you don’t want the unit to recalculate your route, you can turn automatic recalculation off. The top of the screen can always point north or it can point in the direction you are traveling. For example, you may know how to detour around an accident and want to just continue with the same journey after the detour.
PRINT-Clarion_NICE_Guide.book Page 50 Monday, March 21, 2005 1:08 PM Chapter 3: Navigation 50 Changing map perspective Zooming in and out N.I.C.E. offers three different map views. Pressing the zoom buttons changes the scale of the map. Scale Map button 3D perspective with clouds Press the map button to alternate among 2D, 3D and split screen views. With 3D view you can see more of the road ahead. Daytime blue sky and clouds turn to stars at night.
PRINT-Clarion_NICE_Guide.book Page 51 Monday, March 21, 2005 1:08 PM N.I.C.E. 51 Viewing an intersection close up Monitoring signal strength When you are within one mile of the next intersection, N.I.C.E.
PRINT-Clarion_NICE_Guide.book Page 52 Monday, March 21, 2005 1:08 PM Chapter 3: Navigation 52 The unit displays three options. Turn simulation on This feature activates route guidance without actually going anywhere. 1. Press the navigation button (F3). 2. Press Setup. 3. Press Navigation Preferences. 4. Scroll down and press Simulation to turn it on. The simulation icon replaces the signal strength indicator along the left edge of the screen. Navigation options menu 2. Press Cancel Route. 5.
PRINT-Clarion_NICE_Guide.book Page 53 Monday, March 21, 2005 1:08 PM N.I.C.E. If the address is not on the map, touch the map in the direction of the address as if your finger was doing the traveling. Continue touching the map until you find the location. 2. Press the push pin button (F5). The unit displays the selected location as a list item. 3. Press the name to confirm the location. 4. Press Set Vehicle Position. The red pointer moves to this position.
PRINT-Clarion_NICE_Guide.book Page 54 Monday, March 21, 2005 1:08 PM Chapter 3: Navigation 54 Backing up safely Backing up procedure If you own a van or SUV, you know how difficult it can be to maneuver into or out of a parking space. With a camera mounted at the back of your vehicle and your N.I.C.E. installed, you can back up safely. When the N.I.C.E. detects that you have put the car into reverse, it switches to rearview camera mode. Note Precautions • Always back up with care.
PRINT-Clarion_NICE_Guide.book Page 55 Monday, March 21, 2005 1:08 PM N.I.C.E. The output from the camera displays in the video window. Audio/video mode button Camera button Full-screen button 55 Updating the address book Adding addresses to the address book involves selecting an address from the N.I.C.E. database and associating a name, such as “Office,” “Grandma’s house” with that address. The only aspect of the address book that you can later edit is the name you associate with an address.
PRINT-Clarion_NICE_Guide.book Page 56 Monday, March 21, 2005 1:08 PM 56 Chapter 3: Navigation Crosshairs appear and the unit centers the point you touched on the screen. Continue touching the map until you find the location. 2. Press the push pin button (F5). The unit displays the selected location as a list item. 3. Press the name to confirm the location. 4. Press Add to Address Book. The unit displays the onscreen keyboard. 5.
PRINT-Clarion_NICE_Guide.book Page 57 Monday, March 21, 2005 1:08 PM N.I.C.E. The unit asks you to confirm the save. 2. 57 Press Edit Address Book. The unit gives you four options: Sample confirmation message The name associated with the example above is, “O I-15 SH.” 7. Press Yes to save the name or No to return to the previous menu. Adding/editing/deleting addresses 1. Press the navigation button (F3).
PRINT-Clarion_NICE_Guide.book Page 58 Monday, March 21, 2005 1:08 PM Chapter 3: Navigation 58 • Edit lets you change the name associated with an address. If you chose to edit an existing name, the unit displays a list of the addresses currently stored. • Delete removes the address from the address book. 3. Press the desired option. If you pressed Add Previous Destination, the unit displays a list of previous destinations. Currently-stored address list 4.
PRINT-Clarion_NICE_Guide.book Page 59 Monday, March 21, 2005 1:08 PM N.I.C.E. The onscreen keyboard appears, with the address name displayed near the top. 59 Press and hold the backspace button to erase the existing name, then type a name. For example, rather than use the address of our local school as the name, you could change it to “SCHOOL.” 6. Press the accept button (check mark) to save the edited name. A confirmation screen appears. 7.
PRINT-Clarion_NICE_Guide.book Page 60 Monday, March 21, 2005 1:08 PM Chapter 3: Navigation 60 Listening to the radio while navigating To listen while you navigate, press the SIRIUS button below the LCD. When minimized, only the top line appears. When maximized, two additional lines appear. Exit button Turns radio off The SIRIUS controls overlay the top of the navigation screen.
PRINT-Clarion_NICE_Guide.book Page 61 Monday, March 21, 2005 1:08 PM N.I.C.E. • To directly select a channel, press the DIRECT button followed by the channel button. • To select a preset channel, press BAND to alternate among the three bands, then press the band number. 61 The MUSIC controls overlay the top of the navigation screen. Music controls Note Navigation Voice guidance takes priority over the radio.
PRINT-Clarion_NICE_Guide.book Page 62 Monday, March 21, 2005 1:08 PM Chapter 3: Navigation 62 When minimized, only the top line appears. Traveling with N.I.C.E. Exit button Turns radio off To remove the unit from your vehicle, lift up the latch that holds the suction cup to the windshield.
PRINT-Clarion_NICE_Guide.book Page 63 Monday, March 21, 2005 1:08 PM N.I.C.E. 4. Customizing Changing screen brightness 1. This chapter explains how to customize the N.I.C.E. unit and features to suit your preferences. 63 Press the onscreen mode button followed by Setup on the menu grid. N.I.C.E.
PRINT-Clarion_NICE_Guide.book Page 64 Monday, March 21, 2005 1:08 PM Chapter 4: Customizing 64 1. The unit displays the SETUP menu. 1. The unit displays the brightness bar. LCD button Brightness arrows Setup menu 2. Press the LCD button. Brightness bar 2. Press the left and right arrows to adjust the brightness of the screen. The new setting takes effect immediately. 3. Press the LCD button again to accept the new setting.
PRINT-Clarion_NICE_Guide.book Page 65 Monday, March 21, 2005 1:08 PM N.I.C.E. Setting the speaker volume 65 The volume level displays on the status bar. You control the volume through a setup option or by using the volume up/down buttons on the radio and music default screens, and on the remote control. Each method adjusts the same volume setting. This procedure explains how to set volume using navigation setup. 1. If you’re not in navigation mode, press NAVI. 2.
PRINT-Clarion_NICE_Guide.book Page 66 Monday, March 21, 2005 1:08 PM Chapter 4: Customizing 66 4. Press and hold the Volume Up (F1) or Volume Down (F2) buttons to adjust the volume between 0 and 100 percent. Customizing navigation 5. Press the mute button (F4) to mute all sound. These general instructions work for all options. 6. Press the navigation button (F3) to return to the main navigation screen, or simply wait a few seconds and the main navigation screen appears automatically. 1.
PRINT-Clarion_NICE_Guide.book Page 67 Monday, March 21, 2005 1:08 PM N.I.C.E. The navigation menu appears. 67 The Setup menu appears. Navigation button (F3) Navigation menu 2. Multi-item scroll buttons (F2 & F4) Back button (F6) Setup menu Press Setup. 3. Press an option button. Use the multi-item scroll buttons to view additional options.
PRINT-Clarion_NICE_Guide.book Page 68 Monday, March 21, 2005 1:08 PM 68 Chapter 4: Customizing 4. Press the button to turn the feature on/off. 5. Scroll down to display additional options. 6. Press the back button (F6) to return to the Setup menu. 7. When you’re finished, press the exit button (F1). The options menu or settings appear. Maximizing space for the map To see more of the map, turn off all the indicators, icons and status bars that provide additional information. 1.
PRINT-Clarion_NICE_Guide.book Page 69 Monday, March 21, 2005 1:08 PM N.I.C.E. • Compass Icon 69 When set to Shortest Time, the unit calculates the route based on the shortest estimated travel time. This time is based on road type (for example, interstates are assumed to be faster). • Next maneuver Icon • Enlarged Intersection icon 2. Press the option to change it. 5. 3. When you’re finished, press the exit button (F1).
PRINT-Clarion_NICE_Guide.book Page 70 Monday, March 21, 2005 1:08 PM Chapter 4: Customizing 70 Press Navigation Preferences and scroll to view the following options. Changing the language 1. Press the navigation button (F3). 2. Press Setup. 3. Press Set Language. The Languages menu appears. Navigation preferences • Press the Avoid Freeway Yes/No button to display the desired setting. • Press the Toll Yes/No button to display the desired setting. 3.
PRINT-Clarion_NICE_Guide.book Page 71 Monday, March 21, 2005 1:08 PM The caution screen appears in the selected language. N.I.C.E. 71 6. When you’re finished, press the exit button (F1). Changing distance units The distance to the next maneuver appears in the upper right of the screen. The unit can report distances in miles, kilometers and meters, or miles and yards. Accept button Caution screen in French 5. Press the accept button.
PRINT-Clarion_NICE_Guide.book Page 72 Monday, March 21, 2005 1:08 PM Chapter 4: Customizing 72 The unit displays. Defining position using lists If your starting point is in a high-rise complex or large manufacturing plant where the N.I.C.E. mounted in your vehicle does not have direct access to the satellite signal, follow this or the procedure in the next topic to establish your point of origin (HOME). Units menu 4. Press the navigation button (F3), 2. Press Setup. 3.
PRINT-Clarion_NICE_Guide.book Page 73 Monday, March 21, 2005 1:08 PM N.I.C.E. If the address is not on the map, touch the map in the direction of the address as if your finger was doing the traveling. Continue touching the map until you find the location. 2. Press the push pin button (F5). The unit displays the selected location as a list item. 3. Press the name to confirm the location. 4. Press Save as HOME. 73 Turning voice guidance on and off When voice guidance is on (the default setting), N.I.
PRINT-Clarion_NICE_Guide.book Page 74 Monday, March 21, 2005 1:08 PM 74 Chapter 5: SIRIUS Satellite Radio 5. SIRIUS Satellite Radio SIRIUS satellite radio makes available over 120 channels of commercial-free entertainment for your car, home or office. Of those 120 channels, 65 provide original content. Music channels include today’s hits, R&B oldies, classical music, country, bluegrass, jazz, latin, reggae, rock and more.
PRINT-Clarion_NICE_Guide.book Page 75 Monday, March 21, 2005 1:08 PM 75 Chapter 5: SIRIUS Satellite Radio How satellite radio works Satellite SIRIUS Satellite Radio company in New York City Over 120 channels of radio content bounce off the network of satellites that encircle the earth. To take advantage of SIRIUS satellite radio, you need Clarion’s NAVSIR SIRIUS Satellite Radio interface and antenna. The interface plugs into the EXT. I/O port on the back of the N.I.C.E.
PRINT-Clarion_NICE_Guide.book Page 76 Monday, March 21, 2005 1:08 PM Chapter 5: SIRIUS Satellite Radio 76 Getting started 2. If you are in navigation mode, press SIRIUS again to open the full SIRIUS display. To listen to SIRIUS satellite radio you need two things in addition to your N.I.C.E.: • Optional NAVSIR interface installed in your vehicle. This unit receives the satellite signal. For installation instructions, see the user’s guide that comes with the NAVSIR.
PRINT-Clarion_NICE_Guide.book Page 77 Monday, March 21, 2005 1:08 PM N.I.C.E. 4. The unit displays the Menu Options page with the SIRIUS ID option highlighted. 6. 77 The 12-digit SIRIUS ID number appears. Options menu Options menu 5. Press the SIRIUS ID menu item. 7. Write this number here.
PRINT-Clarion_NICE_Guide.book Page 78 Monday, March 21, 2005 1:08 PM Chapter 5: SIRIUS Satellite Radio 78 Activate the radio service • • confirms that the antenna is in the best position to receive the satellite signal. Visit Sirius.com and click JOIN, then follow the onscreen instructions. 1. Press MENU. OR 2. The options menu appears. Call SIRIUS at 1-888-539-SIRIUS (7474). A Customer Care representative will activate your service. A subscription fee is involved.
PRINT-Clarion_NICE_Guide.book Page 79 Monday, March 21, 2005 1:08 PM N.I.C.E. The unit displays two 10-segment horizontal bar graphs with a minus (-) to the left and a plus (+) to the right. 79 Note In urban areas where structures may affect the line of sight satellite signal, terrestrial repeaters (TER) strengthen the signal. They may not be available in your geographical location. Basic Operations Antenna aiming graphs The satellite (SAT) graph displays the satellite signal strength.
PRINT-Clarion_NICE_Guide.book Page 80 Monday, March 21, 2005 1:08 PM 80 Chapter 5: SIRIUS Satellite Radio The SIRIUS logo appears for three seconds followed by the SIRIUS default display. 3. Press the onscreen channel previous and next buttons to move to the next channel. The channel starts playing. Definition A channel is a source of satellite radio content.
PRINT-Clarion_NICE_Guide.book Page 81 Monday, March 21, 2005 1:08 PM N.I.C.E. 81 Tuning by category Previewing by category Category groups channels by music genre or other content. For example, your favorite rock channels are in the category “ROCK.” This procedure lets you view by category what’s currently playing on other channels without changing the current channel. 1. Press the onscreen previous and next category buttons to select a category. 1. 2.
PRINT-Clarion_NICE_Guide.book Page 82 Monday, March 21, 2005 1:08 PM Chapter 5: SIRIUS Satellite Radio 82 2. Press DISP (display). 3. Touching DISP again and again alternates the list among channel, artist name and song title 3. Press the channel name on the touch-sensitive screen to select it. The channel begins playing and the LCD returns to the default display.
PRINT-Clarion_NICE_Guide.book Page 83 Monday, March 21, 2005 1:08 PM N.I.C.E. 3. With the channel playing, press and hold any of the numbered keypad buttons (0-9) for one second. The channel number flashes and remains lit to indicate that the unit stored the channel number. The current channel number replaces any previously stored channel associated with that number. Direct tuning by band and preset 1. Press BAND briefly and again briefly to switch among the three bands: A, B, and C.
PRINT-Clarion_NICE_Guide.book Page 84 Monday, March 21, 2005 1:08 PM Chapter 5: SIRIUS Satellite Radio 84 Tuning by preset list Searching for favorites 1. Press and hold BAND. 2. Press DISP. When you turn N.I.C.E. on, it can automatically search the incoming SIRIUS signal and alert you when a favorite song is playing. Then it’s up to you to switch from your current channel to the channel playing your favorite. The unit displays up to five preset channels. 3.
PRINT-Clarion_NICE_Guide.book Page 85 Monday, March 21, 2005 1:08 PM N.I.C.E. the 20 memory slots are used and how many are empty. Finding favorites If it finds one or more songs playing on channels other than the current channel, the N.I.C.E. beeps and displays “Memory Alert” for two seconds followed by the list of favorites that are currently playing appears. Press the name of the song on the touch-sensitive screen to select the channel. 85 The unit displays the stored information, one item at a time.
PRINT-Clarion_NICE_Guide.book Page 86 Monday, March 21, 2005 1:08 PM Chapter 5: SIRIUS Satellite Radio 86 The unit displays two options: Automatic Memory Search and Clear All Memory. Parental control features You may restrict young people from accessing specific channels in two ways: • Skip specific channels when tuning. Use this feature to completely omit specific channels, which the SIRIUS receiver does not even download from the satellite. For instructions, continue with the next topic.
PRINT-Clarion_NICE_Guide.book Page 87 Monday, March 21, 2005 1:08 PM N.I.C.E. Skipping channels With hundreds of channels available, you may wish to limit the accessible list to only those you like. 1. Press the onscreen MENU button. 2. The options menu appears. 3. Press the ADD or SKIP onscreen menu item. 4. Press the onscreen previous and next channel buttons to display the channel selections.
PRINT-Clarion_NICE_Guide.book Page 88 Monday, March 21, 2005 1:08 PM 88 Chapter 5: SIRIUS Satellite Radio The unit displays “Skip” next to the channel number and will not download this channel during regular tuning. Accessing skipped channels There are only two ways to access skipped channels: • Enter the channel number directly. See “Direct tuning by channel” on page 80. • Use the Add option to restore the channel. Restoring a skipped channel 1. Press the onscreen MENU button. 2.
PRINT-Clarion_NICE_Guide.book Page 89 Monday, March 21, 2005 1:08 PM N.I.C.E. Locking out certain channels 89 The options menu appears Locking a channel requires the entry of the four-digit lock code to play the channel. You can use this feature to prevent unauthorized people, such as children, from accessing specific channels. Locking a channel When you select this option, the unit prompts you to define a four-digit lock code. 1. Press the onscreen MENU button. Options menu 2.
PRINT-Clarion_NICE_Guide.book Page 90 Monday, March 21, 2005 1:08 PM 90 3. Chapter 5: SIRIUS Satellite Radio If this is the first time you’ve used this feature, enter the default code “0000.” 5. Press the channel number on the touchsensitive screen to lock the channel. If you’ve used this feature before, enter your unique four-digit code. To change this code, see “Changing the lock code” on page 92. The unit displays a channel list with the current channel highlighted. 4.
PRINT-Clarion_NICE_Guide.book Page 91 Monday, March 21, 2005 1:08 PM N.I.C.E. 91 Accessing locked channels Restoring a locked channel To access a locked channel: When you select this option: 1. Enter the direct channel number. 1. Press the onscreen MEMO button. 2. Enter the four-digit lock code. 2. Press Lock Options on the touch-sensitive screen. The channel begins to play. The unit displays the lock code entry box.
PRINT-Clarion_NICE_Guide.book Page 92 Monday, March 21, 2005 1:08 PM Chapter 5: SIRIUS Satellite Radio 92 Changing the lock code 1. The unit displays the lock code entry box. Press the onscreen MENU button. The options menu appears. Edit code entry box 3. Options menu 2. Press the EDIT CODE menu item. Enter the four-digit code or “0000” if this is the first time you’re setting the code. The New Code prompt appears.
PRINT-Clarion_NICE_Guide.book Page 93 Monday, March 21, 2005 1:08 PM N.I.C.E. 4. 93 The options menu appears. Enter the new four-digit code using the keypad buttons. The unit prompts you to confirm the code. 5. Enter the new four-digit code again. You have changed the lock code. To exit without setting this option, press Enter or MENU again. Resetting factory defaults To return the unit to the configuration it had when you purchased it: 1. Press MENU. Options menu 2.
PRINT-Clarion_NICE_Guide.book Page 94 Monday, March 21, 2005 1:08 PM Chapter 5: SIRIUS Satellite Radio 94 The unit displays: Restore setting options 3. Press YES. All SIRIUS option settings return to their factory defaults.
PRINT-Clarion_NICE_Guide.book Page 95 Monday, March 21, 2005 1:08 PM N.I.C.E. 6. Music modes 95 Portable music storage This chapter provides guidelines for using the N.I.C.E. in video and music mode. Playing music You can play music stored on the unit’s hard disk or on a portable memory storage device connected to the USB 1.1 port. For information about how to download music (and photos) from your PC to the N.I.C.E., see “Copying files” on page 103. USB 1.
PRINT-Clarion_NICE_Guide.book Page 96 Monday, March 21, 2005 1:08 PM Chapter 6: Music modes 96 If the portable memory storage device has an extension cable, connect the cable. Power to the N.I.C.E. may be on or off when you connect the device. 2. The music default screen appears and the last song you were listening to begins to play. Portable memory storage button Song title Music mode button Folder button If the power to the unit is off, turn it on.
PRINT-Clarion_NICE_Guide.book Page 97 Monday, March 21, 2005 1:08 PM N.I.C.E. 3. To change the song, press the title of a different song in the right pane. 5. 97 Press the music mode to alternate among these options: OR Music mode button To play a song in a different folder, press the folder button. Repeat all songs in one folder. OR To play a song stored on an portable memory storage device, press the portable memory storage button. Note Only MP3 files can be played while navigating. 4.
PRINT-Clarion_NICE_Guide.book Page 98 Monday, March 21, 2005 1:08 PM Chapter 7: Video mode 98 7. Video mode This chapter provides guidelines for using the N.I.C.E. in video and photo modes. Video options N.I.C.E. includes several video options: • Backup view If your vehicle is equipped with a rearview camera, output from the camera displays in the N.I.C.E. video window. For more information, see “Backing up safely” on page 54.
PRINT-Clarion_NICE_Guide.book Page 99 Monday, March 21, 2005 1:08 PM N.I.C.E. Connect to the player 99 Press the onscreen mode button and then press VIDEO. Plug the DVD player or video game system cable into the A/V IN port on the back of the unit. The unit displays the video window. DVD/Video game mode Camera button Exit Full-screen mode A/V IN por t Video cable A/V IN connection Video screen Viewing a movie or playing a game 1. Press VIDEO at the bottom of the screen. OR 2.
PRINT-Clarion_NICE_Guide.book Page 100 Monday, March 21, 2005 1:08 PM 100 Chapter 7: Video mode The image displays on the screen. 3. Press the full-screen mode button to stretch the video input to fill the screen. Backing up with the camera 1. Press the VIDEO button below the LCD. OR Press the onscreen mode button and press VIDEO. 2. Press the camera button. The image appears in the video window. 3. Press the full-screen button to stretch the rearview camera image to fill the screen.
PRINT-Clarion_NICE_Guide.book Page 101 Monday, March 21, 2005 1:08 PM Photo storage N.I.C.E. 101 1. If the photos are stored on a memory stick insert the stick directly into the USB 1.1 port on the back of the unit. Power to the N.I.C.E. may be on or off when you connect a portable memory storage device. If the portable memory storage device has an extension cable, connect the cable. If the photos are on your computer, see “Copying files” on page 103 for how to copy them from the PC to the N.I.C.E.
PRINT-Clarion_NICE_Guide.book Page 102 Monday, March 21, 2005 1:08 PM Chapter 7: Video mode 102 The unit displays the photo default screen. 2. Portable memory storage device button Full-screen mode button Previous/next slide Exit Start slide show To select digital images on a portable memory storage device, press the portable memory storage device button. 3. To expand the image to fill the screen, press the full-screen mode button. 4. Press the Start-slide-show button to start the show. 5.
PRINT-Clarion_NICE_Guide.book Page 103 Monday, March 21, 2005 1:08 PM N.I.C.E. 8. Care and updating This chapter covers cleaning the unit, updating the map database, uploading music and photos from a PC to the N.I.C.E., updating the unit’s firmware, and troubleshooting. Cleaning the unit To remove dust, gently wipe the unit with a damp, soft, clean cloth. 103 Updating the map database Clarion continuously publishes new map databases on DVD.
PRINT-Clarion_NICE_Guide.book Page 104 Monday, March 21, 2005 1:08 PM 104 Chapter 8: Care and updating Removing the unit 1. If you have a laptop computer you may be able to transfer files without removing the N.I.C.E. from your vehicle. Otherwise, lift the latch that holds the suction cup to the windshield to remove the N.I.C.E. from your vehicle. Latch Locating the latch 2. Carry the N.I.C.E. to the PC.
PRINT-Clarion_NICE_Guide.book Page 105 Monday, March 21, 2005 1:08 PM N.I.C.E. Connecting to your PC 2. You connect your N.I.C.E. to a PC using a standard USB 2.0 cable. Most computers come with this cable or you can purchase one at your computer store. 1. 105 Connect one end of a standard USB cable to the USB 2.0 port on the N.I.C.E. Make sure power to both the PC and the N.I.C.E. is turned off. USB 2.0 port * * Cable not included USB 2.0 connection 3.
PRINT-Clarion_NICE_Guide.book Page 106 Monday, March 21, 2005 1:08 PM 106 4. Chapter 8: Care and updating Therefore, the drive letter you see may be different from the one in the following example. Turn on power to both the PC and the N.I.C.E. Copying files 1. If you’re updating the map database, insert the DVD with the new database in the DVD drive on the PC. 2. On the PC, open My Computer or Windows Explorer. N.I.C.E. as drive Consult your Windows manual if you need help.
PRINT-Clarion_NICE_Guide.book Page 107 Monday, March 21, 2005 1:08 PM N.I.C.E. The N.I.C.E. folder opens, displaying the default Map, Music and Photo folders. 4. 107 Double-click one of the folders, Map, Music or Photos in the N.I.C.E. window to open it. If you’re copying from the PC to the N.I.C.E., this is the destination folder. If you’re copying from the N.I.C.E. to the PC, this is the source folder. PC Drag and drop N.I.C.E.
PRINT-Clarion_NICE_Guide.book Page 108 Monday, March 21, 2005 1:08 PM 108 Chapter 8: Care and updating Hold CTRL and press A to select all files in the list. If you’re copying from the PC to the N.I.C.E., this is the source folder. If you’re copying from the N.I.C.E. to the PC, this is the destination folder. 7. Arrange the two windows on the PC desktop so that you can see the contents of both the source and destination folders. 8. In the source folder, select the files to copy.
PRINT-Clarion_NICE_Guide.book Page 109 Monday, March 21, 2005 1:08 PM N.I.C.E. A Copying message may appear, depending on the PC’s operating system and processor speed. 109 When the copy is finished, the files appear in the selected Music or Photo folder on the N.I.C.E. Sample Copying message Sample Music folder after copying files Disconnecting from the PC 1. Turn off power to the N.I.C.E. and shut down the PC. 2. Unplug the USB cable from both the N.I.C.E. and the PC.
PRINT-Clarion_NICE_Guide.book Page 110 Monday, March 21, 2005 1:08 PM 110 Chapter 8: Care and updating Deleting photo and music files 1. Follow the steps in “Connecting to your PC” on page 105. 2. On the PC, open My Computer or Windows Explorer. Caution Do not delete the Map folder, as it contains all of the maps used for navigation. 5. Consult your Windows manual if you need help. Hold CTRL and click individual file names to select them.
PRINT-Clarion_NICE_Guide.book Page 111 Monday, March 21, 2005 1:08 PM N.I.C.E. 7. Click Yes to delete the files, or No if you’re not sure. After pressing Yes, the files are deleted from the N.I.C.E. Updating the firmware From time to time Clarion upgrades the N.I.C.E. firmware. Definition Note The N.I.C.E. does not maintain a Recycle bin from which you can retrieve files you may have deleted by mistake. Once you delete files, they are gone.
PRINT-Clarion_NICE_Guide.book Page 112 Monday, March 21, 2005 1:08 PM Chapter 8: Care and updating 112 The unit displays the SETUP menu. 4. Update software button The unit displays the current Operating System (OS) version and searches for any upgrades. LCD adjustment button FM transmitter button Setup menu Press the update software button. 5. Follow the instructions on the screen.
PRINT-Clarion_NICE_Guide.book Page 113 Monday, March 21, 2005 1:08 PM N.I.C.E. 113 Troubleshooting Description N.I.C.E. does not turn on. Probable Cause The power cable may not be properly connected. Remedy Check power cable and fuse. The fuse may be blown. GPS signal strength is weak In some applications/installations, GPS signal may be difficult to receive. Position the built-in GPS antenna to a better angle for signal reception. To locate the antenna, see “Back view” on page 11.
PRINT-Clarion_NICE_Guide.book Page 114 Monday, March 21, 2005 1:08 PM Chapter 8: Care and updating 114 Description Probable Cause Remedy The GPS signal was lost while en route. The unit’s line of sight to the GPS satellite has been obstructed, such as by entering a tunnel or parking garage. Check the signal strength meter. If the signal does not return, you can manually set the vehicle position. For more information, see “Defining position using lists” on page 72 The LCD displays, “Check antenna”.
PRINT-Clarion_NICE_Guide.book Page 115 Monday, March 21, 2005 1:08 PM N.I.C.E. Description You hear no sound from the unit’s internal speaker. You hear no sound from your car stereo speakers N.I.C.E. displays an “abort” message 115 Probable Cause Remedy The speaker may be turned off or 1. redirected to the stereo speakers in your car or home. Press the NAVI button; press Setup, Navigation Preferences. 2. Scroll to Voice Guidance and press the button to change the setting from Off to On. 3.
PRINT-Clarion_NICE_Guide.book Page 116 Monday, March 21, 2005 1:08 PM Chapter 8: Care and updating 116 Description When trying to update firmware, the unit displays, “OS Update File can’t be found” Probable Cause Remedy To update, you need the update Double-check all connections. software on portable memory storage in the USB 1.1 (Host) port. See “Updating the firmware” on page 111.
PRINT-Clarion_NICE_Guide.book Page 117 Monday, March 21, 2005 1:08 PM N.I.C.E. 9. Reference 117 Mode grid This button appears onscreen in all modes. Modes You select operational modes by pressing either physical or onscreen buttons. Mode buttons These buttons appear below the LCD. Pressing it displays a grid of menu options. Enters navigation mode; used for navigation. For navigation options, see“Setup reference” on page 129. Selects navigation mode. Selects SIRIUS Satellite radio mode.
PRINT-Clarion_NICE_Guide.book Page 118 Monday, March 21, 2005 1:08 PM 118 Chapter 9: Reference Enters photo viewing mode; used to view photos stored on the N.I.C.E. For photo options, see “Photo reference” on page 128. Enters video mode; used to back up vehicles equipped with a rearview camera and to view DVD movies or play video games. For video options, see “Video reference” on page 129. Enters setup mode; used to select FM transmitter frequency, set LCD brightness, and upgrade software.
PRINT-Clarion_NICE_Guide.book Page 119 Monday, March 21, 2005 1:08 PM N.I.C.E. Navigation button (F3), starts navigation and accesses navigation setup options. Pointer button (F3) centers the map at the current location. Scroll down (forward) button (F4), displays next options four at a time. Mute button (F4), turns all sound off. Map button (F4), changes map perspective. Push pin button (F5), selects the point on the map marked by the crosshairs when defining a location with your finger.
PRINT-Clarion_NICE_Guide.book Page 120 Monday, March 21, 2005 1:08 PM 120 Chapter 9: Reference Start Route Guidance To access these options, press the navigation button (F3). Address/Intersection Defines specific address or intersection to which you’re headed (your destination). State/Province Name: selects the location state or province. Use this option if the destination is in a different state or province than the one in which you are located.
PRINT-Clarion_NICE_Guide.book Page 121 Monday, March 21, 2005 1:08 PM N.I.C.E. If you choose Address, the unit displays the onscreen keyboard so you can enter the address. The top of the screen displays the address range. Point of Interest Defines a public location, such as a bank or hospital, as your location. State/Province Name: selects the state or province in which the point of interest is located.
PRINT-Clarion_NICE_Guide.book Page 122 Monday, March 21, 2005 1:08 PM 122 Chapter 9: Reference Previous Destination Add Current Location Selects a location based on the last 15 destinations. Adds your current destination to the address book. Map Edit- Selects a destination by pinpointing it on the touchscreen. When using this feature F3 becomes the pointer button and F5 the push pin button.
PRINT-Clarion_NICE_Guide.book Page 123 Monday, March 21, 2005 1:08 PM N.I.C.E. Navigation Preferences Simulation On: used to preview and demonstrate how route guidance works. Off: default setting. Shortest Time: calculates route based on road type. Interstates are assumed to offer the quickest route. Distance: calculates route based on shortest distance as the crow flies. Avoid Freeway Yes: calculates route without taking you on a freeway or interstate. No: calculates route based on Shortest setting.
PRINT-Clarion_NICE_Guide.book Page 124 Monday, March 21, 2005 1:08 PM Chapter 9: Reference 124 GPS Icon Display On: turns display of the GPS indicator on. Off: turns display of the GPS indicator off. See “Monitoring signal strength” on page 51 for examples of the three versions that indicate strong, weak and no satellite signal. Status Bar Display, Scale Icon Display, Compass Icon Display, Next Maneuver, Enlarged Intersection On: turns display of indicator on. Off: turns display of indicator off.
PRINT-Clarion_NICE_Guide.book Page 125 Monday, March 21, 2005 1:08 PM N.I.C.E. Set Vehicle Position Address/Intersection: moves the red pointer to a specific location defined by the address that follows. As you enter the address, N.I.C.E. prompts with possibilities to speed entry. For an explanation of these options, see “Address/Intersection” on page 120. Point of Interest: moves the red pointer to a special public place, such as an airport, grocery store, hospital, etc.
PRINT-Clarion_NICE_Guide.book Page 126 Monday, March 21, 2005 1:08 PM 126 Chapter 9: Reference SIRIUS satellite radio reference 1. To access the satellite radio options, press the onscreen MENU button. The Menu options list appears on the left side of the screen. 2. Press the option name in the menu. The option settings appear to the right of the menu. 3. Press the setting button. If, while on the Menu Options, you don’t actually set any option for 10 seconds, the menu closes.
PRINT-Clarion_NICE_Guide.book Page 127 Monday, March 21, 2005 1:08 PM N.I.C.E. 127 EDIT CODE Memory Option This option associates a four-digit code with a specific channel requiring you to enter that code to hear the channel. See “Changing the lock code” on page 92 for more information. This option lets you control the automatic memory search function and clear all memory slots. Clear all Memory: clears all favorite artist and song title combinations you previously stored.
PRINT-Clarion_NICE_Guide.book Page 128 Monday, March 21, 2005 1:08 PM Chapter 9: Reference 128 Music reference Photo reference Portable memory storage device button, displays folders on the device connected to the USB 1.1 port. Folder button, displays folders on the N.I.C.E. Portable memory storage device button, displays folders on the device connected to the USB 1.1 port. Enlarges image to fit screen. Music mode button, alternates among repeat, play folder in order, and random among all songs.
PRINT-Clarion_NICE_Guide.book Page 129 Monday, March 21, 2005 1:08 PM N.I.C.E. Video reference Enlarges image to fit screen. Displays image from DVD or video game. Displays input from rearview camera. 129 Setup reference To access these options, press the mode button (F3), then press the SETUP cube on the menu grid. FM Transmitter button, redirects audio output from the speakers in the N.I.C.E. to the speakers in your car using a wireless connection.
PRINT-Clarion_NICE_Guide.book Page 130 Monday, March 21, 2005 1:08 PM 130 Chapter 9: Reference Specifications Dimensions (W x H x D): Operating system Embedded processor Memory Power source Map database Temperature Liquid crystal dIsplay (LCD) 191mm x 128mm x 31mm Windows CE version 4.
PRINT-Clarion_NICE_Guide.book Page 131 Monday, March 21, 2005 1:08 PM N.I.C.E.
PRINT-Clarion_NICE_Guide.
PRINT-Clarion_NICE_Guide.book Page 133 Monday, March 21, 2005 1:08 PM N.I.C.E.
PRINT-Clarion_NICE_Guide.
PRINT-Clarion_NICE_Guide.book Page 135 Monday, March 21, 2005 1:08 PM N.I.C.E. F G F1-F6 buttons 10 Factory defaults, restoring for radio 93, 127 FAQ 23 Favorites (radio) deleting 85 finding 85 Favorites, storing radio favorites 84 Firmware upgrade button 129 upgrading 111 Flash card/drive 95 FM transmitter 30 button 129 Folder button, music 18, 128 Formats for photos 98 music 95, 98 Freeways, avoiding 23, 69 Front view (of N.I.C.E.
PRINT-Clarion_NICE_Guide.
PRINT-Clarion_NICE_Guide.book Page 137 Monday, March 21, 2005 1:08 PM N.I.C.E.
PRINT-Clarion_NICE_Guide.book Page 138 Monday, March 21, 2005 1:08 PM 138 mode button 18, 97, 128 player controls 18 player, main screen 18 playing 95 playing while navigating 61, 97 storage 95 MUSIC button 117 Mute button (F4) 119 button, remote control 22 N N.I.C.E.
PRINT-Clarion_NICE_Guide.book Page 139 Monday, March 21, 2005 1:08 PM N.I.C.E.
PRINT-Clarion_NICE_Guide.
PRINT-Clarion_NICE_Guide.book Page 141 Monday, March 21, 2005 1:08 PM N.I.C.E.
PRINT-Clarion_NICE_Guide.
PRINT-Clarion_NICE_Guide.book Page 143 Monday, March 21, 2005 1:08 PM N.I.C.E. Stereo, routing audio to vehicle 30 Stopping navigation 51 Storage for music 95, 98 for photos 101 for video 101 Street Name 120 Subscription, radio 76 System diagnostics 125 Information 125 T Temperature specifications 130 TER (radio) 79, 127 Toll roads 123 avoiding 23, 69 Trip canceling 51 previewing 52 see also route starting 33 Troubleshooting 113 Tuning by preset 83 the radio 79 U Unit N.I.C.E.
PRINT-Clarion_NICE_Guide.
PRINT-Clarion_NICE_Guide.book Page 145 Monday, March 21, 2005 1:08 PM N.I.C.E. 1. Limited Warranty Information For USA and Canada only This product is warranted against all defects in material workmanship for a period of one year from the date of original purchase. Clarion ProAudio products, except for speakers, are covered by a two year limited warranty when installed by an authorized Clarion dealer.
PRINT-Clarion_NICE_Guide.book Page 146 Monday, March 21, 2005 1:08 PM 146 User’s Guide © 2005 SIRIUS Satellite Radio Inc. “SIRIUS” and the SIRIUS dog logo are registered trademarks of SIRIUS Satellite Radio Inc.