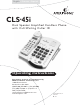
English • Francais • Español CLS•45i Dual Speaker Amplified Cordless Phone with Call-Waiting Caller ID Operating Instructions Ameriphone products are manufactured by Walker, a Division of Plantronics, Inc. 12082 Western Avenue Garden Grove, CA 92841 VOICE (800) 874-3005 or (714) 897-0808 TTY (800) 772-2889 or (714) 897-1111 FAX (714) 897-4703 email: ameriphonecs@plantronics.com www.ameriphone.com © 2003 Plantronics, Inc. 76513.
Important Safety Instructions When using your telephone equipment, basic safety precautions should always be followed to reduce the risk of fire, electric shock and injury to persons including the following: 1. Read and understand all instructions. 2. Follow all warnings and instructions marked on the telephone. 3. Do not use this telephone near a bathtub, wash basin, kitchen sink or laundry tub, in a wet basement, near a swimming pool or anywhere else where there is water. 4.
instructions. Adjust only those controls that are covered by the operating instructions. Improper adjustment may require extensive work by a qualified technician to restore the telephone to normal operation. E. If the telephone has been dropped or the case has been damaged. F. If the telephone exhibits a distinct change in performance. 15. Never install telephone wiring during a lightning storm. 16. Never install telephone jacks in wet locations unless the jack is specifically designed for wet locations.
Safety Instructions (continued) Safety Instructions For Batteries should be made by an authorized Canadian maintenance facility designated by the supplier. Any repairs or alterations made by the user to this equipment, or equipment malfunctions, may give the telecommunications company cause to request the user disconnect the equipment. Risk of explosion if battery is replaced by an incorrect type. Dispose of used battery according to the instructions.
Contents Important Safety Instructions ______________ ii Deleting Selected Caller ID Information . . . . . . . . . . . . . . . . . Deleting All Caller ID Information Saving Caller ID Information To Memory . . . . . . . . . . . . . . . . . . . Receiving Call Waiting Caller ID . Additional Safety Notes for Canadian Users . . . . . . . . . . . . . . iii Safety Instructions for Batteries . . iv For Your Information _____ 2 20 21 20 21 Speed Dial and Memory Functions ______ 22 Warranty Service . . . . . .
For Your Information Thank you for selecting the CLS45i Dual-speaker Amplified Cordless Telephone from Ameriphone. These operating instructions and quick-reference guide provide the information you need for safe, efficient use of the CLS45i. Read this document thoroughly before using your telephone and keep it nearby for easy reference. Warranty Service Your telephone is designed to provide years of quality service.
About your new CLS45i The CLS45i is the flagship of the Ameriphone® product line. It has been custom-engineered with an unprecedented array of features to provide years of convenience and assistance. It is powered by the latest technology yet thoughtfully designed for ease-of-use, especially for people who have trouble hearing on the telephone. The CLS45i is a Dual-Speaker Amplified Cordless Telephone with 2.4GHz technology for greatly increased power and extended operating range.
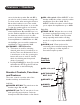
Features – Handset The CLS45i has an extensive array of features. Included among them are: • Amplification up to 40 dB • Hands-free Communication • Caller ID (if subscribed) • Intercom • Memory Dialing • Speakers for Three-way conference calling and call waiting (if subscribed) • Portability within a given area For added convenience and ease of use, there is a tactile nub on the #5 dialing key and tactile symbols on the memory and function keys on the base.
Features – Handset The following controls and indicators are on the face of the handset. the cradle, by pressing TALK. b. To insert pauses into numbers: When storing numbers into memory, press REDIAL to insert pauses when necessary, such as when entering a sequence of numbers (calling card or credit card number).You may also be asked to provide information for identification or validation purposes when making telephone transactions, such as with a bank or other merchant.
Features – Handset VOL slide switch. When AMPLIFY on the turns the handset speaker On and Off. It can also be used to answer incoming calls. For best results, after turning this function On and the handset is out of the cradle, place the handset face down or on its side so that the speaker grille is not blocked. AMPLIFY button. This button turns the extra amplification On and Off. Press it to put the handset amplifer into the On mode for maximum volume boost.
Features – Handset HEADSET jack. 2.5mm jack to allow the RING FLASHER. This red light, located on the top right back corner of the handset, flashes when your telephone is ringing. NEW CALL / IN USE indicator. Located at the top right-front corner of the earpiece, it flashes to let you know you have a new call or to indicate that the handset is in use. use of a headset Your handset, when connected to a headset (not included) will provide you with hands-free communication.
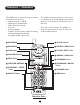
Features – Base POWER (also Low Battery) indicator (red/green) IN USE light (green) CHARGE indicator (red) Base Faceplate SPEAKER GRILLE ANTENNA MEMORY KEYPAD PROG buttons buttons button INTERCOM (and Page) button FLASH button REDIAL button SPEAKER MUTE VISUAL RINGER SPEAKER VOL slide control PHONE NUMBER DIRECTORY 8 button button
Features – Base Features and controls on the faceplate (top) of the base. when storing numbers. It lets you program numbers up to 32 digits. See additional description on page 5. SPEAKER button. Backlit button lights up when Speaker is turned On. Press it and it provides hands-free communication with adjustable volume. Note: In Speaker mode, only one party at a time can be heard. It is best that you wait until the other party is finished speaking before you speak.
Features – Base RING TONE. Slide to set ringer tone to “L” (low) or “H” (high). RINGER. Slide to set ringer loudness to “OFF”, “L” (low), “M” (medium) or “H” (high). EXT SPK OUT (Audio) jack. This 3.5 mm jack is compatible with Personal Computer speakers and assistive listening devices such as a neckloop and cochlear implant. See page 7 (handset). Controls on the right side. AMPLIFIER OFF ON. This switch determines the initial state of the amplification on the handset.
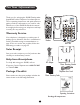
Installing and Using Your CLS45i There are six (6) steps involved in setting up your CLS45i. 1. Install included battery pack into handset. 2. (Optional) Insert four AA alkaline batteries (for backup in case of AC power outage) into base. 3. Decide if you want the telephone to sit on a desk/tabletop or hang on the wall (if on the wall, follow Instructions for Wall Mounting) 4. Plug the telephone line cord into the phone base and telephone wall jack 5.
Installing and Using Your CLS45i Monitoring the Level of the Backup Batteries in the Base approximately two (2) minutes. Place the handset in the base to recharge the battery. Chart 1 below indicates how to read the lights and indicators on the base to determine the status of the batteries and AC power. To maximize the battery charge, place the handset back into the cradle when not in use and each night.
Installing and Using Your CLS45i CAUTION: Place the telephone and power cords where they will not interfere with movement, be damaged or create a fire or other electrical hazard. Wall Mounting You may want to mount the base of your CLS45i on a wall. 1. Turn the phone over so that the bottom is facing you. 2. Attach the phone mounting bracket to the bottom of your phone base as shown in illustration by first inserting the tabs of the bracket into the slots on the phone base.
Installing and Using Your CLS45i Setting Up Caller ID 4. Press UP (▲) or DOWN (▼) to change the level. 5. Press INTERCOM to select your preference. 6. Press UP (▲) or DOWN (▼) to go to the next menu. The Caller ID SETUP procedure begins only after the handset is fully charged. Enter SETUP Mode NOTE: In SETUP, if there is no input within 30 seconds, the program will default to the last selection in that mode (e.g., Language) and the CLS45i will return to Standby.
Installing and Using Your CLS45i minute digits are set, AM/PM will flash. 11. Press UP (▲) or DOWN (▼) to for either AM or PM. 12.Press INTERCOM once to select. After AM or PM is selected, the time/date digits will be blanked. 13.Press INTERCOM once to display the time/date again. Or, press UP (▲) or DOWN (▼) to go to the next menu. NOTE: With Auto-Talk Off, picking up the handset from the cradle does not answer the call.You will need to press TALK or SPEAKER to answer the call. 1.
Installing and Using Your CLS45i Press INTERCOM to confirm.When the area code is confirmed, the entered digits move to the far left and change from flashing to steady On. Press UP (▲) or DOWN (▼) to go to the next menu. To set up your CLS45i again, press CHANNEL and hold it down for three seconds in the Standby mode.You will again enter the SETUP mode. PLACING CALLS FROM THE BASE WITH THE HANDSET EITHER IN OR OUT OF THE CRADLE (USING THE BASE AS A SPEAKERPHONE) 1. Press SPEAKER 2.
Installing and Using Your CLS45i will flash on both the base and handset. Note that when the handset is in the cradle, only the base will ring. 1. Lift the handset to begin your conversation. a. If Auto-Talk is On, do not press the TALK key. b. If Auto-Talk is Off, you will need to press the TALK key. 2. To end your conversation, press TALK or place the handset back in the cradle.
Installing and Using Your CLS45i Handset Tone Control three-way call between the handset, base and a third party on another telephone line. To adjust the frequency of the incoming sounds to the level that gives you the greatest clarity, simply slide the TONE Control switch to LO or HI. Paging and Talking to the Handset from the Base Press INTERCOM on the base and the handset beeps for 15 seconds. If you press and hold INTERCOM, it beeps for 60 seconds.
Caller ID Functions Reviewing Caller ID Information Placing a Call from Caller ID Information Each incoming call is stored using up to12 characters for the name and up to 16 digits for the number. When reviewing the Caller ID List, press CALLER ID to dial the number with the handset in handset mode. Pressing CALLER ID twice adds a “1” before the dialing digits. When you place calls using Caller ID information, you have 4 dialing options: 1.
Caller ID Functions Deleting Selected Caller ID Information Saving Caller ID Information to Memory 1. While reviewing the Caller ID, press DELETE to delete the displayed caller information.The display flashes “ERASE ?” 2. Press INTERCOM to select.The display briefly reads “CID ERASED.” The next Caller ID entry appears automatically or the display reads, “- NO CALLS -” if the list is empty. 1. While reviewing Caller ID, press MEM button.The display reads “SAVE TO” and “MEMO?” 2. Press INTERCOM to select.
Caller ID Functions Receiving Call Waiting / Caller ID Calls Unknown Call If a call is from another country or caller’s number is not available,“UNKNOWN NUMBER” is displayed. It will be stored in Caller ID log. When you are on an existing call, you will hear a beep.The display shows incoming call waiting caller ID information. 1. To answer the incoming Call Waiting call, press FLASH.The original call will be placed on Hold and you will be connected to the incoming caller.
Speed Dial and Memory Functions Storing Numbers in Memory “A,” “B,” and “C”). The CLS45i stores 17 telephone numbers in memory: 10 on the handset and 7 on the base. Note: When storing numbers in either the base or handset memory buttons, it’s a good idea to make a record of where you stored them.There is no other means for checking to see in which key you have stored a number. To create the name you would:.
Speed Dial and Memory Functions Storing Numbers in the Base Memory Buttons Starting with the TALK or SPEAKER Button: 1. In standby mode, press TALK or SPEAKER to open the line. 2. Press MEM and the desired memory key location (0 through 9).The number is dialed automatically. The memory buttons for the base are M1 through M4 and ER5 through ER7. 1. Press PROG. 2. Dial the number to be programmed (up to 16 digits). 3. Press PROG. 4. Press one of the memory buttons (M1 through M4, ER5 through ER7).
Speed Dial and Memory Functions 3. Press UP (▲) or DOWN (▼) to review the previous or next location. 4. Press “DOWN (▼). At the end of the memory the display shows “- -” in the top right corner plus the words, “END OF RECORD.” Note:You can retrieve the call again by pressing TALK or SPEAKER. Transferring Calls from the Base to the Handset The base must be in SPEAKERPHONE mode (SPEAKER button must be On.). Press FLASH once to return the handset to stand-by mode. Or, Press MEM again to add a memory entry.
Troubleshooting Received signal filters or fades? For your convenience, we have listed some common problems that may occur with cordless phones, followed by a list of items that should be checked. Check to ensure: • Battery pack in HANDSET is fully charged • HANDSET is not too far from the BASE • ANTENNA on BASE is raised Telephone does not work? Interference on reception? Check to ensure: • Base is plugged into POWER SOURCE. • Handset is CHARGED.
Regulatory Compliance Important Information for Customers Part 68 of FCC Rules Information company. For products approved after July 23, 2001, the REN for this product is part of the product identifier that has the format US:AAAEQ##TXXXX.The digits represented by ## are the REN without a decimal point (e.g., 03 is a REN of 0.3). For earlier products, the REN is separately shown on the label. This CLS45i complies with Part 68 of the FCC rules and the requirements adopted by the ACTA.
Customer-Owned Coin/Credit Card Phones disconnect the equipment until the problem is resolved. To comply with state tariffs, the telephone company must be given notification prior to connection. In some states, the state public utility commission, public service commission or corporation commission must give prior approval of connection. This telephone equipment is not intended to be repaired and it contains no repairable parts.
Regulatory Compliance Important Information for Customers (continued) Industry Canada Technical Specifications will not occur in a particular installation; if this equipment does cause harmful interference to radio or television reception, which can be determined by turning the equipment off and on, you are encouraged to try to correct the interference by one of the following measures: 1. Where it can be done safely, reorient the receiving television or radio antenna. 2.
precaution may be particularly important in rural areas. telephone interface.The termination on an interface may consist of any combination of devices subject only to the requirement that the sum of the Ringer Equivalence Numbers of all the devices does not exceed five. CAUTION: Users should not attempt to make such connections themselves, but should contact the appropriate electric inspection authority, or electrician, as appropriate.
Warranty Procedure exclusions or limitations may not apply to you. This warranty applies only to Ameriphone products that are purchased and used in the United States or Canada. To get warranty service for your CLS45i Cordless Amplified Telephone, you must provide proof of the purchase date. Ameriphone warrants the CLS45i Cordless Amplified Telephone against any defect in materials or workmanship for the period of one year from the date of purchase.
Product Specifications CLS•45i Dual Speaker Cordless Amplified Telephone Operates on analog telephone lines Amplification Incoming up to 40dB Electrical Adapter Class 2 transformer Input 120V AC 60Hz Output 9V DC 500mA Jacks Handset 3.5mm remote input 3.5mm audio output 2.5mm headset Base 3.5mm speaker output Battery Specifics Handset Base Operating Backup Number 1 battery pack (3 cell) 4 Size 2/3 AA AA Type 3.6V 750mAh NiMH Alkaline Features and Specifications subject to change without notice.
12082 Western Avenue, Garden Grove, CA 92841 (800) 874-3005 VOICE (800) 772-2889 TTY (714) 897-4703 FAX email:ameriphonecs@plantronics.com website: www.ameriphone.com Ameriphone® products are manufactured by Walker®, a division of Plantronics, Inc. © 2003 Plantronics, Inc. All rights reserved. Ameriphone, Amplifying Your Life, Plantronics and Walker are trademarks or registered trademarks of Plantronics, Inc.