
Use and Care Manual

17cG55_20480
CLASSIC ACCESSORIES, LLC
2264
0 68th AVENUE SOUTH
KENT
, WA 98032, USA ©
2017
classicaccessories.com
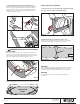
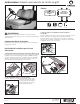
5. WARNING Keep the seat attachment
points clear.
On some models of golf cars it is necessary to keep the seat
cover clear of any metal tab fittings that keep the seat in place
(Fig. 9). Failure to keep these attachment points clear will cause
the seat to malfunction and could damage your cover.
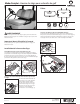
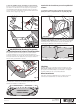
Correct installation of the seat bottom cover shown below:
SEAT BOTTOM
COVER
Fig. 10
Fig. 6
Fig. 7
Fig. 8
Fig. 9
Fig. 11
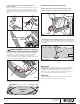
2. Attach the hem clip on the back of the cover.
Hook the hem clip attached to the elastic hem to the opposite
side of the seat hem (Fig. 11). Enjoy your seat covers!
Seat back cover installation:
1. Place the cover over one end of the seat back and pull
the cover over the entire seat front (Fig. 10).
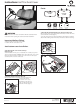
4. Thread the buckle through the webbing loop.
Thread the webbing attachment straps with buckles through
the loops at the ends of both the attachment flaps and the
elastic hem. Once both loops are threaded with the webbing
attachment straps, insert the side release buckles into one
another. (Fig. 6, Fig. 7, Fig. 8).
Cleaning
Clean your cover with a soft brush and lukewarm water or machine
wash in COLD water. DO NOT USE SOAP as it may remove the
protective coatings. Line dry or machine dry on air or delicate.
Storage
To avoid mildew, be sure the cover is completely dry before
you store it.