BUILT IN ELECTRIC FIREPLACE USER’S GUIDE MODEL NUMBERS: 33EB304GRS 39EB364GRS 45EB424GRS CONSUMER SAFETY INFORMATION PLEASE READ THIS MANUAL BEFORE USING THIS APPLIANCE WARNING IF THE INFORMATION IN THIS MANUAL IS NOT FOLLOWED. AN ELECTRIC SHOCK OR FIRE MAY RESULT CAUSING PROPERTY DAMAGE, PERSONAL INJURY OR LOSS OF LIFE. DO NOT STORE OR USE GASOLINE OR OTHER FLAMABLE VAPORS AND LIQUIDS IN THE VICINITY OF THIS OR ANY OTHER APPLIANCE.
SECTION 1: BEGINNING 1) Prior to first use verify that the circuit breakers are on. 3) If your heater does not emit heat, verify the wall thermostat (not included) is set above the current room temperature. If this does not work, switch the main Power Button off for 5 minutes and try again. 2) The heating element on this unit may emit a slight, harmless odor when first used. This odor is a normal reaction to heating the internal heater parts for the first time.
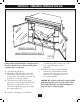
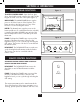
Section 2: Preparing Fireplace for Use Pre-Installation Diagram: Figure 1 REMOTE CONTROL MESH CURTAIN IN PLASTIC BAGS ZIP TIE a smaller bag which contains a box. This box contains the remote control transmitter. 5) Remove the remote control transmitter from the box and install the included batteries. Follow the instructions in the next section to operate the controls of your electric fireplace.
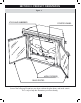
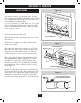
SECTION 3: PRODUCT ORIENTATION Figure 2 LOGS AND EMBERBED CONTROL PANEL MESH CURTAINS GLASS DOORS Some of the following illustrations are shown without the glass doors and mesh curtain. This is only to help the illustrations print more clearly.
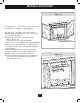
SECTION 4: OPERATION CONTROL PANEL FUNCTIONS Figure 3 TO ACCESS CONTROL PANEL- Open the front glass doors, then slide the mesh curtains to the sides. Lift the hinged door that covers the control panel (figure 3). CONTROL PANEL MAIN POWER- The MAIN POWER button supplies power to all of the functions of the fireplace. This button must be in the ON position for any of the functions to work including the remote. HEATER- The Heater button supplies power to the heater and blower.
SECTION 5: SERVICE LIGHT BULBS Figure 6 This electric fireplace uses (4) clear120V, 40 watt, E12 socket base light bulbs (candelabra base, B bulb). The 33EB304GRS only requires (3) clear 120V, 40 watt chandelier candle type bulb. For your convenience, if a bulb burns out, it is a good idea to replace all the bulbs at the same time. These bulbs are available at most home centers, hardware stores or grocery stores. 1) Turn the Main Power button off.
SECTION 6: DOWN LIGHT Figure 9 This fireplace uses 1 frosted 120V, 7 watt, E12 socket base bulb (open, small base, night light type). 1) Follow steps 1 through 3 in the above section 2) Locate the down light diffuser on the inside ceiling of the firebox (Figure 9). 3) Remove the screws securing the down light diffuser (Figure 10). There are 2 screws in the 33EB304GRS and 3 screws in the 39EB364GRS and 45EB424GRS.
SECTION 7: MAINTENANCE The motors used on the fan and the flame generator assembly are pre-lubricated for extended bearing life and require no further lubrication. However, periodic cleaning/vacuuming of the fan/heater unit is recommended. The vent in the for the heat output should be cleaned periodically. The area around the controls should also be kept clean. Make sure the unit is turned OFF whenever you are cleaning the heater or fireplace. WARNING: Make sure the power is turned off before proceeding.
TWO YEAR LIMITED WARRANTY (PROFESSIONALLY INSTALLED AND/OR BUILT IN ELECTRIC INSERTS) Twin-Star International, Inc.
IN NO EVENT WILL THE COMPANY, OR ANY OF ITS DIRECTORS, OFFICERS OR AGENTS, BE LIABLE TO ANY PURCHASER, OWNER, OR USER OF THE FIREPLACE INSERT, OR TO ANY THIRD PARTY, WHETHER IN CONTRACT, IN TORT, OR ON ANY OTHER BASIS, FOR ANY INDIRECT, SPECIAL, PUNITIVE, EXEMPLARY, CONSEQUENTIAL, OR INCIDENTAL LOSS, COST, OR DAMAGE ARISING OUT OF OR IN CONNECTION WITH THE SALE, MAINTENANCE, USE, OR INABILITY TO USE THE FIREPLACE INSERT, EVEN IF THE COMPANY OR ITS DIRECTORS, OFFICERS OR AGENTS HAVE BEEN ADVISED OF THE POSSI
FOYER ÉLECTRIQUE ENCASTRÉ GUIDE DE L’UTILISATEUR NUMÉRO DE MODÈLES: 33EB304GRS 39EB364GRS 45EB424GRS RENSEIGNEMENTS SUR LA SÉCURITÉ VEUILLEZ LIRE CE GUIDE AVANT D’UTILISER L’APPAREIL AVERTISSEMENT NE PAS SUIVRE LES RENSEIGNEMENTS INDIQUÉS DANS CE GUIDE POURRAIT ENTRAÎNER UN CHOC ÉLECTRIQUE, UN INCENDIE, DES BLESSURES OU LE DÉCÈS. NE PAS CONSERVER OU UTILISER D’ESSENCE OU TOUT AUTRE LIQUIDE OU SOURCE DE VAPEURS INFLAMMABLES PRÈS DE CET APPAREIL OU DE TOUT AUTRE APPAREIL DU MÊME TYPE.
SECTION 1: POUR COMMENCER 3) Si l’appareil de chauffage n’émet aucune chaleur, assurez-vous que le thermostat mural (non inclus) est fixé à une température supérieure à la température actuelle de la pièce. Si l’appareil ne fonctionne toujours pas, coupez l’alimentation de l’appareil en appuyant sur le bouton Power (mise en marche) puis rallumez le foyer après 5 minutes.
Section 2: PRÉPARER LE FOYER AVANT DE L’UTILISER Figure 1 TÉLÉCOMMANDE RIDEAUX DE MAILLE DANS DES SACS DE PLASTIQUE ATTACHE 4) Du côté gauche, à l’intérieur du sac contenant les rideaux, se trouve un petit sac contenant une boîte; cette boîte contient la télécommande. 5) Sortez la télécommande de la boîte et installez-y les batteries fournies. Suivez les directives de la section suivante pour savoir comment utiliser votre foyer électrique.
SECTION 3 : ORIENTATION VERS LE PRODUIT Figure 2 BÛCHES ET LIT POUR TISONS PANNEAU DE CONTRÔLE RIDEAUX DE MAILLE PORTES DE VERRE Certaines des illustrations suivantes n’incluent pas les portes de verre et le rideau de mailles. Cela ne vise qu’à favoriser une meilleure impression des illustrations.
SECTION 4: FONCTIONNEMENT FONCTIONS DU PANNEAU DE CONTRÔLE Figure 3 POUR ACCÉDER AU PANNEAU DE CONTRÔLE - Ouvrez les portes de verre à l’avant puis glissez le rideau de mailles sur les côtés. Soulevez la porte avec charnières recouvrant le panneau de contrôle (figure 3). PANNEAU DE CONTRÔLE MAIN POWER - Le commutateur principal alimente toutes les fonctions du foyer.
SECTION 5 : ENTRETIEN AMPOULES Figure 6 Ce foyer électrique utilise (4) ampoules claires 120 volts, 40 watts de type E12 (culot de type candélabre de type B). Le foyer encastrable de modéle 33EB304GRS n’utilise que (3) ampoules claires 120 volts, 40 watts de type chandelier.Nous vous conseillons de toujours remplacer toutes les ampoules en même temps lorsque l’une d’elles brûle. Vous trouverez ces ampoules dans la majorité des centres de rénovation, quincailleries ou magasins d’alimentation.
section 6: PLAFONNIER D’INTENSITÉ Figure 9 Ce foyer utilise une (1) ampoule claire 120 volts, 7 watts de type E12 (ouverte, petite base, type veilleuse). 1) Suivez les étapes 1 à 3 indiquées dans la section ci-dessus. 2) Le diffuseur du plafonnier d’intensité se trouve dans le plafond intérieur du foyer (figure 9). 3) Retirez les vis retenant le diffuseur du plafonnier (figure 10). Il y a 2 vis pour le modèle de foyer 33EB304GRS et 3 vis pour le modèle 39EB364GRS et 45EB424GRS.
SECTION 7: ENTRETIEN Les moteurs utilisés par le ventilateur et la génératrice de flammes sont prélubrifiés pour une durée de vie prolongée et n’exigent aucune autre lubrification. Nous recommandons cependant un nettoyage périodique avec aspirateur pour le ventilateur/élément chauffant. L’orifice de ventilation pour la sortie de chaleur devrait être nettoyé de façon périodique. La zone autour des boutons de commande devrait aussi demeurer propre.
GARANTIE LIMITÉE DE DEUX ANS (POÊLE ENCASTRABLE ÉLECTRIQUE INSTALLÉ PROFESSIONNELLEMENT ET/OU INTÉGRÉ) Twin-Star International Inc.
SOIT DANS LE CADRE DU CONTRAT, EN CAS DE PRÉJUDICE, OU EN TOUTE AUTRE CIRCONSTANCE, DE TOUT DOMMAGE, DÉPENSE OU PERTE DIRECTS, INDIRECTS, SPÉCIAUX, PUNITIFS, EXEMPLAIRES OU CONSÉCUTIFS DUS OU ASSOCIÉS À LA VENTE OU À L’ENTRETIEN DU POÊLE ENCASTRABLE, À SON UTILISATION OU À L’INCAPACITÉ DE L’UTILISER, MÊME SI LA COMPAGNIE, SES DIRECTEURS, SES CADRES OU SES AGENTS ONT ÉTÉ MIS AU COURANT DE LA POSSIBILITÉ DE TELS DOMMAGES, DÉPENSES OU PERTES, ET MÊME SI DE TELS DOMMAGES, DÉPENSES OU PERTES SONT PRÉVISIBLES.
CHIMENEA ELÉCTRICA EMPOTRADA GUÍA DEL USUARIO MODEL NUMBERS: 33EB304GRS 39EB364GRS 45EB424GRS INFORMACIÓN DE SEGURIDAD PARA EL CONSUMIDOR. LEA ESTE MANUAL ANTES DE UTILIZAR ESTE APARATO ¡ADVERTENCIA! AL NO SEGUIR LAS INSTRUCCIONES INDICADAS EN ESTE MANUAL, PUEDE CAUSAR CHOQUES ELÉCTRICOS O UN INCENDIO, PROVOCANDO DAÑOS MATERIALES, LESIONES O UNA PÉRDIDA DE VIDA. NO GUARDE, NI UTILICE GASOLINA U OTROS LÍQUIDOS O PRODUCTOS QUE CAUSAN VAPORES INFLAMABLES, CERCA DE ESTE APARATO O DE CUALQUIER OTRO APARATO.
SECCIÓN 1: COMIENZO 3) Si el calefactor no emite calor, verifique que el termostato de pared (no incluido) se encuentre configurado por encima de la temperatura ambiente actual. Si esto no funciona, apague el aparato durante 5 minutos presionando el botón de encendido e inténtelo nuevamente. GUÍA DE INICIO RÁPIDO 1) Antes de utilizar la chimenea por primera vez compruebe que los cortacircuitos estén encendidos.
SECCIÓN 2: PREPARACIÓN DE LA CHIMENEA PARA LA UTILIZACIÓN Diagrama de instalación previa: Figura 1 CONTROL A DISTANCIA CORTINAS DE MALLA DENTRO DE BOLSAS DE PLÁSTICO FIJACIÓN Si la película de protección de plástico que cubre la 4) Dentro de la bolsa de la cortina izquierda, se encuentra una bolsa más pequeña que contiene parte delantera de la chimenea eléctrica está en su una caja. Esta caja contiene el control a lugar, quítela cuidadosamente en este momento. 1) Abra las puertas de vidrio.
SECCIÓN 3: PRESENTACIÓN DEL PRODUCTO Figura 2 TRONCOS Y BRASAS PANEL DE CONTROL CORTINAS DE MALLA PUERTAS DE VIDRIO Para favorecer la claridad, algunas ilustraciones entre las siguientes, se muestran sin la presencia de las puertas de vidrio y cortinas de malla.
SECCIÓN 4: FUNCIONAMIENTO FUNCIONES DEL PANEL DE CONTROL Figura 3 PARA ACCEDER AL PANEL DE CONTROL- Abra las puertas de cristal delanteras; a continuación, corra las cortinas de malla hacia los costados. Levante la puerta con bisagras que cubre el panel de control (figura 3). LIFT PANEL DE CONTROL MAIN POWER: El botón MAIN POWER suministra energía a todas las funciones de la chimenea. Este botón debe estar en la posición ON para que se activen las funciones y el control remoto.
SECCIÓN 5: SERVICIO DE MANTENIMIENTO BOMBILLAS Figura 6 4 E12 120V (bombilla B con base candelabro). El inserto 33EB304GRS solo requiere (3) bombillas transparentes de tipo vela de candelabro de 40 vatios y 120V. Para su comodidad, si una bombilla se quema, es conveniente reemplazar todas las bombillas al mismo tiempo. Estas bombillas se encuentran disponibles en la mayoría de las tiendas de artículos del hogar, ferreterías o tiendas de comestibles. 1) Apague el botón Main Power.
SECCIÓN 6: LÁMPARAS PROYECTADAS HACIA ABAJO Figura 9 Esta chimenea utiliza una bombilla esmerilada con base de enchufe E12, 120 V, de 7 vatios (base pequeña abierta, tipo velador). 1) Siga los pasos 1 al 3 de la sección mencionada. 2) Ubique el difusor de las lámparas proyectadas hacia abajo en el techo interior de la caja de fuego (Figura 9). 3) Quite los tornillos que sujetan el difusor de las lámparas proyectadas hacia abajo (Figura 10).
SECCIÓN 7: MANTENIMIENTO Los motores utilizados para el ventilador y el generador de llamas están prelubrificados, para prolongar la vida útil y no requieren ninguna lubrificación adicional. Pero, recomendamos limpiar y pasar el aspirador periódicamente, sobre la unidad del calentador/ ventilador. Debe limpiar regularmente las tomas de aire de la puerta del panel de control, adentro y afuera. Cuando la puerta está en posición abierta, debe pasar el aspirador sobre la rejilla del calentador.
GARANTÍA LIMITADA DE DOS AÑOS (HOGAR ELÉCTRICO PARA CHIMENEA EMPOTRADO Y/O INSTALADO EN FORMA PROFESIONAL) Twin-Star International, Inc.
ADVERTIDO A LOS DIRECTORES, AUTORIDADES O AGENTES DE LA POSIBILIDAD DE TALES PÉRDIDAS, COSTOS O DAÑOS, O SI LAS MISMAS SON PREVISIBLES. EN NINGÚN CASO LA COMPAÑÍA NI NINGUNO DE SUS DIRECTORES, AUTORIDADES NI AGENTES SERÁN RESPONSABLES POR CUALQUIER PÉRDIDA, COSTO O DAÑO DIRECTO QUE SUPERE EL PRECIO DE COMPRA DEL HOGAR ELÉCTRICO PARA CHIMENEA.