
User guide
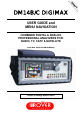


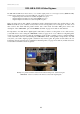

DM-14B & DM-14C User’s Guide
6
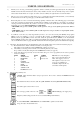
To select PLAN–PRG–CHAN–FREQ increase, etc.
To activate, confirm and/or quit the various menus, measurements or settings
(keep pressed for 2” to activate the numerical keyboard and the scroll menu)
Activates, in cycles, the various measurement levels.
Activates/disactivates the various menus related to the activated function.
N.B. Dual function keys: when you see the words 2" or 10” (2 or 10 seconds) written above the keys, you should keep
the key pressed for 2 or 10 seconds to activate the second function.
All the remaining keys are just as easy to use and you can find complete descriptions on the last page (folded) of this
guide: we suggest you open it out for easier use.
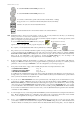
To use the numerical keyboard
(SHIFT function), keep the key pressed for 2 seconds,
digit the number of the plan, channel, program, frequency etc. and press again to confirm.
If you prefer, you can adjust/select all the various parameters by rotating the encoder knob.
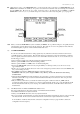
7) We promised you a user–friendly instrument, capable of doing everything by itself (or nearly); as you can see when
you are in measurement mode (MEAS) the upper part of the screen shows all the settings, for example: MODE–
PLAN–PRG–CHAN– FREQ–LNB– DiSEqC, etc. whereas the lower part of the screen shows all the measurements.
These can be seen individually or all together, by pressing the MORE MEAS key once according to the
measurement level you require (you can program levels 1–2–3 in CONFIG. See p. 12)
8) If when navigating within the measurements you change any parameters, the program number will disappear.
Simply press PRG and reselect the previous program number by pressing the arrow keys to recall the previous
parameters, or if you want, press MEMORY to store the configuration you are using (see page 14).
9) Now, please read the index on page 3, then carefully study the three most important menus to start:
• CONFIGURATION MENU Page 12
• SPECIAL FUNCTION MENU Page 13
• PROGRAM STORE MENU Pages 14-15-16
You will learn the remaining functions in a few days by using the instrument. The first time you use the meter, we
strongly advise you connect it to a satellite dish or antenna which has already been installed and is operational and
where you know the channels and frequencies well.
10) As you can see, in MEASUREMENT mode, the top left hand side of the display shows in which function you are
positioned, for example: QPSK. The upper part of the screen shows all the meter's settings (MODE), for example:
PROG–CHAN–FREQ etc., which can be directly recalled using the respective, direct function keys. The lower part
of the screen shows the POWER/LEVEL measurement and if you press the key MORE MEAS key once or twice
you can recall all the other measurements, which can be carried out. By pressing SPECTRUM, the meter instantly
shows, in the lower left-hand side of the screen, the mode you are in. (Remember that the spectrum can be automatic
or manual, see relative MENU).
11) You can navigate in every screen using the UP and DOWN keys and in measurement mode using the direct function
keys. Please remember that this type of navigation is the same for all of your meter's menus and screens and that
when you are in digital mode, the response of the various menus becomes a little slower.
12) Now go to the CONFIGURATION MENU, keep the SPECIAL key pressed for two seconds (see page 10). Select
your country's standard, the measurement unit you prefer and the TIMER setting (if you set "5 min" the meter turns
off after 5 minutes of inactivity and re-starts from the last measurement without losing data). You can adjust the
To select PLAN–PRG–CHAN–FREQ decrease, etc