
Installation guide


© 2006 directed electronics
7
h1/5 green/white (-) normally closed zone 6
This wire will trigger the alarm if it looses its normally closed ground. Remove this wire
from the ground wire and attach it to a normally grounded item you wish to protect
such as the back of your stereo.
h1/6 white/blue (-) accessory b output (200mA)
This wire produces a 200mA output when activated by the remote control and can be
used to operate a variety of accessories. All accessory outputs can be programmed to
different types of outputs. Please see Programming Note #6.
h1/7 blue (-) trunk trigger input - zone 5
This input will respond to a negative input with an instant trigger. Connect to (-) trunk
pins and it will report on Zone 5. It can also be used with Directed single-stage sensors.
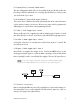
h1/8 violet (+) door trigger input - zone 4
Connect the violet wire to a wire that shows (+)12V when any door is opened. This
wire will report Zone 4.
h1/9 green (-) door trigger input - zone 4
Most vehicles use negative door trigger circuits. Connect the GREEN wire to a wire
showing ground when any door is opened. When connecting to newer model vehicles
there is generally a need to use individual door triggers. This wire will report Zone 4.
NNOOTTEE::
If using a door trigger wire that has a delay, the installer-selectable program-
ming grid or the Cliffnet Wizard can be used to turn the door ajar warning off.
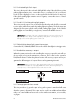
h1/10 red (+) 12v constant
Before connecting the RED wire, remove the supplied fuse. Connect to the battery pos-
itive terminal (be sure to use the supplied fuse holder and a 5 amp fuse) or the con-
stant (+) 12V supply to the vehicle fusebox.