USER MANUAL Portable Air Conditioner and Heater With Heat Pump Technology PAC12 PAC15 PAC18 Please read this manual carefully prior to operating the product.
TABLE OF CONTENTS INTRODUCTION..................................................................................................................................................................................... 3 IMPORTANT SAFEGUARDS.................................................................................................................................................................. 4 PRODUCT DIAGRAM..................................................................................................
INTRODUCTION Thank you for purchasing the PAC12, PAC15 or PAC18 Portable Air Conditioner and Heater. This unit is designed to improve indoor living and working comfort by providing cooling, dehumidifying, heating, and ventilation with minimal installation. Please complete the following information for future reference. Retain this owner’s manual with your sales receipt as a permanent record of your purchase.
IMPORTANT SAFEGUARDS Before installing and using your portable air conditioner and heater, it is important that you read this owner’s manual carefully. Store this manual in a safe place for future reference. This instruction manual is used for guidance and does not form part of a contract. It reserves the right to make technical changes without prior notice. 1. Always place the unit on a level surface. 2. The appliance shall be installed in accordance with national wiring regulation. 3.
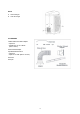
PRODUCT DIAGRAM ( ) FRONT PAC12 A. Control panel B. Vertical air louvers C. Air outlet D. Castors E.
BACK A. Hot air outlet grill B. Lower air inlet grill ACCESSORIES Flexible exhaust hose with 2 adapters • 3-piece set • stretches from 14 1/4” to 60 5/8” (36cm to 150cm) Window exhaust adapter Adjustable window slider kit • 3-piece set • adjusts 33 1/2” to62” (85cm to 157.
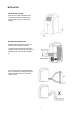
INSTALLATION SELECTING THE LOCATION Place the unit in a flat location where the air outlets are not obstructed. Place the unit at least 20” (50cm) away from a wall or other obstacle. MOUNTING THE EXHAUST HOSE Slide the square end of the exhaust duct over the hot air outlet on the back of the unit. The exhaust hose should be kept as short and straight as possible. Prevent any sharp bends in the exhaust hose, as this will trap hot exhaust air.
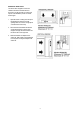
WINDOW KIT INSTALLATION The window kit is designed to fit into most standard vertical and horizontal windows. However, it may be necessary to modify some aspects of the installation process for certain window types. 1. Open the window or sliding door and adjust the length of the window kit to fit the opening. Mark and cut down a single panel of the window kit if necessary. 2. Place the window kit between the window and the window frame as shown in the images to the right.
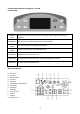
CONTROL PANEL AND MULTI-COLOR DISPLAY(PAC12) CONTROL PANEL FAN SPEED TIMER ON SWING TIMER OFF AM PM ON/OFF MODE FAN SPEED Button SWING Button Press this button to choose high, medium or low fan speed. In dehumidifying mode, this button is inoperable. Press this button to oscillate the vertical louvers or to stop oscillation. ∨ Button This button decreases the room temperature/timer hours. ∧ Button This button increases the room temperature/timer hours.
( ) CONTROL PANEL AND MULTI-COLOR DISPLAY PAC15 CONTROL PANEL FAN SPEED Button SWING Button Press this button to choose high, medium or low fan speed. In dehumidifying mode, this button is inoperable. Press this button to oscillate the vertical louvers or to stop oscillation. ∨ Button This button decreases the room temperature/timer hours. ∧ Button This button increases the room temperature/timer hours. Power Button Press this button to turn the unit on or off.
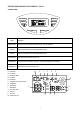
CONTROL PANEL AND MULTI-COLOR DISPLAY( (PAC18) ) CONTROL PANEL F C MO DE R WE PO FAN G SWIN Power Button Press this button to turn the unit on or off. Mode Button Press this button to select the mode (auto, cooling, dehumidifying, fan or heating). Swing Button Press this button to oscillate the vertical louvers or to stop oscillation. Fan Speed Button Press this button to choose high, medium or low fan speed. In dehumidifying mode, this button is inoperable.
CONTROL PANEL FUNCTIONS ON/OFF( POWER ) BUTTON Starts or stops the unit. MODE BUTTON Press to select the operating mode: Fan Mode Air Conditioning Mode Heating Mode Dehumidifying Mode Auto Mode FAN BUTTON Press to select the fan speed: High, Medium, and Low. The fan speed can be visually distinguished by the number of the digital air segments (follow arrow above) flow out from the windmill fan image on the multi-colour display.
OPERATION USING THE CONTROL PANEL COOLING 1. Properly install the exhaust hoses. 2. Plug the power cord into a grounded outlet. 3. Turn on the unit by pressing the On/Off button on the control panel. 4. Press the Mode button until “ or ” icon appears on the multi-colour display. 5. Press the ∧ or ∨ buttons until the desired temperature appears on the multi-colour display. The temperature ranges from 61°F - 88°F (16°C - 31°C). 6. Select the fan speed by pressing the Fan button.
During the Auto mode, The unit operates in dehumidifying mode when the room temperature is between 68°F 73°F. The unit operates in cooling mode when the room temperature is above 73°F. You may use the timer with the Auto mode. SLEEP MODE (This mode can only be programmed from the remote control.) 1. The air conditioner will need to be in operation. 2. Press the Sleep button. The “ ” icon appears on the multi-colour display. 3. The fan motor runs at low speed. 4.
WATER DRAINAGE When the unit is in cooling mode, unwanted water is extracted from the air. Most of this water is re-used to cool the unit and make it run more efficiently. When the unit is used in extremely humid environments, water will collect in a water container at the bottom of the unit. When the water container is full, the compressor will stop but the fan will continue to run. When the water container is full, the unit will display ‘FULL or ’ on the control panel until the tank is emptied.
MAINTENANCE Always turn off and unplug the unit before cleaning to avoid electrical shock. CLEANING THE HOUSING Wipe the surface of the unit with a soft, damp cloth. Do not use abrasive chemicals or detergents to clean the surface of the unit, as the unit may become scratched or damaged. Avoid direct exposure to sunlight as this may change the surface colour. CLEANING THE FILTER Slide the filters out from the side of the unit. Immerse the filter gently in warm water with a mild detergent.
TROUBLESHOOTING Before seeking repair or service, please check the following: PROBLEM Unit does not operate or only runs in fan mode. Cooling efficiency is not satisfactory. Unit is noisy or vibrates. The unit starts and stops frequently. POSSIBLE CAUSE REMEDY Is the unit plugged in? Securely plug the power cord into the wall outlet. Is the main power supply on? Re-establish the main power supply. Is the water container full indicator light on? Empty the water container.