LT-03070 A PDF file was made for this manual, (see additional pages) but the quark files are NOT in the released directory. P:\eco~xfer\logs&forms\Form no doc.
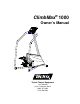
® ClimbMax 1000 Owner’s Manual Tectrix Fitness Equipment 68 Fairbanks Irvine, California 92618 (800) 767-8082 (714) 380-8082
© 1997 Tectrix Fitness Equipment Important Safety Instructions: Read and Save 1. Read all instructions before using this equipment. 2. DANGER: DISCONNECT FROM SUPPLY CIRCUIT BEFORE OPENING. AVERTISSEMENT: DECONNECTEUR DU CIRCUIT D’ALIMENTATION AVANT D’OURVRIR. 3. Unplug all electrical appliances before cleaning and after use. 4. Close supervision is necessary when this equipment is used by or near children or disabled persons. 5. Use this equipment for the intended use as described in this manual. 6.
ClimbMax 1000 Owner’s Manual Table of Contents CHAPTER 1 - INTRODUCTION About This Book CHAPTER 2 - ASSEMBLY AND SETUP 111 111 333 Assembly Overview 333 Unpacking ClimbMax 1000 Parts List 333 333 Assembling the ClimbMax 1000 Attach the Feet to the Base Attach the Display Upright Attach the Display Console to the Display Upright Attach the Handrails Attach the Optional Water Bottle Holder Plug in the Display Cable 444 444 555 555 666 666 777 Level the ClimbMax 777 Plugging in the ClimbMax 777 S
CHAPTER 1 - INTRODUCTION Welcome to ClimbMax 1000, the perfect climber for your fitness facility or other group exercise environment. ClimbMax’s durability, ease of use, and flexible programming make it ideal for both individual and partnered workouts. ClimbMax’s features include: • Simple to Use: Press any key and ClimbMax’s console leads you through the simple steps to start a workout. Or, just step on and start climbing.
Page 2 Chapter 1 - Introduction Chapter 4 - The Heart Rate Program How to use the optional heart rate monitoring and programming features. Chapter 5 - Testing How to make sure your ClimbMax is operating properly. Appendix A How ClimbMax’s level settings translate into climbing speeds. Appendix B Speed and energy conversion chart.
CHAPTER 2 - ASSEMBLY AND SETUP This chapter describes how to unpack and assemble your ClimbMax, and how to use setup mode to configure the climber for your situation. Assembly Overview It’s easy to assemble ClimbMax—it will probably take about 30 minutes. You need these common tools: • 3/16” Allen Wrench • 7/16” wrench or socket wrench and ratchet • 1/2” wrench Here’s an overview of the steps in the assembly: 1. Unpack ClimbMax and make sure you have all the parts. 2.
Page 4 Chapter 2 - Assembly and Setup The Hardware Kit for the CM1000 (part# 71100) contains: Description 5/16” x 2” Screw 5/16” x 2.25” Screw 5/16” Split Washer 5/16” Nyloc Nut 5/16” x 2.5” Button Cap Screw Bracket, Handrail Clamp #10 x 3/4” Phillips-head Screw Qty 4 3 7 3 2 1 9 Part Number 41011 41050 43042 42033 41138 52078 41009 Item # 8 9 10 11 -12 -- The console and related materials for the ClimbMax 1000 are packed in the Configuration Kit included with the unit.
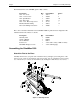
ClimbMax 1000 Owner’s Manual Page 5 Attach the Display Upright Attach the display upright (5) to the base (1) using two 5/16” by 2” screws (8) and washers (10) as shown in Figure 2. Be sure the ribbon cable goes through the slot, as shown, and the display console backplate is facing toward the base. Finger tighten the screws; you will finish tightening them with a wrench later, after installing the handrails.
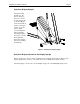
Page 6 Chapter 2 - Assembly and Setup Attach the Handrails Slip the left (6) and right (7) handrails over the plugs on the top of the rear feet. They will probably fit tightly; if necessary, use a spray cleaner as a lubricant. Rotate the handrails into the clamp bracket at the top of the display console upright (5). Slip the handrail clamp bracket (12) behind the handrails, as shown in Figure 3.
ClimbMax 1000 Owner’s Manual Page 7 Plug in the Display Cable Lay the ClimbMax on its right side. Take the lower end of the display ribbon cable (the one you routed through the slot in the base when attaching the display upright). Fold around the motor and plug it into the connector on the power board. Level the ClimbMax Move the climber to where it will be used. Press on either side of the front foot to see if you can rock it from side to side.
Page 8 Chapter 2 - Assembly and Setup • Full Setup or Step and Go: If you choose “Step and Go,” a climber can get on the ClimbMax and start climbing, without entering any workout information. The default is “Full Setup.” When a user chooses “step and go” operation, ClimbMax uses the default workout length (the one you set as “Def Prog”)and the default weight setting of 150 pounds (70kg). • Beep On or Off: Should the console keys beep when pressed? Choose On or Off.
CHAPTER 3 - LET’S CLIMB So far, we’ve discussed what the facility owner needs to do to get the ClimbMax ready to use. This chapter describes how to use it; what each climber can do to get the most out of his or her ClimbMax workout. Overview This is how you work out on ClimbMax: 1. Get on. 2. Set how long you want to work out. 3. Set your weight. 4. Select manual mode or a program. 5. If you want, adjust the climbing speed. 6.
Page 10 Chapter 3 - Let’s Climb When climbing, you should have a smooth, stair-climbing action. The pedals should not hit the floor at the bottom of each stroke, or their upper limit at the top of the stroke. If they do, either climb faster or adjust the ClimbMax’s speed setting as described later in this chapter. Find a speed and technique that’s comfortable for you; this could be short, quick steps or long slow steps.
ClimbMax 1000 Owner’s Manual Page 11 2. The light next to “Program” now flashes. Press the Manual program key. 3. Start climbing! If the speed is too fast or slow, press the up or down arrow key to adjust it until you’re comfortable. While you’re climbing, the console shows your progress and statistics about your workout. For details about these displays, see the section “The Workout Display,” later in this chapter. You can raise or lower the workout level at any time by pressing the up and down arrows.
Page 12 Chapter 3 - Let’s Climb When you change the length of a program, ClimbMax intelligently adjust the program’s profile to match your setting. For the fat burning and strength programs, it adds or removes repetitions of the center section; for the endurance program, it increases or decreases the length of the center section. The warm-up and cool-down periods stay the same. If you set the workout length to five minutes, you’ll do just the warm-up and cooldown. 1.
ClimbMax 1000 Owner’s Manual Page 13 • The three Progress Indicators show six categories of information. At the beginning of a workout the three top categories are shown. Pressing the Switch Display button at the right of the fields switches between categories; the lights over and under each field indicate which information is currently displayed. If you hold down Switch Display for half a second, the fields will alternate between categories every five seconds.
Page 14 Chapter 3 - Let’s Climb The three bottom categories are: Heart Rate or Level If you have the heart rate monitor option, this is your current heart rate in beats per minute. Without a heart rate monitor, this shows the level setting for the climber. In manual mode, this is your vertical speed; in a program, this is the base setting for the program—your climbing speed depends on where you are in the program. Distance Climbed In feet or meters.
CHAPTER 4 - THE HEART RATE PROGRAM As an option, the ClimbMax includes a heart rate monitor harness you can wear during a workout to continuously monitor your heart rate. In either manual or program mode, the heart rate monitor merely gives you more information—it lets you see your current heart rate at any time.
Page 16 Chapter 4 - The Heart Rate Program While you’re climbing, the fields at the top of the console show statistics about your workout. For details about this display, see the section “The Workout Display,” in Chapter 3. The workout graph shows a horizontal line representing your target heart rate. Each column of lights is your heart rate for a segment of the workout, moving from right to left. Each light represents ten beats per minute. The blinking column is your current heart rate.
CHAPTER 5 - TESTING CLIMBMAX PERFORMANCE You can test the electronics inside ClimbMax by using test mode. In test mode, you can adjust the tension of the drive belt, check the odometer reading, and test all the LEDs on the console. To enter test mode, turn the ClimbMax off, then press and hold the HR Control key while turning it back on. All displays will light until you release the key.
Page 18 Chapter 5 Testing ClimbMax Performance To leave test mode, press Clear. For more information about maintaining and servicing your ClimbMax, see the ClimbMax 1000 Maintenance and Repair Manual.
APPENDIX A - CLIMBER LEVEL TO SPEED CONVERSION When you adjust the speed during a ClimbMax program, you’re really adjusting the “level” you have the climber set to. While the climbing speed does increase as you raise the level, there is not a direct relationship between the level number shown in the Progress Indicator area and your vertical speed. (In manual mode, the level does equal your vertical speed.
APPENDIX B - SPEED AND ENERGY CONVERSIONS The table below shows approximate values for energy used at various speeds during a ClimbMax workout. The values shown are for a 150 pound climber. Ft/Min 10 15 20 25 30 35 40 45 50 55 60 65 70 75 80 85 90 95 100 110 120 130 140 150 160 170 180 190 200 M/min 3.0 4.6 6.1 7.6 9.1 10.7 12.2 13.7 15.2 16.8 18.3 19.8 21.3 22.9 24.4 25.9 27.4 29.0 30.5 33.5 36.6 39.6 42.7 45.7 48.8 51.8 54.9 57.9 61.0 MPH 3.2 3.7 4.1 4.6 5.0 5.5 5.9 6.4 6.8 7.3 7.8 8.2 8.7 9.1 9.6 10.
Declaration of Conformity We declare that to best of our knowledge that the fitness equipment listed below, and manufactured by: Tectrix Fitness Equipment Inc. 68 Fairbanks Irvine CA, 92618, USA conforms to: Directive : EMC 89/336/EEC Standards : IEC335-1, EN55014, EN50082-1 Product Name : ClimbMax (Series) Model Numbers : 91000-91999 European Contact : Tectrix International, U.K.
Tectrix Fitness Equipment P/N 03070