
Installation & Assembly
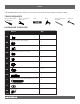
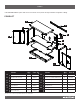
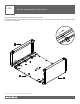
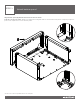
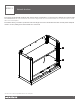
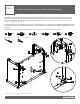
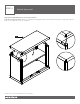
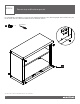
Table Of Contents

8
Attach brackets, spacers, and electrical bushing.
STEP 4
*Please note location of predrilled holes on each part.
Align the exterior brackets (H) and interior brackets (I) with the upper square holes on the back panel. Use a 1/2 in.
wrench to secure the brackets through the holes using two 5/16-18 x 3/4 in. carriage bolts (AA), two 5/16-18 x 3/4 in.
flange nuts (BB), and two 5/16 in. washers (CC) per side as shown. Please make sure the curved edge of the exterior
bracket is on top when attached.
Align the cabinet spacers (J) with the lower holes on the back panel. Use a #3 Phillips screwdriver and 7/16 in. wrench
to secure the spacers to the unit using one 1/4-20 x 1/2 in. machine screw (DD) and one 1/4-20 in. hex nut (EE) per side
as shown.
Align the electrical bushing (FF) with the large circle on the back of the unit. Push in to secure.
H
J
FF
AA
H
BB
I
CC
DD
J
EE
I
x 4
AA
x 4
BB
x 4
CC
x 2
DD
x 2
EE
x 1
FF
#3 Phillips 7/16 in. and 1/2 in.