MODEL GL-X INSTALLATION & OPERATION Rev. 1.00A CMA DISHMACHINES 12700 KNOTT AVENUE GARDEN GROVE, CALIFORNIA 92841 800-854-6417 FAX 714-895-2141 www.cmadishmachines.
TABLE OF CONTENTS MODEL CMA-GL-X 1. 2. 3. SPECIFICATIONS .........................................................................................2 1.1. GL-X .............................................................................................................................................. 2 1.2. GL-X OPERATIONAL CYCLE ........................................................................................................... 3 GETTING STARTED ................................................
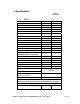
1. Specifications METRIC EQUIVALENT 1.1. GL-X WATER CONSUMPTION PER RACK 1.7 GAL. 6.44 L PER HOUR 40.8 GAL. 154.4 L WASH TIME-SEC 57 57 RINSE TIME-SEC 48 48 DWELL TIME-SEC 15 15 2 MIN. 2 MIN. 30 30 WASH TANK CAPACITY 1.7 GAL. 6.44 L PUMP CAPACITY 35 GPM 132.5 LPM 140°F 60°C WATER INLET ½” — DRAIN CONNECTION 1” — CYCLE TEMPERATURES(recommended) 140°F 60°C WASH-°F (Min) 120°F 52°C DEPTH 23 ½” 59.69 cm WIDTH 24” 60.
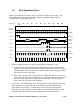
1.2. GL-X Operational Cycle The GL-X Operational Cycle has a total cycle time of 2 minutes (120 seconds). The Timing Diagram and the steps listed below detail the individual functions that are executed during each Operational Cycle. Seconds: 0 10 120 20 30 40 50 60 70 80 90 100 110 Instant Start Relay Cam 1 Start/Stop Cam 2 Detergent Cam 3 WASH DRAIN RINSE Drain/Rack Counter Cam 4 Flush/Fill Cam 5 Sanitizer Cam 6 Rinse Cam 7 Pump Motor Cam 8 Heater 1.
The pump motor runs the pump for the 57-second wash cycle, then pumps the water out through the drain, turns off for about 8 seconds (allowing the machine to refill with clean rinse water) and then runs the pump for the 48-second rinse cycle. 3. Cam switch 3 controls the drain function. At the end of the 57-second wash cycle, cam switch 3 energizes the drain valve solenoid allowing the pump motor to drain the wash water out of the machine. Cam switch 3 also increments the rack counter by one each cycle. 4.
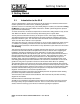
Getting Started 2. Getting Started 2.1. Introduction to the GL-X The GL-X Glasswasher is unique in its field; it has all the features of a standard commercial size machine packed into an under-counter, standalone glasswasher. Operation of the GL-X is extremely easy. After initially filling the machine (see section 3.1.3 Filling the Machine), pressing the rocker Fill/Start switch to the “START” position begins the operation cycle, which runs automatically.
Getting Started 2.2. Receiving and Installation The glasswasher is shipped from the factory in a corrugated box on a wooden pallet. The installation guidelines give a systematic procedure for setting up the machine. 1. Start by removing the box and packaging material. Check for the following component parts: A. Drain Screen: The Wash Tank Scrap Screen is shipped inside the wash cavity of the machine. This screen must be in place during operation.
Getting Started 2.2.4.
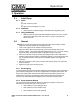
Operation 3. Operation 3.1. Initial Setup 3.1.1. Check… Drain screen is in place Spay arms and end plugs are secure 3.1.2. Chemicals • Assure there is a sufficient supply of chemicals before beginning a shift. 3.1.3. Filling the Machine • 3.2. With the power ON, press and hold the Fill/Start switch in the “FILL” position until the water level in the wash tank is about 1” deep, or just below the bottom wash arm. General Caution: Do not operate the dishmachine without the drain screen in place.
Operation These cams were set at the factory but must be adjusted after final installation to maximize efficiency of chemical use (see section 4.1.1 Cam Adjustment.) 3.2.3. Proper Filling The number 4 cam determines the amount the machine is automatically filled each cycle. When the number 4-cam switch actuator rides down into the cam groove, the solenoid valve on the fill line is energized causing the machine to fill.
Maintenance 4. Maintenance The maintenance procedures detailed in this section are to be performed by qualified personnel. 4.1. Timer assembly The standard timer assembly consists of a (2 minutes per revolution) motor turning a common shaft, which, in turn, rotates eight cams. As the cams rotate, they control various functions and the sequence of the operational cycle. A label on the timer assembly identifies the individual function of each of the 8 cams.
Maintenance 4.2. Quick service guide MODELS: GLX TECHNICAL ISSUE Wash Pump motor will not shut off Continues cycles Sustainer heater not working Machine does not drain Does not hold water Tank overflows overnight Water leaks out of Vacuum Breaker CAUSE SOLUTION Delimer switch in delime position Flip to NORMAL position Faulty delimer switch Replace switch, P/N 00475.30 Faulty manual drain switch Replace switch, P/N 03406.62 Faulty contactor Replace contactor, P/N 00404.
Maintenance 4.3. Troubleshooting PROBLEM LIKELY CAUSE SOLUTION Machine inoperative Power off at circuit breaker Reset circuit breaker Defective power switch Replace power switch P/N: 00433.10 Defective timer assembly motor Replace timer assembly motor P/N: 00501.00 Pump Motor inoperative Door is open Close door Control drawer is pulled out Secure control drawer Defective reed (door) switch Replace reed (door) switch P/N: 00557.
Maintenance PROBLEM LIKELY CAUSE SOLUTION Low heat during operation Low incoming water temperature Turn up supply water heater (below 140° F) Insulate supply water pipe Thermostat out of adjustment Adjust thermostat Defective sustainer heater Replace heater P/N: 04109.
Maintenance PROBLEM LIKELY CAUSE SOLUTION Activating detergent primer switch does not run pump Defective sani/detergent primer switch Replace primer switch P/N: 03470.00 Defective detergent pump motor Replace pump motor P/N: 00416.00 Activating sani primer switch does not run pump Defective sani/detergent primer switch Defective sani pump motor Replace primer switch P/N: 03470.00 Replace pump motor P/N: 00416.
Addendum 5. Addendum for Machines Installed in the City of Chicago “All food dispensing establishments using chlorine or other approved chemical sanitizers shall, at all times, maintain an adequate testing device.” “Dishes and other eating and drinking utensils to be washed in a dishwashing machine shall be properly scraped and pre-rinsed and shall be stacked in racks or trays so as to avoid overcrowding, and so as to permit the wash and rinse waters to reach all surfaces of each utensil.
Appendix A: Operator & Cleaning Instructions MODEL GL-X INSTALLATION & OPERATION MANUAL Rev. 1.
Electrical Diagram 6. Electrical Diagram MODEL GL-X INSTALLATION & OPERATION MANUAL Rev. 1.
Electrical Diagram MODEL GL-X INSTALLATION & OPERATION MANUAL Rev. 1.