
User`s manual


UC-7400-LX Plus User’s Manual Getting Started
2-6
NOTE
After changing the IP settings, use the networking restart command to activate the new IP
address. However, the LCM display will still show the old IP address. To update the LCM display,
you will need to reboot the UC-7400-LX Plus.
Modifying Network Settings over the Network
IP settings can be activated over the network, but the new settings will not be saved to the flash
ROM without modifying the file /etc/network/interfaces.
For example, type the command #ifconfig eth0 192.168.1.1 to change the IP address of LAN1 to
192.168.1.1.
root@Moxa:# ifconfig eth0 192.168.1.1
root@Moxa:/etc/network/#
Configuring the WLAN through the PCMCIA Interface
The following IEEE802.11g wireless modules are supported:
y ASUS—WL-107g
y CNET—CWC-854 (181D version)
y Edmiax—EW-7108PCg
y Amigo—AWP-914W
y GigaByte—GN-WMKG
y Other brands that use the Ralink RT2500 series chip set
To configure the WLAN for IEEE802.11g:
1. First unplug the CardBus wireless LAN card.
2. Use the command #vi /etc/networking/interfaces to open the “interfaces” configuration file
with vi editor, and then edit the 802.11g network settings (the wireless interface name should
be “eth2” on the UC-7400 Plus).
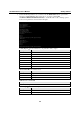
# We always want the loopback interface.
auto eth0 eth1 eth2 lo
iface lo inet loopback
# embedded ethernet LAN1
iface eth0 inet static
address 192.168.3.127
network 192.168.3.0
netmask 255.255.255.0
broadcast 192.168.3.255
# embedded ethernet LAN2
iface eth1 inet static
address 192.168.4.127
network 192.168.4.0
netmask 255.255.255.0
broadcast 192.168.4.255
# embedded ethernet LAN3
iface eth2 inet static
address 192.168.5.127
network 192.168.5.0
netmask 255.255.255.0
broadcast 192.168.5.255