
Troubleshooting guide


5
button on your keypad and the spa will begin to heat.
Depending on initial water temperature, reaching the
desired temperature may take 6-10 hours.
WARNING: DO NOT RUN SPA WITH GATE VALVES
CLOSED OR RUN PUMP WITH NO WATER CIRCULATING
IN SPA. THIS COULD DAMAGE THE PUMPS AND PUMP
SEALS.
• Refertopage12-19forsettingltercycleandprogram-
ming.
FILTER MAINTENANCE
Filtration starts as soon as ow is steady through the lter. As
the lter cartridge removes the dirt from the spa water, the
accumulated dirt causes ow resistance.
CLEANING AND REPLACING FILTER CARTRIDGE
Yourspalterhasbeendesignedforquickandeasymain-
tenance. The lter cartridge should be rinsed by hose once
a week and cleaned with a cartridge cleaner once a month.
A second lter cartridge is recommended and will speed
up the process. This can be purchased from your Coast Spas
dealer.
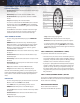
TOP LOAD FILTERS
• TurnpowerOFFatthebreaker.
• Loosenairreliefvalve,thenremoveretainerring.
• Pulldomelidstraightuptoremove.
• DONOTTWISTORPULLDOMELIDUPATANANGLE.
THIS COULD CAUSE DAMAGE TO THE FILTER CANISTER,
ESPECIALLYINFREEZINGWEATHER.DONOTREMOVE
DOMELIDINICYCONDITIONS!
• Removeltercartridgeandcleanwithagardenhose
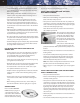
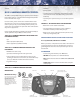
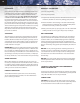
Diagram 03
TYPICAL INSTALLATION - Pump Bleeder (front view)
and a high-pressure nozzle. Periodically you may need to
soak your lter in a “cartridge lter cleaner” to remove ex-
cessmineralsand/oroils.Youcanpurchasethiscleaner
at your Coast Spas dealer.
• Rinselterthoroughlybeforeinstalling.Clean
o-ring on dome lid and apply a light lm of silicone lubri-
cant to o-ring. Do not use a petroleum-based lubricant
as it could damage the o-ring. Consult your Coast Spas
dealer.
• PlacecleanCartridgeinltercanister.
• Replacedomelidandre-tightenretainingring(nger
tight only).
• NOTE:MAKESURETHEO-RINGISONTHEAIRRELIEF
VALVE,ANDISFINGERTIGHTWHENREADYTOSTART
PUMP. This O-ring should periodically be lubricated with
a silicone lubricant.
•3/8’linecomesfromlter
and goes to the corner of
the spa. This drains all the
water around the lter.
• Thisisagoodtimetocheck
the skimmer basket. Bring skimmer door (weir)
forward and unscrew basket. Clean out debris
and reinstall.
FRONT ACCESS SKIMMER/FILTER
• TurnpowerOFF at the breaker.
• Pullopenskimmerweirdoor.
• Reachinandturnskimmerbasketcounter-
clockwise to line up at section on basket.
• Pullstraightupandouttoremovebasket.Cleanout
debris and reinstall.
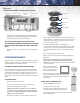
FILTER ACCESS LID
RETAINING RING
AIR RELIEF VALVE
DOME LID
FILTER CARTRIDGE
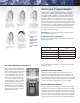
CRYSTALCLEAR
TUBE
OZONATOR
PUMP
PUMP PACK
CONTROL
LED POWER MODULE
VENT FAN
WATER HEATER
PUMP BLEEDER
CLEAR TUBING
VALVE
VALVE
UNION
UNION