TF-TV2609 TF-TV3209
LCD TV A Wide Array of Screen Settings You can choose different screen settings depending on the type of program you are watching or the surrounding conditions (the lighting or the outside weather conditions). You can switch between the Sport, Movie, Music and Normal options, or you can configure the screen settings yourself. A Wide Array of Sound Settings You can choose an optimal sound setting for the type of program you are watching.
ENGLISH FCC Compliance Statements Note : This equipment has been tested and found to comply with the limits for a Class B digital device, pursuant to part 15 of the FCC Rules. These limits are designed to provide reasonable protection against harmful interference in a residential installation. This equipment generates, uses and can radiate radio frequency energy and, if not installed and used in accordance with the instructions, may cause harmful interference to radio communications.
Important Safety Instruction 1) Read these instructions. 2) Keep these instructions. 3) Heed all warnings. 4) Follow all instructions. 5) Do not use this apparatus near water. 6) Clean only with a dry cloth. 7) Do not block any ventilation openings. Install in accordance with the manufacturer's instructions. 8) Do not install near any heat sources such as radiators, heat registers, stoves, or other apparatus (including amplifiers) that produce heat.
ENGLISH Precaution External Television Antenna Grounding If an outside antenna or cable system is connected to the television equipment, be sure the antenna or cable system is electrically grounded to protect against voltage surges and built-up static charges.
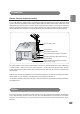
Precaution The unit should not be placed in an enclosed installation such as a bookcase or limited-space rack unless proper ventilation is provided. Do not use the unit near water, oil or inflammables. Do not use a damaged plug and do not let the power cord touch a heat source. Place the unit on a flat and stable surface. Do not place anything (vase, etc) on top of the unit. 6 Do not use the unit in direct sunlight and keep it away from heaters, stoves, and other sources of heat.
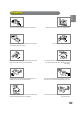
ENGLISH Precaution Do not use or store inflammable substances near the unit. Place the antenna away from the electric wire, not to touch even though it falls down by wind. Place the unit away from the wall for well ventilation. Do not touch the plug with wet hands. Be sure to insert the plug tightly. Hold the plug, not the cord, when disconnecting the plug from the wall outlet.
Table of Contents Precaution . . . . . . . . . . . . . . . . . . . . . . 5 Sound Mode Settings . . . . . . . . . . . . . . . . 26 Unpacking your TV . . . . . . . . . . . . . . . . . . 9 Custom Sound Mode Settings . . . . . . . . . . . . 26 Inserting Batteries in the Remote Control . . . . 9 Sound Balance Settings . . . . . . . . . . . . . . 27 Viewing the Control Panels (Front View) . . . . . . 10 Automatic Volume Control Settings . . . . . . . . 27 Viewing the Control Panels (Rear View) . . . .
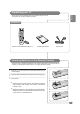
Unpacking your TV ENGLISH Please make sure the following items are included with your TV set. If any items are missing, contact your dealer. Accessories Remote Control & Batteries (AAA x 2) Operating Instructions Power Cord Inserting Batteries in the Remote Control You must insert or replace the batteries in the remote control when you purchase the TV or when you find that the remote control is no longer operating correctly.
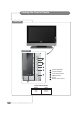
Viewing the Control Panels Front View Right Side 1 2 3 4 1 2 3 4 5 6 5 6 Power Indicator Status Indicator 10 Status Red Stand-by Green Power on Volume adjustment Channel selection Input TV/AV selection MENU selection Power Remote control sensor
ENGLISH Viewing the Control Panels Rear View Connection Cables (Optional : not included) HDMI Connector 4 DVI/PC Sound Cable 3 HDMI/DVI Connector 4 Component Signal Cable 10 Digital Sound Connector 6 Sound Cable 9 S-Video Connector 7 AV Cable 8 PC Cable 5 Coaxial Cable 11 Bottom Side 1 2 3 4 5 6 AC Power Input Terminal Service Port PC(DVI) Sound Input Terminal HDMI/DVI Input Terminal PC Input Terminal Optical Digital Sound Output Terminal 7 8 9 10 11 S-Video Input Terminal Externa
Remote Control - Make sure there are no objects between the remote control and its sensor. - Do not place the remote control near a heater or in damp place. 1 INPUT 12 POWER - Displays a menu of all available input sources. - Also used to confirm your choice in the on-screen menu. 13 CH-LIST - Press to see the channel list 14 AIR/CABLE 2 S.MODE - Press to select AIR/CABLE channels - Press to change to a preset sound mode 15 FAV 3 P.
Connecting an Antenna ENGLISH There are internal and external types of antennas. Rear of the TV Cable Television Network or Air Connecting an Antenna 1 Caution Use a coaxial cable to connect the rear panel of the TV's [AIR] or [CABLE] terminals and the wall mount or external antenna. ☛ lIf the signal is too weak to be received by the TV, purchase an additional wavelength amplifier for better reception. 2 When an Air signal is required, connect to the [AIR] terminal.
Connecting a VCR External devices may have different terminals for the same functions. VCR Rear of the TV Sound Cable Video Cable or S-Video Connector Useful Tips ☛ If there is a terminal called [S-Video Output], connect the TV [S-Video Input] terminal to the VCR [S-video output] terminal. Connect the sound cable to the [Video2 / S-Video Input left / right] (white / red). VIDEO1 Connecting the video / sound cables 1 Connect the antenna cable to the Antenna input of the rear panel of the VCR.
ENGLISH Connecting an HDMI Connection DVD (Home Theater) Rear of the TV HDMI Connector What is HDMI ? Connecting via HDMI 1 Connect the [HDMI/DVI input] terminal at the back of the TV and the [HDMI] terminal of the external device. 2 Connect the TV and the external device after all other connections are done. Watching HDMI 1 ☛ HDMI (High-Definition Multimedia Interface) : A next generation interface that connects the digital audio and video signals using only one cable without compression.
Connecting a PC PC Rear of the TV PC Sound Cable PC Cable Useful Tips ☛ Audio output is only available for PCs with a sound output terminal Connecting a PC 1 Connect the [PC input] and the PC monitor output using a PC video cable. 2 Connect the [PC sound input] and the PC audio output using a PC sound cable. 3 After this is completed, turn on the power of the TV and the PC. Watching a PC screen on a TV 1 PC Turn on the PC and check if your PC settings are correct.
Automatic Channel Settings 1 ENGLISH Any receivable channels can be memorized automatically. Press [MENU]. -The menu will appear. 2 Press [] and move to , then press [OK]. -The menu will appear. 3 Press [] and move to , then Press [OK]. -The menu will appear. 4 Press [] to move to the type of Antenna connection, and press [OK]. -The menu will appear. 5 Press [] to check the status, then press [OK].
Antenna Settings 1 Press [MENU]. -The menu will appear. 2 Press [] and move to , then press [OK]. -The menu will appear. 3 Press [] to move to , then press [OK]. -The menu will appear. 4 Press [] to select Air or Cable. 5 Press [EXIT] to exit the menu. Useful Tips ☛ A n a i r s i g n a l i s t r a n s m i t t e d v i a V H F / U H F o v e r t h e a i r . A n a l o g i s N T S C , wh i l e d igital is ATSC w ith a VSB mod ulated signal.
Adding favorite channels ENGLISH This function is to help users to select their favorite channels as quickly as possible. Press [FAV]. Go to Menu-Favorite channels and press the [FAV] button to check your favorite channels in the list. Adding a channel to the favorite channel list 1 Press [MENU]. -The menu will appear. 2 Press [] and move to , then press [OK]. -The menu will appear. 3 Press [] to move to , then press the [OK] button.
Current Program Information You can check the current time and channel information. (This is only available for digital broadcasts) Press [GUIDE]. Press [GUIDE] to view the program guide for the current channel. The default for the basic broadcasting guide should be set to . (The Program Guide may change without notice by the broadcast station.) 1 Press [GUIDE]. -The Current Guide will appear. 2 Press [] to move to , then press [OK].
Checking the strength of the digital signal ENGLISH This shows the current digital signal strength of a channel. Before Starting ☛ Keep the digital TV receiving mode as is. 1 Press [MENU]. -The menu will appear. 2 Press [] to move to , then press [OK]. -The menu will appear. 3 Press [] to move to , then press [OK]. -The reception sensitivity will be shown in the menu. 4 Press the [EXIT] button to exit the menu.
Screen Mode Settings Press [P.MODE] to recall a pre-set screen type Press [P.MODE]. Each press of the button changes the picture mode from ➔ ➔ ➔ . 1 Press [MENU]. -The menu will appear. 2 Press [] to move to , then press [OK]. -The Menu will appear. 3 Press [] to move to , then press [OK]. -The Menu will appear. 4 Press [] to select a screen mode.
1 ENGLISH Screen Color Settings Press [MENU]. -The menu will appear. 2 Press [] to move to , then press [OK]. -The Menu will appear. 3 Press [] to move to , then press [OK]. -The Menu will appear. 4 Press [] to move to a menu. -Press [] to move to , or . 5 Press [EXIT] to exit the menu. Useful Tips ☛ The PC and HDMI inputs support both screen color mode and RGB custom mode functions.
Film Mode Settings Set your selection to to watch your movie titles at the best quality. You will be able to watch with a more realistic movie screen. 1 Press [MENU]. -The menu will appear. 2 Press [] to move to , then press [OK]. -The Menu will appear. 3 Press [] to move to , then press [OK]. -The Menu will appear. 4 Press [] to move to . -Press [] to toggle between and . 5 Press [EXIT] to exit the menu.
Capturing a Still screen ENGLISH You can pause a scene on the screen. Press [STILL]. Each press of the button will advance the scene one frame. Useful Tips ☛ Audio will continue to operate while the screen is paused. ☛ Pressing a channel number or input signal will automatically cancel the function. Digital Audio Output Settings You can select your digital audio output as or . 1 Press [MENU]. -The menu will appear. 2 Press [] to move to , then press [OK].
Sound Mode Settings You can adjust the mode to Music, Movie, Sports, or News depending on the type of program you are watching. 1 Press [MENU]. -The menu will appear. 2 Press [] to move to , then press [OK]. -The Menu will appear. 3 Press [] to move to , then press [OK]. -The Menu will appear. 4 Press [] to select a sound mode. -Pressing [] will change the settings to , , , , or . 5 Press [EXIT] to exit the menu.
Sound Balance Settings 1 ENGLISH You can balance your speakers for better sound quality. Press [MENU]. -The menu will appear. 2 Press [] to move to , then press [OK]. -The Menu will appear. 3 Press [] to move to , then press [OK]. -The Menu will appear. 4 Press [¥] to change the left/right output levels. -You can adjust the output of the left/right speaker. 5 Press [EXIT] to exit the menu.
Sound (Digital Broadcasting) Settings Press [MTS] to listen to other languages. When English is set as the primary language, pressing [MTS] will change between , , and in this order. (Languages are only available when provided by a broadcasting station.) ■ ■ 1 When changing the channel, the set language will be selected. Press [MENU]. -The menu will appear. 2 Press [] to move to , then press [OK]. -The Menu will appear.
Automatic Time Settings 1 ENGLISH The auto time setting will receive time information from the digital broadcast station. Press [MENU]. -The menu will appear. 2 Press [] to move to , then press [OK]. -The Menu will appear. 3 Press [] to move to
Time and Date Settings Users can select Daylight Saving. 1 Press [MENU]. -The menu will appear. 2 Press [] to move to , then press [OK]. -The Menu will appear. 3 Press [] to move to
TV Activation Time Settings 1 Press [MENU]. -The menu will appear. 2 Press [] to move to , then press [OK]. -The Menu will appear. 3 Press [] to move to
Entering a PIN This option sets up or changes the password for blocking specific channels. 1 Press [MENU]. -The menu will appear. 2 Press [] to move to , then press [OK]. -The Menu will appear. 3 Press [] to move to , then press [OK]. -The Menu will appear. When first accessing the V-Chip menu, no password is set up. When no password is set up, channels cannot be blocked.
TVPG Rating 1 ENGLISH You can block programs based on the TV program rating. Press [MENU]. -The menu will appear. 2 Press [] to move to , then press [OK]. -The Menu will appear. 3 Press [] to move to , then press [OK]. -The Menu will appear. 4 Enter your 4-digit password using the keypad (0~9). -The Menu will appear. 5 Press [] to move to , then press [OK]. -The Menu will appear.
MPAA Ratings Restricting movies by their rating. 1 Press [MENU]. -The menu will appear. 2 Press [] to move to , then press [OK]. -The Menu will appear. 3 Press [] to move to , then press [OK]. -The Menu will appear. 4 Enter your 4-digit password (0~9) using the remote control. The Menu will appear. 5 Press [] to move to , then press [OK]. -The Menu will appear.
1 ENGLISH Captions Settings Press [MENU]. -The menu will appear. 2 Press [] to move to
, then press [OK]. -The Menu will appear. 3 Press [] to move to , then press [OK]. -The Menu will appear. 4 Press [] to move to , then press [OK]. -Captions will be activated. -Selecting will cancel the captions. 5 Press [EXIT] to exit the menu.Digital Mode The Digital Caption function operates for digital channels. 1 Press [MENU]. -The menu will appear. 2 Press [] to move to
, then press [OK]. -The Menu will appear. 3 Press [] to move to , then press [OK]. -The Menu will appear. 4 Press [] to move to , then press [OK]. -Digital Caption may be set. -Selecting will cancel Digital Captions. 5 Press [EXIT] to exit the menu.Checking Items before Connecting to a PC ENGLISH Check the list below before connecting a PC to the TV. Precautions Set your resolution and frequency to a resolution supported by the TV. Refer to the instructions when connecting a PC (graphics and sound cards). ■ Do not connect the power unless all connections have been completed. Severe damage can be caused if the power is on while devices are being connected. ■ Check the terminal of the PC Graphics Card.
Troubleshooting Guide If you are having problems with using the TV, please consult this guide below. If this guide does not help resolve the problem, please contact Technical Support by phone at 1-800-681-2629 or 718-416-3197, or by email at techsupport@cobyusa.com. Our hours are Monday to Friday, 8:30 AM–8:30 PM EST and Saturday to Sunday, 9:00 AM–5:30 PM EST. Setup and Connection Problems Solve The TV won't turn on. ■ Check your power cable connection. I can't view the Basic channels.
Troubleshooting Guide Problems Poor picture Black picture Lined and flickering picture. Disfunctioning channels. Solve ■ Is the power cord unplugged? Make sure the power cable is plugged in correctly, then press the power of the remote control. ■ Check if external input mode is selected Press [external input selection] and select TV ■ ■ ■ ■ ■ Picture with white and black dots. ■ Only certain channels are in black and white ■ The Sub-Screen is black.
Specifications TF-TV2609 Model name Size Display Size Pixel Number 0.1405 mm (H) x 0.4215 mm (V) 1366 x 768 (WXGA) Type a-Si TFT active matrix Brightness 500 cd / m2 Contrast Ratio Viewing Angle 600 : 1 176 (H) / 176 (V) Air 2 ch ~ 69 ch Cable Pixel Pitch LCD RF TV VIDEO Component 26” Diagonal 580.8 mm (H) x 328.
ENGLISH Specifications TF-TV3209 Model name Size Display Size Pixel Number 0.170 mm (H) x 0.510 mm (V) 1366 x 768 (WXGA) Type a-Si TFT active matrix Brightness 500 cd / m2 Contrast Ratio Viewing Angle 600 : 1 176 (H) / 176 (V) Air 2 ch ~ 69 ch Cable Pixel Pitch LCD RF TV VIDEO Component 32” Diagonal 697.69 mm (H) x 392.
Memo 42
Memo 43
P/N : 941261P1CB01