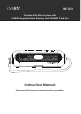
MP-C351 Portable MP3 Micro System with 512MB Integrated Flash Memory and SD/MMC Card Slot Instruction Manual Please read this manual carefully before operation.
SAFETY INSTRUCTIONS CAUTION For Customer Use: Enter below the serial number that is located on the bottom of the unit. Retain this information for future reference. RISK OF ELECTRIC SHOCK DO NOT OPEN CAUTION: TO REDUCE THE RISK OF FIRE AND ELECTRIC SHOCK, DO NOT REMOVE THE COVER (OR BACK) OF THE UNIT. REFER SERVICING ONLY TO QUALIFIED SERVICE PERSONNEL. Model No. MP-C351 Serial No.
SAFETY INSTRUCTIONS 1. Read these instructions carefully. Keep these instructions for future reference. 2. Heed all warnings and follow all instructions. 3. Do not expose to water or moisture. 4. Clean only with a dry cloth. 5. Keep objects away from ventilation openings. Do not block ventilation openings at any time. 6. Do not install near any apparatus that produces heat such as stoves, radiators, amplifiers, etc. 7. Do not force the power plug into a wall outlet.
TABLE OF CONTENTS SAFETY INSTRUCTIONS.................................................................................................................... 2 TABLE OF CONTENTS....................................................................................................................... 4 FEATURES.......................................................................................................................................... 6 PACKAGE CONTENTS....................................................
TABLE OF CONTENTS Manual Tuning.........................................................................................................................18 Preset Tuning..........................................................................................................................18 Store Preset Stations..............................................................................................................18 Store Presets Manually...............................................................
FEATURES • 512MB Integrated Flash Memory • Plays Digital Music from Most Online Stores (Microsoft DRM 9 Support) • 4 Integrated Aluminum-Cone Speakers Deliver Superior Sound • LCD Displays Song Title, Album, and Artist Information (ID3 Tag Support) • SD/MMC Card Slot Allows for Expanded Memory Capacity (SD/MMC Card Not Included) • Mini USB Port for Fast File Transfers • FM Radio with 20-Station Preset Memory • Real-Time MP3 Encoding (No PC Required) • Digital Voice Recording through Integra
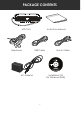
PACKAGE CONTENTS MP-C341 Earphones Instruction Manual USB Cable AC Adapter Line-In Cable Installation CD (for Windows 98 SE) - -
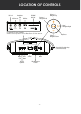
LOCATION OF CONTROLS DC Jack Headphone Jack AUX Line-In USB Port DC 6V SD/MMC Card Slot Previous / Navigation Left Volume + / Navigation Up Next / Navigation Right AUX LINE-iN CONNECTIONS PANEL Slide cover open in the direction of the arrow Volume - / Navigation Down Play/Pause CONNECTIONS A-B REC TIME EQ ALARM Repeat Time/ A-B Alarm Record/ Equalizer SNOOZE MENU Snooze Menu Play/Navigation Control - - Detachable Shoulder Strap (unscrew to detach)
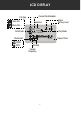
LCD DISPLAY Current Track Number File Type Voice File Alarm Battery Level Equalizer Music File Total Tracks File Format WMA MP3 02 0 NO RM 044 Play Mode MP3 MUSIC 01:16 128 44 KHZ KBPS Bit Rate Sample Frequency - - Elapsed Time
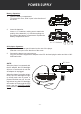
POWER SUPPLY Battery Operation 1. Open the battery compartment. To remove the cover, slide it open in the direction of the arrow. . Insert the batteries. Insert 4 x “C” batteries, making sure to match the polarity of the batteries (+/-) with the markings on the inside of the battery compartment. Replace the battery compartment cover. 4 x “C” Batteries AC Adapter Operation 1. Open the Connections panel located on the rear of the player. Slide the cover open in the direction of the arrow. .
SD/MMC CARD INSTALLATION The integrated SD/MMC card slot lets you upgrade the player’s memory capacity easily with additional SD/MMC cards. To install an SD/MMC card: 1. Open the Connections panel. Slide the cover open in the direction of the arrow. . Insert the SD/MMC card with the metal contacts facing up as shown in the diagram below. Press the card in until you hear a click. 3. To remove the SD/MMC card, press the card in and it will spring back out.
CONNECT TO A COMPUTER USB Driver Installation It is not necessary to install the USB driver if your computer is running Microsoft Windows ME/2000/XP or newer, or Macintosh OS X. Computers running these operating systems will recognize your player automatically when connected. Microsoft Windows 98 SE It is only necessary to install the USB driver if your computer is running Windows 98 SE. 1. Insert the Installation CD into your computer’s CD or DVD drive.
CONNECT TO A COMPUTER 4. Disconnect the USB cable from the player and your computer. Macintosh OS X 1. On the left side of the Finder window, identify the appropriate Removable Disk icon. . Click on the “Eject” arrow on the right of the Removable Disk icon. 3. Disconnect the USB cable from the player and your computer. Transferring Files The USB connection makes it easy to transfer music files (MP3/WMA) or any other data quickly between the player and your computer.
BASIC OPERATIONS Standby Mode The player will enter Standby mode automatically when it is connected to a power source. The LCD will display the time (Clock) in Standby mode. Power On/Off • To turn the player on, press • To turn the player off, press and hold while in Standby mode. . Note: To display the time while the player is on, press and hold TIME/ALARM. The LCD will return to a normal display after a few seconds. Menu Navigation To access the Main menu, press MENU while the player is on.
MAIN MENU OVERVIEW Use the Main menu to select and enter the different player modes shown below. To access the Main menu, press MENU while the player is on.
NAVIGATION MODE (NAV) Enter Navigation mode to browse the files and folders stored in the player or SD/MMC card. To enter NAV mode, select and confirm NAV in the Main menu. The NAV options are: • Music • Voice • Play List (M3U) • SD/MMC Card Navigation Controls • Press • Press / to move up/down the list of files/folders, respectively. to confirm a selection. • If a folder is selected, the contents of that folder will be displayed. Press to return to the previous folder.
MUSIC MODE (MSC) Enter Music mode to start music playback. To enter MSC mode, select and confirm MSC in the Main menu. (Playing an audio file in NAV mode will place the player in MSC mode as well.) Music Controls • Press to play a track. Press again to pause playback. Press paused to stop playback completely. • Press to skip to the next track; press and hold to fast forward through the current track. • Press to skip to the previous track; press and hold to reverse through the current track.
FM RADIO MODE (FM) Enter FM Radio mode to listen to FM radio broadcasts. To enter FM mode, select and confirm FM in the Main menu. There are two methods of tuning into stations: MANUAL and PRESET. When the player is in PRESET mode, the current preset station number will be displayed in the upper-left corner of the screen. Press to change between these two modes. Manual Tuning Place the player in MANUAL tuning mode, then: • Press to increase the station frequency; press and hold with a broadcast signal.
AUXILIARY MODE (AUX) Enter Auxiliary mode to record or play an external device through the player’s speakers. You may wish to connect the player to devices such as iPods® (or other MP3 players), portable media players (PMPs), portable video game consoles, portable DVD players, or any other device with audio. To enter AUX mode, select and confirm AUX in the Main menu. Connect an External Audio Source To connect an external audio source to the player: 1.
RECORDING The player can record from 3 types of sources: Microphone, Line-In, or FM Radio. (See the System Mode (SYS) section for details about changing the player’s recording options.) Voice Recording Make voice recordings through the integrated microphone located on the front face of the player. 1. Set the REC Input to “MIC” (see the System Mode (SYS) section for details). . Place the player in MSC mode. 3. Make sure that playback is stopped completely. • 4. 5.
RECORDING FM Recording Make recordings from the FM Radio. 1. Place the player in FM Radio mode. . Press REC to start recording the FM broadcast. • 4. Press to pause recording; press again to resume recording. Press REC to stop and save the recording. • The resulting file will be saved to the “Record” folder • The file will be named FMXXX.MP3 where XXX corresponds to the numerical sequence in which the recording was made (numbering starts from 001.
ALARM CLOCK The player can be set to turn on and play at a predefined time. (See the System Mode (SYS) section for details about changing the player’s Alarm Clock options.) • To turn the alarm clock on, press TIME/ALARM while the player is on. The “Alarm On” indicator will appear on the screen. • • Make sure the correct time has been set (see the Time Set Mode (Set) section for details). • Make sure the “Alarm On” time has been set (see the Time Set Mode (Set) section for details).
TIME SET MODE (SET) Enter Time Set mode to set the internal Clock and Alarm time. To enter SET mode, select and confirm SET in the Main menu. The Time Set options are: Clock Set and Alarm Set. Clock Set Adjust the clock to the correct time. 1. Enter SET mode from the Main menu and then select and confirm CLOCK SET. . Press / to select which field to adjust (AM/PM, Hour, Minute). 3. Press 4. Press / to adjust the selected (blinking) field.
SYSTEM MODE (SYS) Enter System mode to set the system options of the player. To enter SYS mode, select and confirm SYS in the Main menu. The SYS options are: EQ, Repeat Mode, Display, Auto Off, Sleep Time, Recording, Resume, Delete File, Format, Reset, Information, and Alarm Mode. EQ (Equalizer) Adjust the EQ settings to optimize the way the player processes audio signals. The EQ options are: Normal, Classic, Live, Pop, and Rock. 1. Enter SYS mode from the Main menu and then select and confirm EQ. .
SYSTEM MODE (SYS) Lyric Turn LYRIC display on or off. Lyric display requires a “.LRC” lyric file which may be found on the internet or may be created with a Lyric file editor. Lyric files can contain synchronized timing information as well as lyric information. Lyric files must have the same name as its corresponding music file (eg, “SongTitle1.lrc” and “SongTitle1.mp3”) and must be placed in the same directory. 1.
SYSTEM MODE (SYS) Auto Off Adjust the amount of time the player remains on after a button is pressed; the player will then enter Standby mode to conserve power. The Auto Off options are: 30 sec, 1 min, 2 min, or 3 min. 1. Enter SYS mode from the Main menu and then select and confirm AUTO OFF. . Press / to select an AUTO OFF option. 3. Press to confirm the change (or press MENU to cancel the changes). Sleep Time Set the amount of time the player will play music for before turning off automatically.
SYSTEM MODE (SYS) REC Input (Recording Input) Adjust the recording input source. The REC Input options are: MIC and Line. Select MIC to record from the integrated microphone; select LINE to record from an external device connected to the AUX LINE-IN jack (see the AUXILIARY MODE (AUX) section for details about connecting external devices to the player.) 1. Enter SYS mode from the Main menu, select and confirm RECORDING, and then select and confirm REC INPUT. . Press / to select a REC INPUT option. 3.
SYSTEM MODE (SYS) Format Prepare a disk (internal memory or an installed SD/MMC card) for use with the player when necessary. Always use the Format function of the player when it is necessary to format a disk. Formatting destroys all data on a disk so make sure to back up your data before formatting the disk. 1. Enter SYS mode from the Main menu and then select and confirm FORMAT. . Select and confirm INTERNAL M.
TROUBLESHOOTING If you have a problem with this player, please read the troubleshooting guide below and check our website at www.cobyusa.com for Frequently Asked Questions (FAQs) and firmware updates. If these resources do not resolve the problem, please contact Technical Support. COBY Electronics Technical Support Hours: Monday to Friday, 8:00 AM–11:00 PM EST Saturday and Sunday, 9:00 AM–5:30 PM EST Email: techsupport@cobyusa.com Phone: 800-681-2629 or 800-727-3592 or 718-416-3197 Web: www.cobyusa.
SPECIFICATIONS Power Supply AC: 100-240V Automatic Power Switching DC: 6V (4 x “C” Batteries) Internal Memory 512MB Flash Expanded Memory Port (optional) SD/MMC Card Slot Interface Port USB 1.1 Display Type Dot Matrix LCD Display Resolution 128 x 64 Processor 65MIPS DSP Supported Audio Formats MP3: 96-320kbps, Variable Bit Rate WMA: 32-192kbps Recording Format IMA-ADPCM encoding DRM Support Microsoft DRM 9 with Windows XP SP1 and Windows Media Player FM Frequency Range 87.5 - 108.
- 31 -