
Service manual


3
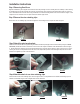
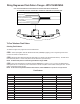
FIGURE 1 FIGURE 2
Step 1-Removing Sun Visors
Begin the installation by removing the Crown Victoria's driver and passenger sun visors. Identify each visor with tape or other marking
to indicate the driver from the passenger side unit; they are not identical. There are three screws that hold the pivotal arm of the sun
visor to the headliner. Remove each screw using a small #20 torx screwdriver starting with the lower screw as shown in Figure 1. Then
unclip the sun visor and rotate it over to expose and remove the two upper screws.
Step 2 Remove the visor retaining clips
Remove the sun visor retaining clips, unscrew the single torx screw holding each one in place as shown in Figure 2.
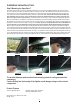
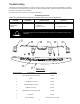
Step 3 Attach the pivot arm brackets
Attach the outer brackets that are supplied noting the difference between passenger and driver side brackets (see Figure 3 -Driver
side shown). Rotate the Pivot Arm on the Driver's side sun visor and verify the orientation of the Outer Bracket as shown in Figure
4. Position the Driver's Side pivot arm and loosely attach the rst Torx screw as shown in Figure 5 . Next, move the sun visor over in
order to gain access to loosely attach the other two Torx screws. Repeat this operation for the Passenger Side pivot arm and outer
bracket. Do not tighten any of the screws at this time.
Step 4 Attach brackets to sun visor retaining clips
Place the inner bracket on the retaining clip as shown in Figures 6 and 7. Loosely attach the inner bracket and retaining clip to the
headliner as illustrated in Figure 8. Do not tighten these screws at this time.
FIGURE 3 FIGURE 4 FIGURE 5
FIGURE 6 FIGURE 7 FIGURE 8
Installation Instructions