
Service manual

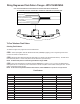

Step 5 Mounting the SuperVisor™
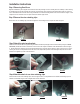
Once all four brackets and sun visors are attached, the SuperVisor is now ready to be installed. Rotate the rear view mirror down
as far out of the way as possible. The cable can either be routed across the top of the SuperVisor and down the corner door post as
shown in Figure 9 or up under the headliner at the center of the vehicle, then across and down behind the plastic corner door post
cover, then down to the oor behind the dashboard (whichever is preferable). Note: To Route the cable above the headliner and
down behind the door post covers, refer to the Ford service manual for detailed instructions as to how to remove the door
post cover to gain access to route the cable. It is advisable to leave an extra loop or loops of cable when installing the light bar to
allow for future changes or reinstallations. Carefully move the SuperVisor into position by tilting one end up with the front outer tip of
the SuperVisor in front of the corner post of the Crown Vic as shown in Figure 10, then swing the other end up into position being very
careful not to scratch the Crown Vic's plastic corner post covers (Note: As you are moving the SuperVisor into position Make sure
you keep the slack out of the SuperVisor's power cable so that it will not interfere with the nal positioning of the SuperVi-
sor). Line up the mounting holes in the outer mounting brackets with the threaded holes in the SuperVisor and thread the supplied
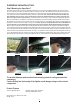
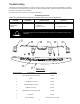
1/4"-20 bolts and internal tooth lock washers into the SuperVisor's Outer Panel (see Figure 11). Next line up the mounting holes in the
Inner mounting brackets with the threaded holes in the SuperVisor and loosely thread the supplied 1/4"-20 bolts and internal tooth lock
washers into holes in the SuperVisor's Outer Panel (see Figure 12). Tighten the 1/4-20 bolts in the Outer Mounting Brackets (see Fig-
ure 13), then tighten the three Torx screws in each of the two outer Pivot Brackets.Tighten the two center inner mounting screws, then
while pushing up on the SuperVisor's Outer Panel, tighten the last two 1/4-20 bolts at the Inner Mounting Brackets (see Figure 14).
The bracket fasteners make excellent hard mounting points for radar guns and video
cameras etc.
Caution:Drilling into the housing of the lightbar could damage wiring or other internal
components.
FIGURE 9 FIGURE 10 FIGURE 11
Installation Instructions Cont.
FIGURE 12 FIGURE 13 FIGURE 14
4
Product Features
TriCore™ lighthead options: Red, Blue, Amber, White, and Green;
Flashing or Steady Burn Control
Size: 46.53" long x 1.69" tall x 6.97" deep
Weight: 7.5 lbs