
Technical data


Operation
10 312185S
Operation
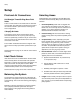
Pressure Relief Procedure
1. Shut off the air to the supply pumps.
2. Close the bleed-type master air valve (required in
your system).
3. Hold a metal part of the valve firmly to the side of a
grounded metal pail, and trigger the dispense valve
to relieve pressure.
4. Shut off the air to the dispense valve, if applicable.
If you suspect that the dispense needle or hose is com-
pletely clogged, or that pressure has not been fully
relieved after following the steps above, very slowly
loosen the hose end coupling and relieve pressure grad-
ually, then loosen completely. Now clear the needle or
hose.
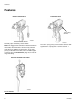
Lever Actuated Valve and
Electric Switch Hand-held Valve
• Be sure the air supply lines are connected correctly
to the (I) and (O) valve air ports.
• To open or close the valve and maintain the open or
closed status, a minimum of 40 psi (280 kPa, 2.8
bar) air pressure must be supplied and maintained
at the (I) or (O) port.
• The trigger and lever only activates the electrical
switch in the handle, which turns the remote sole-
noid on and off. See page 20 for electrical diagram.
• Trigger the gun or pull the lever to turn the solenoid
on. Release the trigger or lever to turn the solenoid
off.
Machine Mount Valve
• Be sure the air supply lines are connected correctly
to the ON (I) and OFF (O) valve air ports.
• To open or close the valve and maintain the open or
closed status, a minimum of 40 psi (280 kPa, 2.8
bar) air pressure must be supplied and maintained
at the ON (I) or OFF (O) port.
• Apply and maintain air pressure to the ON (I) air
port on the valve, and remove air pressure from the
OFF (O) air port on the valve to open the valve.
• Apply and maintain air pressure to the OFF (O) air
port on the valve, and remove air pressure from the
ON (I) air port on the valve to close the valve.
Pneumatic Hand-held Valve
The valve operation is such that it is either fully open or
fully closed.
The valve is opened and closed by the internal air con-
trol valve. Trigger the gun to open the valve. Release the
trigger to close the valve.
Ratio Checking
The output mix ratio of your proportioner can be
checked by dispensing the two fluids separately out of
the nosepiece into tared cups. The cups can then be
weighed and the weights divided to get the mix ratio by
weight.
Use ratio check nozzles 255247 with 15K688 retaining
nut for 1:1 models, or 255245 with 15K688 retaining nut
for 10:1 models to make ratio checks.
Ratio checks provide information on the ratio of an over-
all sample. Transient problems (soft spots) caused by
starting and stopping the flow (lead-lag) may not show
up in this kind of ratio check. Physical tests of the mixed
fluid are the best check of correct ratio and mix quality.