GEFORCE GTX 550 Ti GRAPHICS CARD ® INSTALLATION GUIDE
GEFORCE GTX 550 TI INSTALL ATION GUIDE NVIDIA GeForce GTX 550 Ti
Table of Contents Table of Contents Introduction 1 About This Guide 1 Minimum System Requirements 2 Unpacking 3 Equipment 3 Hardware Installation Safety Instructions Before You Begin Installing the GeForce Graphics Card 5 5 6 6 Driver Installation 11 Configuring SLI Accessing the NVIDIA Control Panel Enabling SLI 15 15 16 Configuring HDMI Enabling Audio Over HDMI 17 17 Features 19 Compliances 23
Table of Contents
Introduction 01 Introduction Thank you for choosing the NVIDIA® GeForce® GTX 550 Ti graphics card. Built from the ground up for DirectX 11 tessellation, the GeForce GTX 550 Ti delivers revolutionary geometry performance for the ultimate next generation DX11 gaming experience. With full support for NVIDIA 3D Vision the GeForce GTX 550 Ti provides the graphics horsepower and video bandwidth needed to experience games and high definition Blu-ray movies in eye-popping stereoscopic 3D.
2 01 Introduction Minimum System Requirements >> Motherboard PCI Express® or PCI Express 2.0-compliant motherboard with one dual-width x16 graphics slot. For a 2-way SLI configuration, you need an SLI-ready motherboard with one dual-width x16 graphics slot for each graphics card. >> System Power Supply Minimum 400W or greater system power supply (with a minimum 12V current rating of 24A) with one 6-pin PCI Express supplementary power connector for each graphics card.
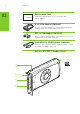
3 Unpacking 02 Unpacking Prior to unpacking your new NVIDIA GeForce GTX 550 Ti graphics card, it is important to make sure you meet all the system requirements listed on page 2 for a smooth installation. Be sure to inspect each piece of equipment shipped in the packing box. If anything is missing or damaged, contact your reseller. Equipment The following equipment and documentation are included in the GeForce GTX 550 Ti graphics card box.
4 Unpacking 02 Registration Card WELCOME Register to gain priority access to online and phone support. 4-to-6 Pin Adapter (Optional) Use the 4-to-6 pin adapter to convert two 4-pin power supply connectors to one 6-pin connector. DVI-to-VGA Adapter (Optional) Use to connect a VGA monitor to the DVI connector or a DVI monitor to the VGA connector. Mini-HDMI-to-HDMI Adapter (Optional) Use to connect the mini-HDMI connector on the card to a regular size HDMI connector.
Hardware Installation 5 03 Hardware Installation Installing the NVIDIA GeForce GTX 550 Ti graphics card hardware involves opening up your computer. Follow all of the safety instructions provided here to ensure that there is no damage to you, your computer, or the graphics board. Safety Instructions To reduce the risk of fire, electric shock, or injury, always follow basic safety precautions. Note: All hardware must be installed prior to installation of the drivers.
6 03 Hardware Installation Before You Begin The GeForce GTX 550 Ti graphics card is a PCI Express 2.0 ×16 graphics card. Your computer may already have a graphics card installed in the PCI Express slot. If so, you will need to remove that graphics card and replace it with the GeForce GTX 550 Ti graphics card. If you do not have a graphics card, this means that your motherboard has on-board graphics (there is a graphics chip installed on your motherboard or integrated in the motherboard chipset).
Hardware Installation 7 3 Remove any existing graphics card (if there is one). Save hardware (such as screws and brackets) to use when installing the NVIDIA graphics card. ! Attention: If your system has been running for a period of time prior to opening the panels, it is very important that you wait until the graphics card in your system has cooled before taking the card out of the system. Graphics cards get very hot when they have been operating for any length of time.
8 03 Hardware Installation 5 Plug the graphics card into the Primary PCI Express x16 slot on your motherboard. This is often the slot closest to the CPU but may be the second or third slot. Look for the slot labeled ×16. It will likely be the only PCI Express slot with a retention lever on the end of the slot or the one closest to the CPU. Note: It is recommended that you install the graphics card into the primary PCI Express x16 slot.
9 Hardware Installation 6 Two GeForce graphic cards (2-way SLI): a) Install the second GeForce card into the outer most PCI Express x16 slot on the motherboard. b) Connect the two cards together using the dual SLI bridge connector that came with your SLI-ready motherboard. SLI 7 Connect one 6-pin PCI Express auxiliary power connectors coming from the computer power supply to the connectors on the top edge of on the top edge of the GeForce GTX 550 Ti graphics card.
Hardware Installation 8 Reinstall the cover on your computer and reconnect any cables that you removed earlier in the installation. 9 Connect your computer monitor(s) to the GeForce graphics card 1 using the mini-HDMI and DVI connectors. The GeForce GTX graphics card can be connected to PC monitors that support DVI, VGA, and HDMI inputs. A single GeForce GTX 550 Ti graphics card can support up to two displays per card in a multi-monitor configuration. 2 10 DVI connector for digital displays.
Driver Installation 11 04 Driver Installation With the hardware installed, it is now time to install the graphics driver. NVIDIA recommends downloading and installing the most recent drivers available at: http://www.nvidia.com/drivers. Use the following procedure to load the graphics drivers. 1 Power up your system. 2 Insert the driver installation CD or double click on the GeForce driver executable file you downloaded from www.nvidia.com/drivers.
12 04 Driver Installation 3 Select the Express Installation option and then click NEXT when the Install Options window displays. Note: It may take several minutes for the installation to take place. Your screen may go blank for a few seconds one or more times during installation. This is normal. The Install in progess… screen will let you know when the installation is complete.
Driver Installation 13 4 Click RESTART NOW once the install has finished. Note: Please visit www.nvidia.com/support to access our 24 x 7 x 365 online support system, where you can submit questions directly to our tech support staff. Questions may only be submitted in English. GeForce customers purchasing NVIDIA-branded products also have access to toll free technical support at 1-800-797-6530 from 8:00AM-5:00PM Pacific Time, M-F. The technical support line is accessible from the U.S. and Canada only.
14 04 Driver Installation
Configuring SLI 15 05 CONFIGURING SLI SLI is a revolutionary technology developed by NVIDIA that allows you to connect identical GeForce graphics cards together to deliver increased performance. You can enable SLI by either clicking on the SLI capable system balloon in the system tray or by going to the NVIDIA Control Panel. Accessing the NVIDIA Control Panel 1 To access the NVIDIA Control Panel, you can right-click the Windows desktop and select NVIDIA Control Panel from the menu.
16 04 Configuring SLI >> Windows Vista zz Classic view Go to Start Control Panel and select the NVIDIA Control Panel icon. zz Control Panel Home view Go to Start Control Panel Additional Options and select the NVIDIA Control Panel icon. Enabling SLI 2 Once you have the NVIDIA Control Panel open, click on Set SLI and PhysX configuration in the left task pane. 3 Select from the following multi-GPU configurations: >> Disable SLI Select this mode when you want to drive displays on each GPU.
Configuring HDMI 17 05 CONFIGURING HDMI Connecting your HDTV via HDMI allows you to output both digital audio and video from your graphics card to an HDTV. Enabling Audio Over HDMI If you are connecting to your display over HDMI, you may need to set the HDMI output to be your default audio device. In Windows 7, select Start Control Panel Sound. On the Playback tab, select your HDMI display and select Set Default.
18 05 Configuring HDMI
19 Features 06 FEATURES >> Microsoft® DirectX® 11 Support: DirectX 11 GPU with Shader Model 5.0 support designed for ultra high performance in the new API’s key graphics feature, GPU-accelerated tessellation. 1 >> NVIDIA® 3D Vision™ Ready : GeForce GPU support for NVIDIA 3D Vision, bringing a fully immersive stereoscopic 3D experience to the PC. A combination of high-tech wireless glasses and advanced software, 3D Vision transforms hundreds of PC games into full stereoscopic 3D.
20 06 Features definition video decode acceleration and post-processing that delivers unprecedented picture clarity, smooth video, accurate color, and precise image scaling for movies and video. zz Hardware Decode Acceleration: Provides ultra-smooth playback of H.264, VC-1, WMV, DivX, MPEG-2 and MPEG-4 HD and SD movies without the need for a dual or quad-core CPU. zz Dual-stream Hardware Acceleration: Supports picture-inpicture content for the ultimate interactive Blu-ray and HD DVD movie experience.
21 Features >> PCI Express 2.0 Support : Designed for the new PCI Express 2.0 bus architecture offering the highest data transfer speeds for the most bandwidth-hungry games and 3D applications, while maintaining backwards compatibility with existing PCI Express motherboards for the broadest support. >> Dual-link DVI Support: Able to drive industry’s largest and highest resolution flat-panel displays up to 2560x1600 and with support for High-bandwidth Digital Content Protection (HDCP). 6 >> HDMI 1.
22 06 Features
Compliances 07 COMPLIANCES >> Australian Communications Authority (C-Tick), Class B >> Bureau of Standards, Metrology, and Inspection (BSMI), Class B >> Conformité Européenne (CE), Class B >> Federal Communications Commission (FCC) - Class B >> Industry Canada (ICES-003), Class B >> Korean Communications Commission (KCC), Class B >> Underwriters Laboratories (UL, cUL) >> Voluntary Control Council for Interference (VCCI), Class B >> ISO9247-307 VDT Ergonomics 23
24 07 Compliances
Compliances 25 Notice ALL NVIDIA DESIGN SPECIFICATIONS, REFERENCE BOARDS, FILES, DRAWINGS, DIAGNOSTICS, LISTS, AND OTHER DOCUMENTS (TOGETHER AND SEPARATELY, “MATERIALS”) ARE BEING PROVIDED “AS IS.” NVIDIA MAKES NO WARRANTIES, EXPRESSED, IMPLIED, STATUTORY, OR OTHERWISE WITH RESPECT TO THE MATERIALS, AND EXPRESSLY DISCLAIMS ALL IMPLIED WARRANTIES OF NONINFRINGEMENT, MERCHANTABILITY, AND FITNESS FOR A PARTICULAR PURPOSE. Information furnished is believed to be accurate and reliable.
www.nvidia.