
Operating instructions


10
7. Allow the unit to operate at the highest setting until the room temperature reaches your comfort
level.
8. Turn the control knob clockwise until the flame goes out. This sets the control valve to operate
in this temperature range.
9. After the log set cycles a few times, you can increase or decrease the temperature setting simply by
rotating the control knob toward “HI” or “LOW”.
10. To turn the main burner off, simply rotate the control knob clockwise to the “PILOT” position.
This will allow the pilot to continue to burn until you are ready to use the log set again.
11. To turn the log set completely off, rotate the control knob clockwise to the “OFF” position. If
this is done, the pilot must be re-ignited the next time you use your log set.
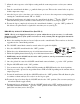
HM2-MIL 18, 24 & 33 LP & Natural Gas (See FIG. 2)
NOTE: This log set is shipped from the factory to operate without the use of any accessory (i.e. wall switch,
thermostat, remote control). If any of these accessories are used, you must follow the appropriate instructions
for these accessories.
+ Notice the marking slots that are located adjacent to the control knobs. These notches are the line-
up points for the control knob positions.
+ The ON/OFF control knob cannot be turned unless it is pushed in slightly.
1. Place the ON/OFF control knob in the “OFF” position.
2. Follow the safety information on page 16 of this instruction manual.
3. Follow the lighting instructions on page 16 of this instruction manual.
4. NOTE: Make sure the ON/OFF switch is in the “OFF” position or your log set main burner will ignite
when you follow the next step.
5. Once the pilot is lit, rotate the ON/OFF control knob counterclockwise to the “ON” position.
6. Flip the ON/OFF switch to the “ON” position.
7. You can now set the log set to HI or LOW by turning the HI/LOW knob to the desired position.
8. Your log set can be operated at any position between HI or LOW, depending on the amount of heat
output you prefer.
9. To turn the main burner off, flip the ON/OFF switch to the “OFF” position. This will allow the pilot
to continue to burn until you are ready to use the log set again.
10. To turn the log set back on, flip the ON/OFF switch to the “ON” position. (You can turn your log set
off and on with the toggle switch.)
11. To turn your log set completely off, flip the ON/OFF switch to the “OFF” position and rotate the
ON/OFF control knob clockwise to the “OFF” position. If this is done, the pilot must be re-
ignited the next time you use the log set.
THTP
TP TH
PILOT
it
PILOT
S
ON
OFF
LO
HI
FIG. 2
PIEZO
ON/OFF
SWITCH