
Operating instructions


8
ASSEMBLY INSTRUCTIONS
1. Remove grate/burner assembly from the box and place in the center of the fireplace.
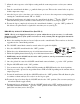
2. Connect the gas line to the appliance regulator located under the grate. NOTE: The manual and
thermostat valve units will have this appliance regulator. The millivolt valve will not have this
regulator. The appliance regulator is built into the millivolt valve and the gas line is connected to the
valve.
3. Make sure the gas connections are tight. Turn on the gas and coat each joint with a soap and water
solution and watch for air bubbles, which will indicate leaks. Any leaks must be corrected before
proceeding with installation. DO NOT USE A FLAME OR ANY IGNITION SOURCE TO
CHECK FOR LEAKS.
4. Remove logs from the box. Notice the notches in the larger logs and the numbers on the bottom of
the same logs. The log placement is very important to the safe operation of the appliance.
NOTE: Match the log placement photo in this instruction manual with the model number of your log set
for correct log placement. The logs MUST be placed exactly as shown. If there is any evidence of carbon or
blackening on the logs, they may be incorrectly placed. There should not be any carbon or blackening on
the logs at any time.
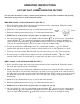
5. Place the back log in the grooves on the elevated cradle toward the back of the grate making sure
the grooves in the bottom of the log fit on the cradle.
6. Place the middle log in the grooves on the center elevated section of the cradle making sure the
grooves in the bottom of the log fit on the cradle. This will position this log between the burner.
7. Place the front log on the front of the grate in front of the cradle making sure the grooves on the
bottom and front of the log fit the bars on the grate.
8. Place the small top logs in the grooves on top of the front and back log, making sure these logs lay
across the middle log in the appropriate groove.
9. Match the model number of your log set with the log set on pages 13 and 14 of this instruction
manual. Your log set should look like this. If it doesn’t, follow steps 5 through 8 above.
This appliance may be installed in an aftermarket *permanently located, manufactured (mobile)
home, where not prohibited by state or local codes.
*Aftermarket: Completion of sale, not for the purpose of resale, from the manufacturer.
This appliance is only for use with the type of gas indicated on the rating plate. This appliance is
not convertible for use with other gases.