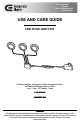
Item #844-606 848-665 Model #847658001054 847658001061 USE AND CARE GUIDE LED PUCK LIGHT KIT Questions, problems, missing parts? Before returning to the store, call Commercial Electric Customer Service 8 a.m. - 6 p.m., EST, Monday - Friday 1-877877-527527-0313 HOMEDEPOT.COM HOMEDEPOT .COM THANK YOU We appreciate the trust and confidence you have placed in Commercial Electric through the purchase of this LED puck light kit. We strive to continually create quality products designed to enhance your home.
Table of Contents Table of Contents ................................. 2 Safety Information ................................ 2 Warranty ............................................... 3 Pre-Installation ..................................... 3 Planning Installation................................... 3 Tools Required ........................................... 3 Hardware Required .................................... 3 Package Contents ...................................... 4 Installation – Surface Mounting ..
Warranty LIMITED WARRANTY The manufacturer warrants this product to be free from defects in materials and workmanship for a period of three (3) years from date of purchase. This warranty applies only to the original consumer purchaser and only to products used in normal use and service.
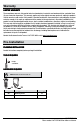
Pre-Installation (continued) PACKAGE CONTENTS A B C D Part E Description Quantity A LED puck assembly 3 B Trim ring (preassembled to LED lights) 3 C Power cord switch 1 D Connection box 1 E Driver 1 4
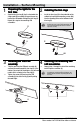
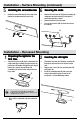
Installation – Surface Mounting 1 □ Preparing the lights for the first time 2 □ Separate the trim ring (B) that is attached to the single-cord LED assembly (A) by pushing on the back of the LED module through the trim ring (B). Repeat this step for the remaining LED assemblies. Installing the trim rings Install the trim rings (B) to the underside of the cabinet by inserting two mounting screws (AA) into the mounting holes on the bottom of each trim ring (B).
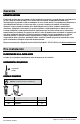
Installation – Surface Mounting (continued) 5 Installing the connection box 6 □ Attach the connection box (D) to the side of the cabinet using two mounting screws (AA). □ □ □ Securing the cords Connect the wire from the LED puck assembly (A) and power cord with switch (C) to the hole in connection box (D) as shown. Connect the driver (E) to the cord. Use nail-on fasteners (BB) to attach the wire on the cabinet.
Questions, problems, missing parts? Before returning to the store, call Commercial Electric Customer Service 8 a.m.- 6 p.m., EST, Monday-Friday 1-877877-527527-0313 HOMEDEPOT.COM HOMEDEPOT .COM Retain this manual for future use.
Artículo #844-606 848-665 Modelo #847658001054 847658001061 GUÍA DE USO Y CUIDADO JUEGO DE LÁMPARAS LED DE DISCO ¿Tiene preguntas, problemas, o faltan piezas? Antes de regresar a la tienda, llame al Servicio a Clientes de Commercial Electric de lunes a viernes de 8 a.m. a 6 p.m., hora local del Este 1-877877-527527-0313 HOMEDEPOT.COM GRACIAS Agradecemos la confianza que ha puesto en Commercial Electric a través de la compra de este juego de lámparas LED de disco.
Tabla de contenido Tabla de contenido............................... 2 Información de seguridad .................... 2 Garantía ................................................ 3 Pre-instalación ..................................... 3 Planificación de la instalación ................... 3 Herramientas requeridas ........................... 3 Herraje requerido ....................................... 3 Contenido del paquete ...............................
Garantía GARANTÍA LIMITADA El fabricante garantiza que este producto está libre de defectos en materiales y mano de obra por un periodo de tres (3) años a partir de la fecha de compra. Esta garantía aplica únicamente al comprador consumidor final y únicamente para los productos usados en condiciones de uso y servicio normal.
Pre-instalación (continuación) CONTENIDO DEL PAQUETE PAQUET E A B C D Pieza E Descripción Cantidad A Ensamble del disco LED 3 B Anillo de recorte (preensamblado en las lámparas LED) 3 C Interruptor del cable eléctrico 1 D Caja de conexiones 1 E Controlador 1 4
Instalación – Montaje sobre superficie 1 □ Preparación por primera vez de las lámparas 2 Instalación de los anillos de recorte □ Instale los anillos de recorte (B) en la parte de abajo del gabinete insertando dos tornillos de montaje (AA) en los agujeros de montaje en la parte de abajo de cada anillo de recorte (B). Separe el anillo de recorte (B) que está puesto en el ensamblaje de lámpara LED de un solo cable (A) empujando por la parte trasera del módulo LED a través del anillo de recorte (B).
Instalación – Montaje sobre superficie (continuación) Instalación de la caja de 5 6 conexiones □ □ Instale la caja de conexiones (D) a un lado del gabinete usando dos tornillos de montaje (AA). □ □ Fijación de los cables Conecte el cable del ensamblaje LED de disco (A) y el cable eléctrico con el interruptor (C) en el agujero de la caja de conexiones (D) como se muestra. Conecte el controlador (E) al cable. Use sujetadores con clavos (BB) para instalar el cable en el gabinete.
¿Tiene preguntas, problemas, o faltan piezas? Antes de regresar a la tienda, llame al Servicio a Clientes de Commercial Electric de lunes a viernes de 8 a.m. a 6 p.m., hora local del Este 1-877877-527527-0313 HOMEDEPOT.COM Retenga este manual para uso futuro.