
Use and Care Manual


7 HOMEDEPOT.COM
Please contact 1-877-527-0313 for further assistance.
Suspension Mounting (continued)
7
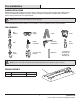
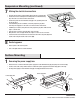
Making the electrical connections
□ Feed the electrical wires from the fixture (A) through the cover plate (AA).
□ Connect the hot and neutral (black and white) wires from the fixture body
(A) to the same color wires from the electrical box.
□ Connect the green wire from the fixture body (A) to the grounding wire from
the electrical box.
□ If 0-10v dimming circuit is available, connect the purple and gray wires
from the power supply box to the same color wires from the electrical box.
□ If dimming is not desired, wrap the ends of the purple and gray wires with electrical
tape to cover the wire.
□ Cover the wire connections using the wire connectors (EE).
□ Wrap the wire connectors (EE) with electrical tape for a more secure connection.
□ Position the wires back inside the electrical box and attach the cover plate (AA) to the
electrical box using the electrical box screws (DD).
8
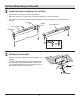
Restoring power
□ Restore power at the electrical panel.
□ Turn on the light switch to activate the fixture.
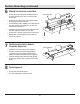
1
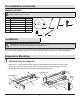
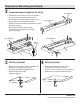
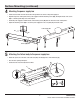
Removing the power supply box
□ Remove the four screws that attach the power supply box to the LED fixture body (A) using the power tool hex bit (FF).
□ Put the screws aside as they will be needed to reattach the power supply box to the fixture body (A) in a later step.
□ Lift the power supply box from the fixture body (A) and unplug the Quick Connect wires.
Surface Mounting
Power Supply Box
Quick
Connect
A
Power Supply Box
A
FF
DD
AA