
Installation Guide


4
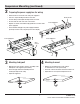
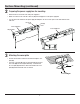
Suspension Mounting
1
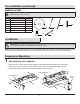
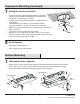
Removing the power supply box
□ Remove the four screws that attach the power supply box to the LED fixture body (A) using the power tool hex bit (FF).
□ Put the screws aside as they will be needed to reattach the power supply box to the fixture body (A) in a later step.
□ Lift the power supply box from the fixture body (A) and unplug the Quick Connect wires.
Installation
WARNING: RISK OF ELECTRIC SHOCK. Ensure the electricity to the wires you are working on is shut off. Either remove the fuse or turn off the
circuit breaker before removing the existing light fixture or installing the new one.
With power disconnected to the electrical box, remove the existing fixture. Make a sketch of how the current fixture is wired (by wire color)
or mark the wires with masking tape and a pencil so you will know how to properly reconnect the wires to the new LED light fixture.
AA
DD
EE FF
BB
CC
Pre-Installation (continued)
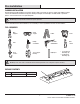
HARDWARE INCLUDED
NOTE: Hardware not shown to actual size.
Part Description Quantity
AA Cover Plate 1
BB Cable Set 2
CC Chain with S-Hook 2
DD Electrical Box Screw 2
EE Wire Connector 3
FF Power Tool Hex Bit 1
FF
Quick
Connect
Power Supply Box
A
A
Power Supply Box