Item # 1001390037 Model # 54260141 1001390730 54259141 1001391103 54283141 Use and Care Guide LED Strip lightS Questions, problems, missing parts? Before returning to the store, call Commercial Electric Customer Service 8 a.m. – 7 p.m., EST, Monday - Friday 9 a.m. – 6 p.m., EST, Saturday 1-877-527-0313 HomeDepot.COM THANK YOU We appreciate the trust and confidence you have placed in Commercial Electric through the purchase of this LED light.
Table of Contents Table of Contents. . . . . . . . . . . . . . . . . . . . . . . . . . . . . . . . . . . . 2 Safety Information. . . . . . . . . . . . . . . . . . . . . . . . . . . . . . . . . . . 2 Warranty. . . . . . . . . . . . . . . . . . . . . . . . . . . . . . . . . . . . . . . . . . . 2 Pre-Installation. . . . . . . . . . . . . . . . . . . . . . . . . . . . . . . . . . . . . . 3 Planning Installation . . . . . . . . . . . . . . . . . . . . . . . . . . . . . . . . 3 Tools/Hardware Required. . . . . .
Pre-Installation PLANNING INSTALLATION WARNING: Shut off power at the circuit breaker or fuse panel before removing an old fixture or installing the new one. Before beginning assembly, installation, or operation of product, make sure all parts are present. Compare parts with the Hardware Included and Package Contents lists. If any part is missing or damaged, do not attempt to assemble, install, or operate the product. Contact customer service for replacement parts.
Pre-Installation (continued) Additional Parts Available to Purchase NOTE: Separate parts not shown to actual size. Visit www.HomeDepot.com for more information and to purchase. Part Description Quantity CC Electrical Box Plate (4 in.) 1 DD Plate Screws 2 SKU 1001471759* CC DD * Required for Surface Mounting Installation WARNING: RISK OF ELECTRIC SHOCK. Ensure the electricity to the wires you are working on is shut off.
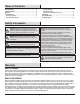
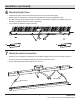
Installation (continued) 2 Preparing the fixture for installation □□ After separating the lens cover (A) from the fixture body (B), unplug the wire connectors to disconnect the terminal and ground wires. A Wire Connector B Wire Connector 3 Removing one of the knockouts in the fixture □□ Using a screwdriver, punch out one of the five large knock outs (1, 2, 3, 4, or 5) in the fixture body (B) for wiring based on the installation position. (4) (5) (3) (1) B (2) 5 HomeDepot.
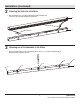
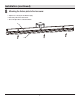
Installation (continued) 4 Preparing to mount the fixture □□ Mark the two keyhole mounting positions of the fixture body (B) on the ceiling. □□ Drill a hole in the ceiling for each of the two mounting holes. □□ Install a drywall anchor (BB) and a mounting screw (AA) in each drilled mounting hole. BB AA B AA Keyholes 5 Attaching the electrical box plate □□ Feed the electrical wires from the electrical junction box through the electrical box plate (CC - not included).
Installation (continued) 6 Mounting the light fixture □□ Feed the electrical wires from the electrical box through the knock out hole in the fixture body (B). □□ Align the large ends of the keyholes on the fixture body (B) with the two mounting screws (AA) in the ceiling. □□ Once both screw heads are through the large ends of the keyholes, slide the fixture body (B) to the left until the heads of the mounting screws (AA) slide into the narrow ends of the keyholes.
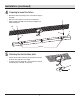
Installation (continued) 8 Attaching the fixture plate to the lens cover □□ Snap the lens cover (A) onto the fixture body (B). □□ Restore the power to the electrical box. □□ Turn on the light switch to activate the fixture.
Care and Cleaning CAUTION: Before attempting to clean the fixture, disconnect the power to the fixture by turning the breaker off or removing the fuse from the fuse box. □□ Clean the fixture with a soft, dry cloth. □□ Do not use cleaners with chemicals, solvents, or harsh abrasives. □□ Do not use liquid cleaner on the LEDs, LED driver, or wiring inside the fixture. Troubleshooting WARNING: Before doing any work on the fixture, disconnect power to the light fixture.
Questions, problems, missing parts? Before returning to the store, call Commercial Electric Customer Service 8 a.m. – 7 p.m., EST, Monday - Friday 9 a.m. – 6 p.m., EST, Saturday 1-877-527-0313 HomeDepot.C0m Retain this manual for future use.
Artículo # 1001390037 Modelo # 54260141 1001390730 54259141 1001391103 54283141 GUÍA DE USO Y CUIDADO Barras de luz LED ¿Preguntas, problemas, piezas faltantes? Antes de devolver el producto a la tienda, llame al Centro de Atención al Cliente de Commercial Electric en el horario de 8 a.m. – 7 p.m., Hora del Este de EE.UU., de lunes a viernes. 9 a.m. – 6 p.m., Hora del Este de EE.UU., sábados. 1-877-527-0313 HomeDepot.
Contenido Contenido. . . . . . . . . . . . . . . . . . . . . . . . . . . . . . . . . . . . . . . . . 12 Informacíon sobre seguridad. . . . . . . . . . . . . . . . . . . . . . . . . . 12 Garantía. . . . . . . . . . . . . . . . . . . . . . . . . . . . . . . . . . . . . . . . . . 12 Previo a la instalación . . . . . . . . . . . . . . . . . . . . . . . . . . . . . . . 13 Planificacíon de la instalacíon. . . . . . . . . . . . . . . . . . . . . . . . 13 Herramientas/materiales necesarias. . . . . . . . . . . . .
Previo a la instalación PLANIFICACÍON DE LA INSTALACióN ADVERTENCIA: Corte la corriente en el disyuntor o panel de fusibles antes de retirar una lámpara vieja o instalar una nueva. Antes de comenzar el armado, la instalación o antes de operar el producto, asegúrese de que tiene todas las piezas. Compare las piezas con la lista del contenido incluyda. Si falta alguna pieza o si está dañada, no comience a armar, instalar, ni operar el producto.
Previo a la instalación (continuación) Piezas adicionales disponibles para comprar NOTA: Piezas no mostrados al tamaño real. Visite www.HomeDepot.com para obtener más información y para comprar. Pieza CC DD Descripción Cantidad Cubierta de caja eléctrica (4 pulg.) 1 Tornillos de cubierta 2 SKU 1001471759* CC DD * Requerido para montaje en superficie Instalación ADVERTENCIA: RIESGO DE DESCARGA ELÉCTRICA. Asegúrese de cortar el suministro eléctrico en los cables con los que trabajará.
Instalación (continuación) 2 Preparar la lámpara para la instalación □□ Después de separar la cubierta de la lente del cuerpo de la lámpara, desenchufe los conectores de cables para desconectar los cables terminal y de tierra. A Conector de cable B Conector de cable 3 Retire uno de los agujeros ciegos en la lámpara □□ Con un destornillador, puntee uno de los cinco orificios ciegos grandes (1, 2, 3, 4, ó 5) en la caja de la lámpara (B) para el cableado en función de la posición de instalación.
Instalación (continuación) 4 Prepararse para montar la lámpara □□ Marque las dos posiciones de montaje de los orificios ciegos de la caja de la lámpara (B) en el techo. □□ Perfore un agujero en el techo para cada uno de los dos agujeros de montaje. □□ Instale un anclaje para panel de yeso (BB) en cada orificio de montaje perforado.
Instalación (continuación) 6 Fijar la lámpara □□ Pase los cables eléctricos de la caja eléctrica a través del agujero en la caja de la lámpara (B). □□ Alinee los orificios ciegos de montaje que están en la caja de la lámpara (B) con los 2 tornillos (AA) de montaje del techo.
Instalación (continuación) 8 Fijar la caja a la cubierta de la lámpara □□ Chasque la cubierta de la lámpara (A) en el caja de la lámpara (B). □□ Restaure la alimentación de la caja eléctrica. □□ Encienda la lámpara.
Cuidado y limpieza PRECAUCIÓN: Antes de limpiar la lámpara, desconecte el suministro eléctrico hacia este apagando el cortacircuitos o extrayendo el fusible de la caja de fusibles. □□ Limpie la lámpara con un paño suave y seco. □□ No utilice limpiadores con productos químicos, solventes o abrasivos. □□ No use limpiador líquido en las bombillas LED, en la unidad LED ni en los cables que están dentro de la lámpara.
¿Preguntas, problemas, piezas faltantes? Antes de devolver el producto a la tienda, llame al Centro de Atención al Cliente de Commercial Electric en el horario de 8 a.m. – 7 p.m., Hora del Este de EE.UU., de lunes a viernes. 9 a.m. – 6 p.m., Hora del Este de EE.UU., sábados. 1-877-527-0313 Homedepot.Com Conserve este manual para uso futuro.