Item # 1004060729 1004060730 Model # 54263211 54261211 Use and Care Guide LINKABLE LED Strip lightS WITH SELECTABLE COLOR TEMPERATURE Questions, problems, missing parts? Before returning to the store, call Commercial Electric Customer Service 8 a.m. – 7 p.m., EST, Monday - Friday 9 a.m. – 6 p.m., EST, Saturday 1-877-527-0313 HomeDepot.COM THANK YOU We appreciate the trust and confidence you have placed in Commercial Electric through the purchase of this LED light.
Table of Contents Table of Contents. . . . . . . . . . . . . . . . . . . . . . . . . . . . . . . . . . . . 2 Safety Information. . . . . . . . . . . . . . . . . . . . . . . . . . . . . . . . . . . 2 Warranty. . . . . . . . . . . . . . . . . . . . . . . . . . . . . . . . . . . . . . . . . . . 2 Pre-Installation. . . . . . . . . . . . . . . . . . . . . . . . . . . . . . . . . . . . . . 3 Planning Installation . . . . . . . . . . . . . . . . . . . . . . . . . . . . . . . . 3 Tools/Hardware Required. . . . . .
Pre-Installation PLANNING INSTALLATION Before beginning assembly, installation, or operation of product, make sure all parts are present. Compare parts with the Hardware Included and Package Contents lists. If any part is missing or damaged, do not attempt to assemble, install, or operate the product. Contact Customer Service for replacement parts. NOTE: Keep your receipt and these instructions for proof of purchase.
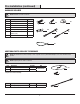
Pre-Installation (continued) HARDWARE INCLUDED NOTE: Hardware not shown to actual size. Part Description Quantity AA Mounting Screw 2 BB Drywall Anchor 2 CC End Cover 2 DD End-to-end Connector 1 EE Linking Cable (12 in.) 1 FF Power Cord with ON/OFF Switch (5 ft.) 1 GG Cable Tie 1 AA CC BB DD FF EE GG Additional Parts Available to Purchase NOTE: The hardware kit for surface mounting is sold as a separate accessory. Visit www.HomeDepot.com for more information and to purchase.
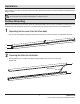
Installation Select a suitable location that can support the weight of the fixture. Determine the method for mounting the fixture before drilling, based on the type of ceiling. WARNING: RISK OF ELECTRIC SHOCK. Ensure the electricity to the wires you are working on is shut off. Either remove the fuse or turn off the circuit breaker before removing an existing light fixture or installing the new one. Surface Mounting With power disconnected to the electrical box, remove the existing fixture.
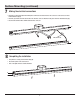
Surface Mounting (continued) 3 Removing one of the knock outs in the fixture □□ Hold the fixture body (B) up to the mounting surface to determine which knock out hole to use for wiring the fixture. □□ Mark two keyhole locations on the mounting surface. □□ Using a screwdriver, punch out one of the large knock out holes in the fixture body (B) for wiring, based on the installation position. Knock Out Holes Knock Out Holes B Keyholes 4 Preparing to mount the fixture □□ Drill a 1/8-in.
Surface Mounting (continued) 5 Attaching the electrical box plate □□ Feed the electrical wires from the electrical box through the center of the electrical box plate (HH - not included). □□ Secure the electrical box plate (HH - not included) to the electrical box with the electrical box screws (II - not included). NOTE: The hardware kit for surface mounting is sold as a separate accessory. Visit www.HomeDepot.com for more information and to purchase.
Surface Mounting (continued) 7 Making the electrical connections □□ Insert the hot and neutral (black and white) wires from the electrical box into the wire connectors of the same color wires from the fixture body (B). □□ Insert the ground wire from the electrical box into the wire connector attached to the green wire from the fixture body (B). □□ Reconnect the terminal wires with the attached wire connector.
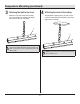
Suspension Mounting NOTE: Separate mounting hardware (not included) not shown to actual size. NOTE: When determining the desired location for suspension mounting the light fixture using the plug-in installation method, make sure the light fixture is located directly below the electrical outlet and that the distance between the electrical outlet and the end of the light fixture is less than 5 ft.
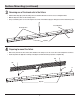
Suspension Mounting (continued) 3 4 Attaching the light to the chain □□ Attach the S hook at the bottom of the mounting chain (not included) to the fixture body (B). Repeat this step on the other side of the fixture. Attaching the chain to the ceiling □□ Hang the fixture body (B) by placing one chain over each hook (not included) that has been installed on the ceiling. □□ Adjust chains to level light.
Suspension Mounting (continued) 5 Connecting the power cord NOTE: Make sure the distance between the electrical outlet and the end of the light fixture is less than 5 ft. when using the plug-in installation method. □□ Remove the end cover (CC) from the strip light. □□ Plug the power cord (FF) into the end of the fixture body (B) and then plug the other end of the power cord (FF) into an electrical outlet. □□ Secure the power cord (FF) to the ceiling using cord clips or cable raceway (not included).
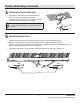
Linking Feature WARNING: RISK OF ELECTRIC SHOCK. Disconnect power to the strip light before linking additional strip lights. □□ Multiple light fixtures can be connected, but only the first light fixture needs to be plugged into an electrical outlet or direct wired to an electrical box. WARNING: Provide power to the fixtures only after all linking connections have been made. □□ Remove the end cover (CC) from one end of each fixture body (B) that will be linked.
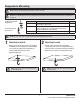
Adjusting the Color Temperature of the Light This LED light fixture allows you to customize the color temperature of the light using three settings: soft white, bright white, or daylight. □□ Move the toggle switch on the fixture body (B) to choose your favorite correlated color temperature (CCT) from three options: 3000k Soft White, 4000k Bright White, or 5000k Daylight. NOTE: The factory setting for the correlated color temperature (CCT) is 3000K, which is the warmest white light.
Questions, problems, missing parts? Before returning to the store, call Commercial Electric Customer Service 8 a.m.-6 p.m., EST, Monday-Friday 1-877-527-0313 Homedepot.COM Retain this manual for future use.
Artículo # 1004060729 1004060730 Modelo # 54263211 54261211 GUÍA DE USO Y CUIDADO Barras de luz LED enlazables CON TEMPERATURA DE COLOR DE LUZ AJUSTABLE ¿Preguntas, problemas, piezas faltantes? Antes de devolver el producto a la tienda, llame al Centro de Atención al Cliente de Commercial Electric en el horario de 8 a.m. – 7 p.m., Hora del Este de EE.UU., de lunes a viernes. 9 a.m. – 6 p.m., Hora del Este de EE.UU., sábados. 1-877-527-0313 HomeDepot.
Contenido Contenido. . . . . . . . . . . . . . . . . . . . . . . . . . . . . . . . . . . . . . . . . 16 Informacíon sobre seguridad. . . . . . . . . . . . . . . . . . . . . . . . . . 16 Garantía. . . . . . . . . . . . . . . . . . . . . . . . . . . . . . . . . . . . . . . . . . 16 Previo a la instalación . . . . . . . . . . . . . . . . . . . . . . . . . . . . . . . 17 Planificacíon de la instalacíon. . . . . . . . . . . . . . . . . . . . . . . . 17 Herramientas/materiales necesarias. . . . . . . . . . . . .
Previo a la instalación PLANIFICACÍON DE LA INSTALACióN Antes de comenzar el armado, la instalación o antes de operar el producto, asegúrese de que tiene todas las piezas. Compare las piezas con la lista del contenido incluyda. Si falta alguna pieza o si está dañada, no comience a armar, instalar, ni operar el producto. Comuníquese con el servicio al cliente para el reemplazo de las piezas. NOTA: Guardar el recibo de compra y estas instrucciones como prueba de compra.
Previo a la instalación (continuación) MATERIALES INCLUIDOS NOTA: Los materiales no se ilustran en tamaño real. Pieza Descripción Cantidad AA Tornillo de montaje 2 BB Anclaje para panel de yeso 2 CC Capuchón de extremos 2 DD Conector extremo a extremo 1 EE Cable de enlace (12 pulg.
Instalación Seleccione una ubicación adecuada que pueda soportar el peso del aparato. Determinar el método de montaje de la lámpara antes de la perforación, en función del tipo de techo. ADVERTENCIA: RIESGO DE DESCARGA ELÉCTRICA. Asegúrese de cortar el suministro eléctrico en los cables con los que trabajará. Extraiga los fusibles o apague el cortacircuitos antes de quitar el aparato de iluminación existente o instalar uno nuevo.
Montaje en superficie (continuación) 3 Retire uno de los agujeros ciegos en la lámpara □□ Sostenga la caja de la lámpara (B) hasta el techo para determinar qué agujero ciego usar para el cableado de la lámpara. □□ Marque las dos posiciones de montaje de los agujeros ciegos en el techo. □□ Con un destornillador, puntee uno de los agujeros ciegos grandes en la caja de la lámpara (B) para conectar en función de la posición de instalación.
Montaje en superficie (continuación) 5 Fijar la cubierta de la caja eléctrica □□ Pase los cables eléctricos de la caja eléctrica a través del centro de la cubierta de la caja eléctrica (HH - no se incluyen). □□ Asegure la cubierta (HH - no se incluyen) a la caja eléctrica con los tornillos de caja eléctrica (II - no se incluyen). NOTA: El kit de herramientas de instalación en superficie se vende como un accesorio separado. Visite www.HomeDepot.com para obtener más información y para comprar.
Montaje en superficie (continuación) 7 Hacer las conexiones eléctricas □□ Inserte los cables energizado y neutro (negro y blanco) de la caja eléctrica en los conectores de los cables del mismo color de la carcasa (B). □□ Inserte el cable de conexión a tierra de la caja eléctrica en el conector del cable verde de la carcasa (B). □□ Vuelva a conectar los cables terminales con el conector de cable adjunto.
Instalación suspendida NOTA: Las diferentes piezas de ferretería (no se incluyen) no se muestran en tamaño real. NOTA: Al determinar el lugar deseado para el montaje suspendido de la lámpara utilizando el método de instalación enchufable, asegúrese de que la lámpara se encuentra directamente debajo del receptáculo eléctrico y que la distancia entre el receptáculo eléctrico y el extremo de lámpara es inferior a 5 pies.
Instalación suspendida (continuación) 3 4 Sujetar la lámpara a la cadena □□ Coloque el gancho S en la parte inferior de la cadena de suspensión (no incluido) a la caja de la lámpara (B). Repita este paso en el otro lado de la caja. Sujetar la cadena al techo □□ Cuelgue la caja de la lámpara (B) colocando una cadena sobre cada gancho (no incluido) que haya sido instalado en el techo. □□ Ajuste las cadenas para nivelar la lámpara.
Instalación suspendida (continuación) 5 Enchufar el cable de alimentación NOTA: Asegúrese de que la distancia entre el receptáculo eléctrico y el extremo de la lámpara es inferior a 5 pies cuando se utiliza el método de instalación enchufable. □□ Retire el tapón de la cubierta final (CC) de la barra de luz LED. □□ Enchufe el cable de alimentación (FF) en el extremo de la caja de la lámpara (B) y luego conecte el otro extremo del cable de alimentación (FF) a un receptáculo eléctrico.
Función de enlace ADVERTENCIA: RIESGO DE DESCARGA ELÉCTRICA. Desconecte la energía eléctrica en la barra de luz antes de enlazar otras barras de luz. □□ Se pueden conectar múltiples barras, pero solamente la primera barra de luz necesita ser enchufado en un receptáculo eléctrico o directamente conectado a una caja eléctrica. ADVERTENCIA: Proporcionar energía a las barras sólo después de todas las conexiones de enlace se han hecho.
Ajustar la temperatura del color del luz Este lámpara LED le permite ajustar la temperatura del color de la luz usando tres ajustes: blanco suave, blanco brillante, o luz del día. □□ Mueva el conmutador en el cuerpo de la lámpara (B) para elegir su temperatura de color correlacionada (CCT) favorita de entre tres opciones: 3000k Blanco cálida, 4000k Blanco frío, o 5000k Luz del día. NOTA: El ajuste inicial de la temperatura de color correlacionada (CCT) es 3000K, que es la luz blanca cálida.
¿Preguntas, problemas, piezas faltantes? Antes de devolver el producto a la tienda, llame al Centro de Atención al Cliente de Commercial Electric en el horario de 8 a.m. – 7 p.m., Hora del Este de EE.UU., de lunes a viernes. 9 a.m. – 6 p.m., Hora del Este de EE.UU., sábados. 1-877-527-0313 Homedepot.Com Conserve este manual para uso futuro.