
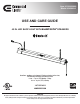
Installation Guide

4
1
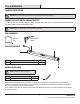
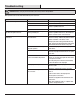
Mounting to drywall
□ Drill two holes large enough to clear the closed flaps of
the butterfly nut on the toggle bolt (not included). Make
sure to fasten the toggle bolt into the butterfly nut before
inserting the flaps into the ceiling. Tighten the toggle bolt.
□ Mark two spots on the ceiling 30 in. apart for the mounting hardware (not included).
NOTE: Separate mounting hardware (not included) not shown to actual size.
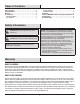
Part Description Quantity
Toggle Bolts Consisting of a No. 10-24 bolt 2-7/8 inches long with two
tapered wings 1 by 5/16 inch.
2
Studs Measuring 1-3/4 inches overall and having 1-1/4 inches of
wood screw threads on one end and at least six No. 10-24
machine screw threads on the other end.
2
Metal Hooks With a No. 10-24 threaded hole that engages the bolt
threads.
2
For mounting to drywall:
Toggle bolt x 2
For mounting to wood:
Hook screw x 2
2
Mounting to wood
□ Drill two 1/16 in. diameter holes in the ceiling to
accommodate hook screws (not included). Make sure to
fasten the combo wood-machine end into the metal hook.
Tighten the hook screw (not included) into the wood.
3
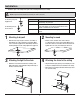
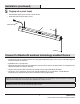
Attaching the light to the chain
□ Attach the S hook at the bottom of the mounting chain
(AA) to the hanger on the light fixture. Repeat this step on
the other side of the fixture.
4
Attaching the chain to the ceiling
□ Hang the fixture body by placing one chain (AA) over each
hook (not included) that has been installed on the ceiling.
□ Adjust chains to level light. The fixture must hang at least
3 in. from the ceiling.
A
AA
A
AA
Installation