
Installation Guide


4
1
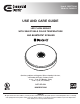
Separating the diffuser shade from
the fixture plate
□ Turn the diffuser shade (B) counterclockwise to remove it
from the fixture plate (A).
2
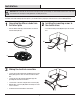
Installing the mounting screws to
the electrical box
□ Screw the mounting screws (BB) directly to the electrical
box.
Installation
WARNING: RISK OF ELECTRIC SHOCK. Ensure the electricity to the wires you are working on is shut off. Either remove the fuse or turn off the
circuit breaker before removing the existing light fixture or installing the new one.
With power disconnected to the electrical box, remove the existing fixture. Make a sketch of how the current fixture is wired (by wire color)
or mark the wires with masking tape and a pencil so you will know how to properly reconnect the wires to the new LED light fixture.
3
Making the electrical connections
□ Connect the hot and neutral (black and white) wires from the
fixture plate (A) to the same color wires from the electrical
box.
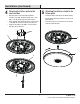
□ Connect the green wire from the fixture plate (A) to the
grounding wire from the electrical box.
□ Cover the wire connections using the wire connectors (AA).
□ Wrap the wire connectors (AA) with electrical tape for a more
secure connection.
□ Position the wires back inside the electrical box.
BB
BB
AA
B
A