
Installation Guide


4
3
2
1
Installation
Select a suitable location that can support the weight of the fixture. Determine the method of mounting before
drilling.
WARNING: RISK OF ELECTRIC SHOCK. Ensure the electricity to the wires you are working on is shut off. Either remove
the fuse or turn off the circuit breaker before removing the existing light fixture or installing the new one.
With power disconnected to your electrical box, remove the existing fixture. Make a sketch of how the current
fixture is wired (by wire color) or mark the wires with masking tape and a pencil so you will know how to properly
reconnect the wires to the new LED light fixture.
1
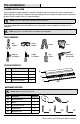
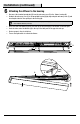
Separating the diffuser from the housing
□ Press down gently on one end of the diffuser (B) until you meet
with resistance from the bottom of the end cap of the housing
(A). Slide the diffuser (B) toward the end
being pressed down. Lift the diffuser (B)
from the other end, removing it from
the housing (A).
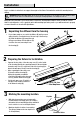
2
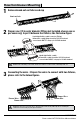
Preparing the fixture for installation
□ Squeeze the two sides of the wire way cover (C) on the inside
of the housing (A) while also pushing inward on the metal tabs
from wire way cover (C) on the back side of the housing (A) to
detach the wire way cover(C) from the housing (A).
□ After separating the wire way cover
(C) from the fixture housing (A),
unplug the terminal ground wire
connection (D) between the wire way
cover (C) and the fixture housing (A).
□ Set the wire way cover (C) aside in a
safe place until ready to reattach it
to the fixture housing (A).
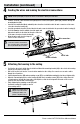
3
Marking the mounting location
□ With help from another person, temporarily
hold the fixture housing (A) up to the ceiling to
determine the best mounting position and which
knock out hole to use for wiring the fixture.
□ Mark two keyhole locations for mounting.
The distance between the two keyholes is
31.89 in(810mm).
Knock out holes
Keyhole
A
C
D
Metal Tab from
Wire Way Cover
B
B
A