SKU #1002 632 078 Model #74206/HD USE AND CARE GUIDE 5-6 IN. ROUND FLAT PANEL WITH SELECTABLE COLOR TEMPERATURES Questions, problems, missing parts? Before returning to the store, call Commercial Electric Customer Service 8 a.m. - 7 p.m., EST, Monday - Friday, 9 a.m. - 6 p.m., EST, Saturday 1-877-527-0313 HOMEDEPOT.COM THANK YOU We appreciate the trust and confidence you have placed in Commercial Electric through the purchase of this LED Flat Panel Fixture.
Table of Contents Table of Contents. . . . . . . . . . . . . . . . . . . . . . . . . . . . . . . . . . . . 2 Safety Information. . . . . . . . . . . . . . . . . . . . . . . . . . . . . . . . . . . 2 Warranty. . . . . . . . . . . . . . . . . . . . . . . . . . . . . . . . . . . . . . . . . . . 2 Pre-Installation. . . . . . . . . . . . . . . . . . . . . . . . . . . . . . . . . . . . . . 3 Tools Required. . . . . . . . . . . . . . . . . . . . . . . . . . . . . . . . . . . . . 3 Hardware Included. . . . . . . .
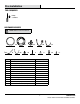
Pre-Installation TOOLS REQUIRED Phillips screwdriver HARDWARE INCLUDED NOTE: Hardware not shown to actual size. AA FF BB GG CC HH DD II JJ Part Description Quantity AA 7.5 in. fixture 1 BB Mounting bracket 1 CC 5 & 6 in. Torsion spring brackets 2 DD E26 adapter with male connector 1 EE Stripped wires with male connector 1 FF 5 & 6 in. Torsion springs 2 GG Ground wire 1 HH Ground wire screw 1 II J-Box mounting screws 2 JJ Wire nuts 3 KK 5 & 6 in.
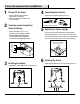
5-6 In. Recessed Can Installation 1 2 4 Turning Off the Power □□ Turn the power OFF at the switch and fusebox or the circuit breaker. □□ Remove the existing trim installed in the recessed housing. Connecting the terminals □□ Connect the two terminals together (See Fig. 3). Fig. 3 Choosing a color temperature before installing Connect the orange connectors 5 □□ Use the slide switch to choose a color temperature before installing.
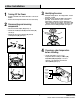
J-Box Installation 1 3 Turning Off the Power □□ Identify the wiring: (black - line voltage, white - neutral and green - ground) □□ Connect the green ground wire (GG) to the mounting plate (BB). Use the wire nuts (JJ) to connect the stripped wires of the male connector (EE) to the two wires coming from the J-box (black - line voltage, white - neutral). Connect the ground wire in the J-box to the green wire on the mounting plate (BB). See figure 4.
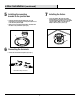
J-Box Installation (continued) 5 7 Installing the mounting bracket to the junction box Installing the fixture □□ Secure the fixture (AA) to the mounting bracket (BB) by pressing the fixture into the mounting bracket until the clips on the fixture engage together. Make sure the fixture is firmly locked into place (See Fig. 8). □□ Install the mounting bracket (BB) to the J-box by inserting the two mounting screws (II) through the slots in the mounting bracket (BB).
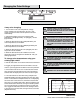
Changing the Color Settings NOTICE: The toggle switch is located on the back of the fixture. 4-way color changing: WARNING: CHANGES OR MODIFICATIONS NOT EXPRESSLY APPROVED BY THE PARTY RESPONSIBLE FOR COMPLIANCE COULD VOID THE USER’S AUTHORITY TO OPERATE THE EQUIPMENT. 1. You can lock in one color temperature, change among multiple color temperatures, dim from 10%100%, memorize the last color temperature and reset automatically. 2.
Questions, problems, missing parts? Before returning to the store, call Commercial Electric Customer Service 8 a.m. - 7 p.m., EST, Monday - Friday, 9 a.m. - 6 p.m., EST, Saturday 1-877-527-0313 HOMEDEPOT.COM Retain this manual for future use.
SKU #1002 632 078 Modelo #74206/HD GUIA DE USO Y CUIADO PANEL PLANO REDONDO DE 5-6 PULG. CON TEMPERATURAS DE COLOR SELECCIONABLES Preguntas, problemas, piezas que faltan ? Antes de regresar a la tienda, llame a Commercial Electric Servicio al Cliente 8 a.m. - 7 p.m., EST, Lunes - Viernes, 9 a.m. - 6 p.m., EST, Sábado 1-877-527-0313 HOMEDEPOT.COM GRACIAS Agradecemos la confianza que ha depositado en Commercial Electric a través de la compra de esta Lámpara LED de pantalla plana.
Tabla de contenidos Tabla de contenidos. . . . . . . . . . . . . . . . . . . . . . . . . . . . . . . . . . 2 información de Seguridad. . . . . . . . . . . . . . . . . . . . . . . . . . . . . 2 Garantia. . . . . . . . . . . . . . . . . . . . . . . . . . . . . . . . . . . . . . . . . . . 2 Pre-instalación. . . . . . . . . . . . . . . . . . . . . . . . . . . . . . . . . . . . . . 3 Herramientas Necesarias . . . . . . . . . . . . . . . . . . . . . . . . . . . . 3 Materiales Incluidos. . . . . . . . . . . . . .
Pre-instalación HERRAMIENTAS NECESARIAS destornillador de cruz PIEZAS INCLUIDAS NOTA : Piezas no mostradas a tamaño real. AA FF BB GG CC HH DD II JJ Part Description AA Accesorio de 7.5 pulgadas 1 BB Soporte de montaje 1 CC Soportes de resorte de torsión de 5 y 6 In. 2 DD Adaptador E26 con conector macho 1 EE Cables con conector macho 1 FF Resorte de torsión de 5 y 6 In.
Instalación para lata empotrada de 5-6 pulg. 1 2 4 Desactivar la alimentaciónr □□ Apague el interruptor y la caja de fusibles o el disyuntor. □□ Quite el revestimiento existente instalado en la carcasa empotrada. Conexión de los terminales □□ Conecte los dos terminales juntos (Véase la Fig. 3). Fig. 3 Elegir una temperatura de color antes de instalar Conecte los conectores naranja 5 □□ Utilice el interruptor deslizante para elegir una temperatura de color antes de instalar.
Instalación para caja de conexiones 1 3 Desactivar la alimentación □□ Identifique el cableado: (línea negra, blanco - neutro y verde - tierra). □□ Conecte el cable de tierra verde (GG) a la placa de montaje (BB). Utilice las tuercas de cable (JJ) para conectar los cables desmontados del conector macho (EE) a los dos cables procedentes de la caja de conexiones (tensión de línea negra, blanco - neutro). Conecte el cable de tierra en el caja de conexiones al cable verde en la placa de montaje (BB).
Instalación para caja de conexiones (continuación) 5 7 Instalación del soporte de montaje en la caja de conexiones Instalación del aparato □□ Asegure el accesorio (AA) al soporte de montaje (BB) presionando el accesorio en el soporte de montaje hasta que los sujetadores encajen entre sí. Asegúrese de que el aparato esté firmemente trabado en su lugar (vea la Fig. 8).
Cambiar la configuración de color (Blanco Suave) (Blanco Brillante) (Luz de Dia) (Interruptor de Luz) DARSE CUENTA: El interruptor de palanca se encuentra en la parte trasera del aparato. Cambio de color en 4 direcciones: ADVERTENCIA: LOS CAMBIOS O MODIFICACIONES NO EXPRESAMENTE APROBADOS POR LA PARTE RESPONSABLE DEL CUMPLIMIENTO PUEDEN ANULAR LA AUTORIDAD DEL USUARIO PARA OPERAR EL EQUIPO. 1.
Preguntas, problemas, piezas que faltan ? Antes de regresar a la tienda, llame a Commercial Electric Servicio al Cliente 8 a.m. - 7 p.m., EST, Lunes - Viernes, 9 a.m. - 6 p.m., EST, Sábado 1-877-527-0313 HOMEDEPOT.COM Conserve este manual para uso futuro.