SKU# 1003 079 253 Model #FP1X2/4WY/WH/HD USE AND CARE GUIDE 1X2 LED FLAT PANEL FIXTURE WITH SELECTABLE COLOR TEMPERATURES Questions, problems, missing parts? Before returning to the store, call Commercial Electric Customer Service 8 a.m. - 7 p.m., EST, Monday - Friday, 9 a.m. - 6 p.m., EST, Saturday 1-877-527-0313 HOMEDEPOT.COM THANK YOU We appreciate the trust and confidence you have placed in Commercial Electric through the purchase of this LED Flat Panel Fixture.
Table of Contents Table of Contents. . . . . . . . . . . . . . . . . . . . . . . . . . . . . . . . . . . . 2 Safety Information. . . . . . . . . . . . . . . . . . . . . . . . . . . . . . . . . . . 2 Warranty. . . . . . . . . . . . . . . . . . . . . . . . . . . . . . . . . . . . . . . . . . . 2 Pre-Installation. . . . . . . . . . . . . . . . . . . . . . . . . . . . . . . . . . . . . . 3 Tools Required. . . . . . . . . . . . . . . . . . . . . . . . . . . . . . . . . . . . . 3 Hardware Included. . . . . . . .
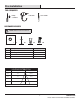
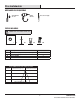
Pre-Installation TOOLS REQUIRED Phillips screwdriver Power Drill 1/2 in. Drill Bit HARDWARE INCLUDED NOTE: Hardware not shown to actual size. AA Part BB CC Description DD Quantity AA Mounting Plate (8.07 in. x 9.8 in. x 0.47 in.) 1 BB 3/16 in. Toggle Bolts 4 CC Wire Nuts 3 DD Screws #8-32 x 1 in. 2 LIGHTING DISTRIBUTION DISTANCE CENTER BEAM (FOOT CANDLES) BEAM DIAMETER 3 FT. 94 8.9 FT. 5 FT. 34 15 FT. 8 FT. 13.2 24 FT. 15 FT. 3.8 44 FT. BEAM ANGLE = 112º 3 HOMEDEPOT.
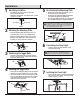
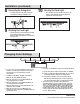
Installation 1 5 Identifying the Wires □□ Turn OFF the main power at the circuit breaker before installing the fixture. □□ Identify the wiring: (black - line voltage, white - neutral and green - ground) line voltage Re-attaching the Mounting Plate □□ Feed the junction box wires through the center of the mounting bracket plate (AA) hole. □□ Re-attach the mounting plate (AA) by inserting the four toggle bolts (BB) into the drilled holes.
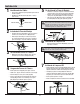
Installation (continued) 8 Connecting the Swing Arms 9 Attaching the Panel Light □□ Insert the swing arm’s key hole slot into the mounting bracket plate’s hanging screw. 10 Securing the Panel Light □□ Once the fixture has been raised and is flush to the ceiling, lock the fixture by moving it towards the opposite direction it was raised. □□ Feed the junction box and fixture wires through the mounting bracket plate’s center hole. □□ Raise the fixture to the direction of the arrow on the swing arm.
Questions, problems, missing parts? Before returning to the store, call Commercial Electric Customer Service 8 a.m. - 7 p.m., EST, Monday - Friday, 9 a.m. - 6 p.m., EST, Saturday 1-877-527-0313 HOMEDEPOT.COM Retain this manual for future use.
SKU# 1003 079 253 Modelo #FP1X2/4WY/WH/HD GUIA DE USO Y CUIDADO 1X2 LÁMPARA LED PANEL PLANO CON COLOR DE TEMPERATURA SELECCIONABLE Preguntas, problemas, piezas que faltan ? Antes de regresar a la tienda, llame a Commercial Electric Servicio al Cliente 8 a.m. - 7 p.m., EST, Lunes - Viernes, 9 a.m. - 6 p.m., EST, Sábado 1-877-527-0313 HOMEDEPOT.COM GRACIAS Agradecemos la confianza que ha depositado en Commercial Electric a través de la compra de esta Lámpara LED de pantalla plana.
Tabla de contenidos Tabla de contenidos. . . . . . . . . . . . . . . . . . . . . . . . . . . . . . . . . . 7 Información de Seguridad. . . . . . . . . . . . . . . . . . . . . . . . . . . . . 7 Garantia. . . . . . . . . . . . . . . . . . . . . . . . . . . . . . . . . . . . . . . . . . . 7 Pre-instalación. . . . . . . . . . . . . . . . . . . . . . . . . . . . . . . . . . . . . . 8 Herramientas Necesarias . . . . . . . . . . . . . . . . . . . . . . . . . . . . 8 Materiales Incluidos. . . . . . . . . . . . . .
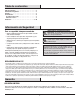
Pre-Instalación HERRAMIENTAS REQUERIDAS taladro eléctrico destornillador de cruz Broca de 1/2 pulg. PIEZAS INCLUIDAS NOTA : Piezas no mostradas a tamaño real. AA Pieza BB CC DD Descripción Cantidad AA Placa de montage (8,07 in. x 9,8 in. x 0,47 in.) 1 BB 3/16 pulg. Perno de palanca 4 CC Tuercas de Cable 3 DD Tornillos #8-32 x 1 in. 2 DISTRIBUCÍON DEL HAZ DE LUZ DISTANCIA CENTRO DEL HAZ (bujías-pie) DIÁMETRO DEL HAZ DE LUZ 3 FT. 94 8.9 FT. 5 FT. 34 15 FT. 8 FT. 13.2 24 FT.
Instalación 1 5 Identificando los Cables □□ Desconecte la alimentación principal del disyuntor antes de instalar el aparato. □□ Identifique el cableado: (línea negra, blanco - neutro y verde - tierra) linea de voltaje 1 2 Instalando la Placa de Montaje □□ Instale la placa de montaje (AA) a la caja de conexiones usando los dos tornillos # 8-32 x 1 (DD) proveidos. BB □□ Alinee la placa de montaje en la dirección que desea que el dispositivo alineado.
Instalación (continuado) 8 9 10 Conexión de los brazos oscilantes □□ Inserte la ranura del orificio del brazo oscilante en el tornillo de sujeción de la placa del soporte de montaje. Asegurar el panel de luz □□ Una vez que el dispositivo se ha elevado y está al ras del techo, bloquear el dispositivo moviéndolo hacia la dirección opuesta que se levantó.
Preguntas, problemas, piezas que faltan ? Antes de regresar a la tienda, llame a Commercial Electric Servicio al Cliente 8 a.m. - 7 p.m., EST, Lunes - Viernes, 9 a.m. - 6 p.m., EST, Sábado 1-877-527-0313 HOMEDEPOT.COM Conserve este manual para uso futuro.