
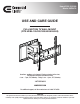
Installation Guide


8
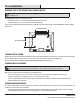
Installation (continued)
7
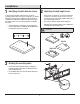
Attaching the brackets to the TV
NOTE:
long, or there is interference between the TV bracket and
cable inlets, we strongly recommend the use of spacers.
□ If necessary, align spacers (KK, LL, MM or NN) over the
mounting holes on the back of your TV.
□ Position the brackets (B) over the TV and attach using the
appropriately sized bolts (CC - JJ) and washers
(OO or PP).
CAUTION: Do not overtighten the bolts as this could
damage your TV.
B
B
CC/DD/EE/FF
GG/HH/II/JJ
KK/LL/MM/NN
OO/PP
NN
OO/PP
8
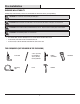
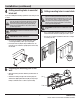
Attaching the TV to the wall plate unit
CAUTION: Use two or more people to complete this step.
□ Hang the TV onto the wall plate unit (A) as shown. Tighten
securely to the wall plate unit (A) using the bolts (1)
preassembled to the bracket (B).
□ Use the bubble level (C) and angle the TV as necessary to
ensure the TV is level before tightening in the next step.
B
C
1
A
9
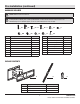
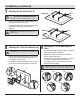
Securing the TV and wall mount in
place
□ Turn the handle clockwise until it stops (Fig. 1), and pull the
handle out from the wall mount (Fig. 2).
□ With the handle pulled out of the wall mount, turn the
handle counterclockwise (Fig. 3).
□ Push the handle back into the wall mount (Fig. 4), and turn
it clockwise to continue fastening the wall mount
(Fig. 5). Repeat these steps until until the TV is secured
tightly against the wall mount.
NOTE: Keep the handle parallel with the wall. Otherwise the
handle may break as the TV is pushed back against the wall.
Fig. 1 Fig. 2 Fig. 3
Fig. 4 Fig. 5