United States compaq.gif (932 bytes) January 3, 2003 top_nav.
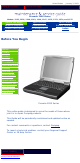
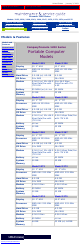
United States compaq.gif (932 bytes) January 3, 2003 top_nav.gif (991 bytes) Presario 1200 Series Models: 1255, 1256, 1260, 1262, 1266, 1267, 1272, 1273, 1274, and 1275 Before You Begin Specifications Parts Catalog Removal Sequence Troubleshooting Battery Operations Product Description Pin Assignments Index Notice The information in this guide is subject to change without notice.
United States compaq.gif (932 bytes) January 3, 2003 top_nav.gif (991 bytes) Presario 1200 Series Models: 1255, 1256, 1260, 1262, 1266, 1267, 1272, 1273, 1274, and 1275 Before You Begin Specifications Parts Catalog Removal Sequence Troubleshooting Battery Operations Product Description Pin Assignments Index Preface This Maintenance and Service Guide is a troubleshooting guide that can be used for reference when servicing the Compaq Presario 1200 Series Portable Computers.
United States compaq.gif (932 bytes) January 3, 2003 top_nav.
United States compaq.gif (932 bytes) January 3, 2003 top_nav.
United States compaq.gif (932 bytes) January 3, 2003 top_nav.
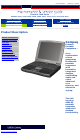
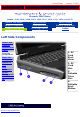
United States compaq.gif (932 bytes) January 3, 2003 top_nav.gif (991 bytes) Presario 1200 Series Models: 1255, 1256, 1260, 1262, 1266, 1267, 1272, 1273, 1274, and 1275 Before You Begin Specifications Parts Catalog Removal Sequence Troubleshooting Battery Operations Product Description Pin Assignments Index Left Side Components Models and Features Controls and Lights Left Side Components Right Side Components Bottom of Unit Rear Connectors Power Management for Windows 98 1.
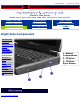
United States compaq.gif (932 bytes) January 3, 2003 top_nav.gif (991 bytes) Presario 1200 Series Models: 1255, 1256, 1260, 1262, 1266, 1267, 1272, 1273, 1274, and 1275 Before You Begin Specifications Parts Catalog Removal Sequence Troubleshooting Battery Operations Product Description Pin Assignments Index Right Side Components Models and Features Controls and Lights Left Side Components Right Side Components 1. Battery Compartment. Bottom of Unit 2. CD Drive.
United States compaq.gif (932 bytes) January 3, 2003 top_nav.
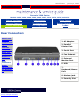
United States compaq.gif (932 bytes) January 3, 2003 top_nav.gif (991 bytes) Presario 1200 Series Models: 1255, 1256, 1260, 1262, 1266, 1267, 1272, 1273, 1274, and 1275 Before You Begin Specifications Parts Catalog Removal Sequence Troubleshooting Battery Operations Product Description Pin Assignments Index Rear Connectors Models and Features Controls and Lights Left Side Components Right Side Components Bottom of Unit Rear Connectors Power Management for Windows 98 1. AC Adapter. 2.
United States compaq.gif (932 bytes) January 3, 2003 top_nav.
United States January 3, 2003 Maintenance & Service Guide Presario 1200 Series Models: 1255, 1256, 1260, 1262, 1266, 1267, 1272, 1273, 1274, and 1275 | Home Page | Notice | Preface | Product Description | Troubleshooting Illustrated Parts Catalog | Removal & Replacement Procedures | Specifications Pin Assignments | Battery Pack Operations Power Management for Windows 98 Power Management Settings Depending on your patterns of computer use, you can set different levels of power management.
United States January 3, 2003 Maintenance & Service Guide Presario 1200 Series Models: 1255, 1256, 1260, 1262, 1266, 1267, 1272, 1273, 1274, and 1275 | Home Page | Notice | Preface | Product Description | Troubleshooting Illustrated Parts Catalog | Removal & Replacement Procedures | Specifications Pin Assignments | Battery Pack Operations Power Management for Windows 98 Sleep You can select Sleep mode instead of turning off the computer when you have finished using it.
United States January 3, 2003 Maintenance & Service Guide Presario 1200 Series Models: 1255, 1256, 1260, 1262, 1266, 1267, 1272, 1273, 1274, and 1275 | Home Page | Notice | Preface | Product Description | Troubleshooting Illustrated Parts Catalog | Removal & Replacement Procedures | Specifications Pin Assignments | Battery Pack Operations Power Management for Windows 98 Hibernation Mode Hibernation helps conserve battery life and protect your data.
United States January 3, 2003 Maintenance & Service Guide Presario 1200 Series Models: 1255, 1256, 1260, 1262, 1266, 1267, 1272, 1273, 1274, and 1275 | Home Page | Notice | Preface | Product Description | Troubleshooting Illustrated Parts Catalog | Removal & Replacement Procedures | Specifications Pin Assignments | Battery Pack Operations Power Management for Windows 98 Battery Operating Time Battery operating time is affected by variables, such as the following: ● ● ● Power conservation settings Har
United States January 3, 2003 Maintenance & Service Guide Presario 1200 Series Models: 1255, 1256, 1260, 1262, 1266, 1267, 1272, 1273, 1274, and 1275 | Home Page | Notice | Preface | Product Description | Troubleshooting Illustrated Parts Catalog | Removal & Replacement Procedures | Specifications Pin Assignments | Battery Pack Operations Power Management for Windows 98 Rebooting After a Lockup Occasionally you may encounter a frozen keyboard or a locked screen.
United States January 3, 2003 Maintenance & Service Guide Presario 1200 Series Models: 1255, 1256, 1260, 1262, 1266, 1267, 1272, 1273, 1274, and 1275 | Home Page | Notice | Preface | Product Description | Troubleshooting Illustrated Parts Catalog | Removal & Replacement Procedures | Specifications Pin Assignments | Battery Pack Operations Power Management for Windows 98 Servicing Your Computer - Full Off Mode If you need to install or replace components in your system, you must turn the computer off comp
United States compaq.gif (932 bytes) January 3, 2003 top_nav.
United States compaq.gif (932 bytes) January 3, 2003 top_nav.gif (991 bytes) Presario 1200 Series Models: 1255, 1256, 1260, 1262, 1266, 1267, 1272, 1273, 1274, and 1275 Before You Begin Specifications Parts Catalog Removal Sequence Troubleshooting Battery Operations Product Description Pin Assignments Index Preliminary Steps Before running POST, complete the following preliminary steps: 1. If a power-on password has been established, type the password and press the Enter key.
United States compaq.gif (932 bytes) January 3, 2003 top_nav.gif (991 bytes) Presario 1200 Series Models: 1255, 1256, 1260, 1262, 1266, 1267, 1272, 1273, 1274, and 1275 Before You Begin Specifications Parts Catalog Removal Sequence Troubleshooting Battery Operations Product Description Pin Assignments Index Power-On Self Test (POST) Running POST To run POST, complete the following steps: ● ● ● Turn off the computer; then, turn on the computer.
United States compaq.gif (932 bytes) January 3, 2003 top_nav.gif (991 bytes) Presario 1200 Series Models: 1255, 1256, 1260, 1262, 1266, 1267, 1272, 1273, 1274, and 1275 Before You Begin Specifications Parts Catalog Removal Sequence Troubleshooting Battery Operations Product Description Pin Assignments Index Clearing the Power-on Password Clearing the power-on password requires removing all Setup attributes that are programmed in the CMOS. The RTC battery is located on the system board.
United States compaq.gif (932 bytes) January 3, 2003 top_nav.gif (991 bytes) Presario 1200 Series Models: 1255, 1256, 1260, 1262, 1266, 1267, 1272, 1273, 1274, and 1275 Before You Begin Specifications Parts Catalog Removal Sequence Troubleshooting Battery Operations Product Description Pin Assignments Index Compaq Diagnostics Compaq Diagnostics is installed on the hard drive of the computer.
United States compaq.gif (932 bytes) January 3, 2003 top_nav.gif (991 bytes) Presario 1200 Series Models: 1255, 1256, 1260, 1262, 1266, 1267, 1272, 1273, 1274, and 1275 Before You Begin Specifications Parts Catalog Removal Sequence Troubleshooting Battery Operations Product Description Pin Assignments Index Diagnostic Error Codes Diagnostic error codes occur if the system recognizes a problem while running the Compaq Diagnostic program.
United States compaq.gif (932 bytes) January 3, 2003 top_nav.gif (991 bytes) Presario 1200 Series Models: 1255, 1256, 1260, 1262, 1266, 1267, 1272, 1273, 1274, and 1275 Before You Begin Specifications Parts Catalog Removal Sequence Troubleshooting Battery Operations Product Description Pin Assignments Index Troubleshooting Without Diagnostics This section provides information about how to identify and correct some common hardware, memory, and software problems.
United States compaq.gif (932 bytes) January 3, 2003 top_nav.gif (991 bytes) Presario 1200 Series Models: 1255, 1256, 1260, 1262, 1266, 1267, 1272, 1273, 1274, and 1275 Before You Begin Specifications Parts Catalog Removal Sequence Troubleshooting Battery Operations Product Description Pin Assignments Index Solving Minor Problems Some minor problems and possible solutions are outlined in the following tables.
United States January 3, 2003 Maintenance & Service Guide Presario 1200 Series Models: 1255, 1256, 1260, 1262, 1266, 1267, 1272, 1273, 1274, and 1275 | Home Page | Notice | Preface | Product Description | Troubleshooting Illustrated Parts Catalog | Removal & Replacement Procedures | Specifications Pin Assignments | Battery Pack Operations Solving PC Card Problems Some common causes and solutions for PC Card problems are listed in the following table.
United States compaq.gif (932 bytes) January 3, 2003 top_nav.
United States compaq.gif (932 bytes) January 3, 2003 top_nav.gif (991 bytes) Presario 1200 Series Models: 1255, 1256, 1260, 1262, 1266, 1267, 1272, 1273, 1274, and 1275 Before You Begin Specifications Parts Catalog Removal Sequence Troubleshooting Battery Operations Product Description Pin Assignments Index Illustrated Parts Catalog This section provides a breakdown and identifies the spare parts ordering number associated with each item for the Compaq Presario 1200 Series Portable Computers.
United States compaq.gif (932 bytes) January 3, 2003 top_nav.gif (991 bytes) Presario 1200 Series Models: 1255, 1256, 1260, 1262, 1266, 1267, 1272, 1273, 1274, and 1275 Before You Begin Specifications Parts Catalog Removal Sequence Troubleshooting Battery Operations Product Description Pin Assignments Index System Unit Place cursor over each device to obtain its part number.
United States compaq.gif (932 bytes) January 3, 2003 top_nav.gif (991 bytes) Presario 1200 Series Models: 1255, 1256, 1260, 1262, 1266, 1267, 1272, 1273, 1274, and 1275 Before You Begin Specifications Parts Catalog Removal Sequence Troubleshooting Battery Operations Product Description Pin Assignments Index Boards System Unit Place cursor over each device to obtain its part number.
United States compaq.gif (932 bytes) January 3, 2003 top_nav.
United States compaq.gif (932 bytes) January 3, 2003 top_nav.gif (991 bytes) Presario 1200 Series Models: 1255, 1256, 1260, 1262, 1266, 1267, 1272, 1273, 1274, and 1275 Before You Begin Specifications Parts Catalog Removal Sequence Troubleshooting Battery Operations Product Description Pin Assignments Index Mass Storage Devices System Unit Boards Place cursor over each device to obtain its part number.
United States compaq.gif (932 bytes) January 3, 2003 top_nav.gif (991 bytes) Presario 1200 Series Models: 1255, 1256, 1260, 1262, 1266, 1267, 1272, 1273, 1274, and 1275 Before You Begin Specifications Parts Catalog Removal Sequence Troubleshooting Battery Operations Product Description Pin Assignments Index Miscellaneous Cables Kit System Unit Boards Display Assembly Place cursor over each device for a description of that item.
United States compaq.gif (932 bytes) January 3, 2003 top_nav.
United States compaq.gif (932 bytes) January 3, 2003 top_nav.
United States compaq.gif (932 bytes) January 3, 2003 top_nav.
United States compaq.gif (932 bytes) January 3, 2003 top_nav.gif (991 bytes) Presario 1200 Series Models: 1255, 1256, 1260, 1262, 1266, 1267, 1272, 1273, 1274, and 1275 Before You Begin Specifications Parts Catalog Removal Sequence Troubleshooting Battery Operations Product Description Pin Assignments Index Documentation and Software System Unit Boards Display Assembly NOTE: The following information applies only to Models 1255-1267.
United States compaq.gif (932 bytes) January 3, 2003 top_nav.gif (991 bytes) Presario 1200 Series Models: 1255, 1256, 1260, 1262, 1266, 1267, 1272, 1273, 1274, and 1275 Before You Begin Specifications Parts Catalog Removal Sequence Troubleshooting Battery Operations Product Description Pin Assignments Index Removal and Replacement Procedures This section explains the removal and replacement procedures for the computer.
United States compaq.gif (932 bytes) January 3, 2003 top_nav.gif (991 bytes) Presario 1200 Series Models: 1255, 1256, 1260, 1262, 1266, 1267, 1272, 1273, 1274, and 1275 Before You Begin Specifications Parts Catalog Removal Sequence Troubleshooting Battery Operations Product Description Pin Assignments Index Electrostatic Discharge A sudden discharge of static electricity from a finger or other conductor can destroy static-sensitive devices or microcircuitry.
United States compaq.gif (932 bytes) January 3, 2003 top_nav.gif (991 bytes) Presario 1200 Series Models: 1255, 1256, 1260, 1262, 1266, 1267, 1272, 1273, 1274, and 1275 Before You Begin Specifications Parts Catalog Removal Sequence Troubleshooting Battery Operations Product Description Pin Assignments Index Service Considerations Listed below are some of the considerations that you should keep in mind during the disassembly and re-assembly of the computer.
United States compaq.gif (932 bytes) January 3, 2003 top_nav.gif (991 bytes) Presario 1200 Series Models: 1255, 1256, 1260, 1262, 1266, 1267, 1272, 1273, 1274, and 1275 Before You Begin Specifications Parts Catalog Removal Sequence Troubleshooting Battery Operations Product Description Pin Assignments Index Cables and Connectors Most cables used throughout the units are ribbon cables; they must be handled with extreme care to avoid damage.
United States January 3, 2003 Maintenance & Service Guide Presario 1200 Series Models: 1255, 1256, 1260, 1262, 1266, 1267, 1272, 1273, 1274, and 1275 | Home Page | Notice | Preface | Product Description | Troubleshooting Illustrated Parts Catalog | Removal & Replacement Procedures | Specifications Pin Assignments | Battery Pack Operations ZIF Connectors The computer uses a zero insertion force (ZIF) connector for the keyboard cable to the system board.
United States January 3, 2003 Maintenance & Service Guide Presario 1200 Series Models: 1255, 1256, 1260, 1262, 1266, 1267, 1272, 1273, 1274, and 1275 | Home Page | Notice | Preface | Product Description | Troubleshooting Illustrated Parts Catalog | Removal & Replacement Procedures | Specifications Pin Assignments | Battery Pack Operations The ribbon cable position for the 3.2-GB, 4.0-GB, 4.3-GB, or 6.4-GB hard drive. Back to Cables and Connectors.
United States January 3, 2003 Maintenance & Service Guide Presario 1200 Series Models: 1255, 1256, 1260, 1262, 1266, 1267, 1272, 1273, 1274, and 1275 | Home Page | Notice | Preface | Product Description | Troubleshooting Illustrated Parts Catalog | Removal & Replacement Procedures | Specifications Pin Assignments | Battery Pack Operations The ribbon cable position for the CD drive. Back to Cables and Connectors.
United States January 3, 2003 Maintenance & Service Guide Presario 1200 Series Models: 1255, 1256, 1260, 1262, 1266, 1267, 1272, 1273, 1274, and 1275 | Home Page | Notice | Preface | Product Description | Troubleshooting Illustrated Parts Catalog | Removal & Replacement Procedures | Specifications Pin Assignments | Battery Pack Operations The ribbon cable position for the diskette drive. Back to Cables and Connectors.
United States January 3, 2003 Maintenance & Service Guide Presario 1200 Series Models: 1255, 1256, 1260, 1262, 1266, 1267, 1272, 1273, 1274, and 1275 | Home Page | Notice | Preface | Product Description | Troubleshooting Illustrated Parts Catalog | Removal & Replacement Procedures | Specifications Pin Assignments | Battery Pack Operations The cable position for the speaker assembly. Back to Cables and Connectors.
United States compaq.gif (932 bytes) January 3, 2003 top_nav.
United States compaq.gif (932 bytes) January 3, 2003 top_nav.
United States compaq.gif (932 bytes) January 3, 2003 top_nav.gif (991 bytes) Presario 1200 Series Models: 1255, 1256, 1260, 1262, 1266, 1267, 1272, 1273, 1274, and 1275 Before You Begin Specifications Parts Catalog Removal Sequence Troubleshooting Battery Operations Product Description Pin Assignments Index 2. Pull forward on the battery pack tab and remove the battery pack from the chassis. To replace the battery pack, reverse the previous procedures.
United States compaq.gif (932 bytes) January 3, 2003 top_nav.
United States compaq.gif (932 bytes) January 3, 2003 top_nav.gif (991 bytes) Presario 1200 Series Models: 1255, 1256, 1260, 1262, 1266, 1267, 1272, 1273, 1274, and 1275 Before You Begin Specifications Parts Catalog Removal Sequence Troubleshooting Battery Operations Product Description Pin Assignments Index 4. Turn the computer over (right side up), pull forward on the display latches to release and open the display assembly. 5.
United States compaq.gif (932 bytes) January 3, 2003 top_nav.
United States compaq.gif (932 bytes) January 3, 2003 top_nav.
United States compaq.gif (932 bytes) January 3, 2003 top_nav.
United States compaq.gif (932 bytes) January 3, 2003 top_nav.gif (991 bytes) Presario 1200 Series Models: 1255, 1256, 1260, 1262, 1266, 1267, 1272, 1273, 1274, and 1275 Before You Begin Specifications Parts Catalog Removal Sequence Troubleshooting Battery Operations Product Description Pin Assignments Index To replace the processor complete the following steps: 1. Insert the processor into the slot on the system board.
United States compaq.gif (932 bytes) January 3, 2003 top_nav.gif (991 bytes) Presario 1200 Series Models: 1255, 1256, 1260, 1262, 1266, 1267, 1272, 1273, 1274, and 1275 Before You Begin Specifications Parts Catalog Removal Sequence Troubleshooting Battery Operations Product Description Pin Assignments Index CAUTION: When replacing the system board, ensure the dip switch voltage settings on the system board are correct for the computer model and processor voltage marked on the processor chip.
United States compaq.gif (932 bytes) January 3, 2003 top_nav.
United States compaq.gif (932 bytes) January 3, 2003 top_nav.gif (991 bytes) Presario 1200 Series Models: 1255, 1256, 1260, 1262, 1266, 1267, 1272, 1273, 1274, and 1275 Before You Begin Specifications Parts Catalog Removal Sequence Troubleshooting Battery Operations Product Description Pin Assignments Index 5. Disconnect the hard drive data cable from the hard drive and remove from the chassis.
United States compaq.gif (932 bytes) January 3, 2003 top_nav.gif (991 bytes) Presario 1200 Series Models: 1255, 1256, 1260, 1262, 1266, 1267, 1272, 1273, 1274, and 1275 Before You Begin Specifications Parts Catalog Removal Sequence Troubleshooting Battery Operations Product Description Pin Assignments Index To remove the hard drive mounting bracket, remove four screws from the mounting bracket as shown in the illustration.
United States compaq.gif (932 bytes) January 3, 2003 top_nav.
United States compaq.gif (932 bytes) January 3, 2003 top_nav.gif (991 bytes) Presario 1200 Series Models: 1255, 1256, 1260, 1262, 1266, 1267, 1272, 1273, 1274, and 1275 Before You Begin Specifications Parts Catalog Removal Sequence Troubleshooting Battery Operations Product Description Pin Assignments Index 6. Remove the two screws on the bottom of the unit that secure the CD bracket to the system board.
United States compaq.gif (932 bytes) January 3, 2003 top_nav.gif (991 bytes) Presario 1200 Series Models: 1255, 1256, 1260, 1262, 1266, 1267, 1272, 1273, 1274, and 1275 Before You Begin Specifications Parts Catalog Removal Sequence Troubleshooting Battery Operations Product Description Pin Assignments Index 7. Disconnect the CD drive cable from the CD drive and remove the CD drive from the chassis. To replace the CD drive, reverse the previous procedures.
United States compaq.gif (932 bytes) January 3, 2003 top_nav.
United States compaq.gif (932 bytes) January 3, 2003 top_nav.
United States compaq.gif (932 bytes) January 3, 2003 top_nav.gif (991 bytes) Presario 1200 Series Models: 1255, 1256, 1260, 1262, 1266, 1267, 1272, 1273, 1274, and 1275 Before You Begin Specifications Parts Catalog Removal Sequence Troubleshooting Battery Operations Product Description Pin Assignments Index 6. Disconnect the modem cable from the modem. To replace the modem, reverse the previous procedures.
United States compaq.gif (932 bytes) January 3, 2003 top_nav.
United States compaq.gif (932 bytes) January 3, 2003 top_nav.gif (991 bytes) Presario 1200 Series Models: 1255, 1256, 1260, 1262, 1266, 1267, 1272, 1273, 1274, and 1275 Before You Begin Specifications Parts Catalog Removal Sequence Troubleshooting Battery Operations Product Description Pin Assignments Index 7. Disconnect the flex cable attached to the display panel assembly from the ZIF connector on the system board.
United States compaq.gif (932 bytes) January 3, 2003 top_nav.gif (991 bytes) Presario 1200 Series Models: 1255, 1256, 1260, 1262, 1266, 1267, 1272, 1273, 1274, and 1275 Before You Begin Specifications Parts Catalog Removal Sequence Troubleshooting Battery Operations Product Description Pin Assignments Index 8. Disconnect the backlight cable attached to the display panel assembly from the connector on the system board.
United States compaq.gif (932 bytes) January 3, 2003 top_nav.gif (991 bytes) Presario 1200 Series Models: 1255, 1256, 1260, 1262, 1266, 1267, 1272, 1273, 1274, and 1275 Before You Begin Specifications Parts Catalog Removal Sequence Troubleshooting Battery Operations Product Description Pin Assignments Index 9. Support the back of the display panel assembly and remove two screws from each of the display panel hinges.
United States compaq.gif (932 bytes) January 3, 2003 top_nav.gif (991 bytes) Presario 1200 Series Models: 1255, 1256, 1260, 1262, 1266, 1267, 1272, 1273, 1274, and 1275 Before You Begin Specifications Parts Catalog Removal Sequence Troubleshooting Battery Operations Product Description Pin Assignments Index 10. Gently pull the flex cable attached to the display panel assembly through the slot on the Upper CPU cover and remove the display panel assembly with flex and backlight cable attached.
United States compaq.gif (932 bytes) January 3, 2003 top_nav.gif (991 bytes) Presario 1200 Series Models: 1255, 1256, 1260, 1262, 1266, 1267, 1272, 1273, 1274, and 1275 Before You Begin Specifications Parts Catalog Removal Sequence Troubleshooting Battery Operations Product Description Pin Assignments Index Removing the Upper CPU Cover To remove the Upper CPU cover complete the following steps: 1. Prepare the computer for disassembly.
United States compaq.gif (932 bytes) January 3, 2003 top_nav.
United States compaq.gif (932 bytes) January 3, 2003 top_nav.gif (991 bytes) Presario 1200 Series Models: 1255, 1256, 1260, 1262, 1266, 1267, 1272, 1273, 1274, and 1275 Before You Begin Specifications Parts Catalog Removal Sequence Troubleshooting Battery Operations Product Description Pin Assignments Index Removing the Diskette Drive To remove the diskette drive, complete the following steps: Electrostatic Discharge Service Consideration Cables and Connectors 1.
United States compaq.gif (932 bytes) January 3, 2003 top_nav.gif (991 bytes) Presario 1200 Series Models: 1255, 1256, 1260, 1262, 1266, 1267, 1272, 1273, 1274, and 1275 Before You Begin Specifications Parts Catalog Removal Sequence Troubleshooting Battery Operations Product Description Pin Assignments Index 10. Disconnect the diskette drive data cable from the system board. To replace the diskette drive, reverse the previous procedures.
United States compaq.gif (932 bytes) January 3, 2003 top_nav.
United States compaq.gif (932 bytes) January 3, 2003 top_nav.gif (991 bytes) Presario 1200 Series Models: 1255, 1256, 1260, 1262, 1266, 1267, 1272, 1273, 1274, and 1275 Before You Begin Specifications Parts Catalog Removal Sequence Troubleshooting Battery Operations Product Description Pin Assignments Index To remove the fan gasket, complete the following step: Pull the gasket from the fan. To replace the fan assembly, reverse the previous procedure.
United States compaq.gif (932 bytes) January 3, 2003 top_nav.gif (991 bytes) Presario 1200 Series Models: 1255, 1256, 1260, 1262, 1266, 1267, 1272, 1273, 1274, and 1275 Before You Begin Specifications Parts Catalog Removal Sequence Troubleshooting Battery Operations Product Description Pin Assignments Index Removing the System Board Electrostatic Discharge Service Considerations To remove the system board, complete the following steps: Cables and Connectors 1.
United States compaq.gif (932 bytes) January 3, 2003 top_nav.gif (991 bytes) Presario 1200 Series Models: 1255, 1256, 1260, 1262, 1266, 1267, 1272, 1273, 1274, and 1275 Before You Begin Specifications Parts Catalog Removal Sequence Troubleshooting Battery Operations Product Description Pin Assignments Index 15. Remove three standoffs from the system board.
United States compaq.gif (932 bytes) January 3, 2003 top_nav.gif (991 bytes) Presario 1200 Series Models: 1255, 1256, 1260, 1262, 1266, 1267, 1272, 1273, 1274, and 1275 Before You Begin Specifications Parts Catalog Removal Sequence Troubleshooting Battery Operations Product Description Pin Assignments Index 16. Remove two screws from the CD Drive mounting rails and remove the mounting rails from the system board.
United States compaq.gif (932 bytes) January 3, 2003 top_nav.gif (991 bytes) Presario 1200 Series Models: 1255, 1256, 1260, 1262, 1266, 1267, 1272, 1273, 1274, and 1275 Before You Begin Specifications Parts Catalog Removal Sequence Troubleshooting Battery Operations Product Description Pin Assignments Index 17. Remove three screws from the system board.
United States compaq.gif (932 bytes) January 3, 2003 top_nav.gif (991 bytes) Presario 1200 Series Models: 1255, 1256, 1260, 1262, 1266, 1267, 1272, 1273, 1274, and 1275 Before You Begin Specifications Parts Catalog Removal Sequence Troubleshooting Battery Operations Product Description Pin Assignments Index 18. Pull the PCMCIA eject lever out (straight), lift up the right side of the system board and pull forward to remove the system board from the chassis.
United States compaq.gif (932 bytes) January 3, 2003 top_nav.
United States compaq.gif (932 bytes) January 3, 2003 top_nav.gif (991 bytes) Presario 1200 Series Models: 1255, 1256, 1260, 1262, 1266, 1267, 1272, 1273, 1274, and 1275 Before You Begin Specifications Parts Catalog Removal Sequence Troubleshooting Battery Operations Product Description Pin Assignments Index 4. Pull side levers to release the memory module and unplug the memory module from the system board. To replace the memory module, reverse the previous procedures.
United States compaq.gif (932 bytes) January 3, 2003 top_nav.
United States compaq.gif (932 bytes) January 3, 2003 top_nav.
United States compaq.gif (932 bytes) January 3, 2003 top_nav.
United States compaq.gif (932 bytes) January 3, 2003 top_nav.
United States compaq.gif (932 bytes) January 3, 2003 top_nav.
United States compaq.gif (932 bytes) January 3, 2003 top_nav.gif (991 bytes) Presario 1200 Series Models: 1255, 1256, 1260, 1262, 1266, 1267, 1272, 1273, 1274, and 1275 Before You Begin Specifications Parts Catalog Removal Sequence Troubleshooting Battery Operations Product Description Pin Assignments Index Specifications Display 12.1" (Diagonal) TFT Display U.S. Metric Active Area Height Width 9.6" 7.2" 246 mm 184.5 mm Overall Dimensions Width Height Depth 7.35" 10.7" .27" 188.
United States compaq.gif (932 bytes) January 3, 2003 top_nav.
United States compaq.gif (932 bytes) January 3, 2003 top_nav.gif (991 bytes) Presario 1200 Series Models: 1255, 1256, 1260, 1262, 1266, 1267, 1272, 1273, 1274, and 1275 Before You Begin Specifications Parts Catalog Removal Sequence Troubleshooting Battery Operations Product Description Pin Assignments Index Specifications Battery Pack Battery Pack Nickel Metal Hydride (NiMH) Lithium Ion (Li ion) Dimensions Height Length Width 0.8 in (20.3 mm) 5.7 in (145 mm) 3.1 in (78.7 mm) 0.8 in (20.
United States compaq.gif (932 bytes) January 3, 2003 top_nav.
United States compaq.gif (932 bytes) January 3, 2003 top_nav.gif (991 bytes) Presario 1200 Series Models: 1255, 1256, 1260, 1262, 1266, 1267, 1272, 1273, 1274, and 1275 Before You Begin Specifications Parts Catalog Removal Sequence Troubleshooting Battery Operations Product Description Pin Assignments Index Specifications Hard Drives Hard Drives 3.2-GB 4.3-GB 4.8-GB Capacity Per Drive (Formatted) 3.2 GB 4.3 GB 4.8 GB Drive Type 2.5" 2.5" 2.
United States compaq.gif (932 bytes) January 3, 2003 top_nav.gif (991 bytes) Presario 1200 Series Models: 1255, 1256, 1260, 1262, 1266, 1267, 1272, 1273, 1274, and 1275 Before You Begin Specifications Parts Catalog Removal Sequence Troubleshooting Battery Operations Product Description Pin Assignments Index Specifications CD Drive 24× CD Drive Dimensions 128 x 12.7 x 129 mm Weight 0.
United States compaq.gif (932 bytes) January 3, 2003 top_nav.gif (991 bytes) Presario 1200 Series Models: 1255, 1256, 1260, 1262, 1266, 1267, 1272, 1273, 1274, and 1275 Before You Begin Specifications Parts Catalog Removal Sequence Troubleshooting Battery Operations Product Description Pin Assignments Index Connector Pin Assignments This appendix provides connector pin assignment tables for Compaq Presario 1200 Series Portable Computers.
United States compaq.gif (932 bytes) January 3, 2003 top_nav.