400P Color Inkjet Printer Getting Started Guide
Notice • Copyright 2001 Compaq Computer Corporation COMPAQ and the Compaq logo Registered in U.S. Patent and Trademark Office. Microsoft and Windows are trademarks of Microsoft Corporation. All other product names mentioned herein may be trademarks or registered trademarks of their respective companies. Compaq shall not be liable for technical or editorial errors or omissions contained herein. The information in this document is subject to change without notice.
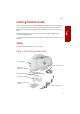
Setup Getting Started Guide This booklet guides you step by step from setup through printing your first document or digital photo. See page 24 for information about contacting Compaq and locating your printer warranty. Setup To setup your printer, follow these easy steps.
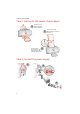
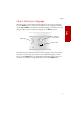
Getting Started Guide Step 2: Load up to 100 sheets of plain paper 1 Make sure you fully extend the paper supports. 2 You can use many different types and sizes of paper. 3 To avoid paper misfeeds, slide the paper guide to the left side of the paper.
Setup Step 4: Select your language When the power is connected, the printer will ask you to select your language. Press the Enter button to confirm you would like to set the language, and then use the Up and Down arrow buttons to find the language you wish to use for the LCD panel. Once you have found your language, press Enter to select it.
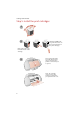
Getting Started Guide Step 5: Install the print cartridges 1 2 Warning: Do not touch the gold contact areas on the back and bottom of the print cartridges. Note: Remove the tape from the bottom of the cartridge. 3 First, push gently at the top of the front cover to release the latch, then pull the cover toward you to open it. Note: The cartridge carrier moves to the loading position when you open the front cover.
Setup 5 4 SNAP! Setup Note: Place black cartridge in right carrier. 6 Step 6: Align the cartridges After installing the print cartridges and closing the cover, an alignment page will be automatically printed. From each alignment group on the alignment page, find the number under the alignment pattern that comes closest to forming a straight line. Note: In this example for alignment group A, 16 comes closest to forming a straight line.
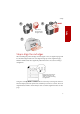
Getting Started Guide Step 7: Connect the USB cable The Compaq 1400P can print photos directly from your digital camera memory card without the use of a PC (see “Printing directly from a memory card” on page 9). However, you can maximize the value of your printer by attaching it to your PC and installing the printer software. 1 2 The location and orientation of the USB port on your computer may be different from the one shown.
Setup Step 8: Install the printer software If your computer is not already on, please turn it on now. 1 Setup Click Cancel on any screens similar to the one shown. Cancel 2 3 Wait for the Compaq printer software installation screen shown in to appear. If it doesn’t, see page 21. 4 Click Next and follow the instructions until the installation is complete. Next Congratulations! You have finished setting up your printer.
Getting Started Guide 8
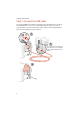
Printing Printing There are two ways you can print using your Compaq 1400P: > Print photos directly from your memory card -- no PC required > Print from an application using your computer Either way, your Compaq 1400P will deliver excellent results. Printing directly from a memory card Printing The Compaq 1400P is equipped with a CompactFlash slot which enables you to print your photos without the use of a PC. Most digital cameras store their photos on a memory card.
Getting Started Guide Insert the side with the pin holes first, with the top lip facing you. When the card is properly inserted, the CompactFlash LED next to the slot will turn on. WARNING: Never remove the memory card when the CompactFlash light is flashing, or you could damage the card. Once the card has been properly inserted, the LCD will display the number of photos found on the card.
Printing # Button/Light Description Setup Provides access to the system setup menu. Use this button to cycle through all setup menus, and the Up/Down buttons to change the settings. 2 Card Access Light Turns on when a CompactFlash card is properly inserted. It also flashes when the card is being accessed. 3 LCD Display Displays menus and status messages. 4 Menu Selects one of the menus (photo select, photo size, etc.) once a card has been inserted.
Getting Started Guide About Photo Cropping When the printer scales a photo to your selected photo size, it attempts to find the best fit possible without omitting any part of the original photo. Depending on the photo, this means it might not fill up the entire selected size in both directions. If you prefer that the photo is the exact size you selected (for example, 4x6”), then the photo can be cropped. This removes a small part of the photo.
Printing Printing your photos Once you have placed your memory card in the card slot, it takes only a few steps to print your photos. Step 1: Print an index The first thing you will want to do is print an index (unless you are using DPOF, in which case you can proceed to Step 3). When a memory card is placed in the card slot, the printer is ready to print an index...simply press the Print button.
Getting Started Guide Step 3: Select the photo size Press the Menu button to move from the Photo Select menu to the Photo Size menu. Use the Up and Down arrow buttons to find a photo size, and the Enter button to select it. The Compaq 1400P saves paper by fitting as many photos on a page as possible. The table below lists the paper sizes and the number of photos per page for each photo size. Paper Index 2.5x3” 6x8cm 3.
Printing Step 6: Print! You have made all of the necessary selections. To print your photos, simply press the Print button. If you would like to review your selections first, repeatedly press the Menu button to return to the previous menus. Each menu will show your selection, each indicated by an asterisk (*). When you have completed your review and you are ready to print, press the Print button. As each photo is processed, the LCD will display the printer’s progress.
Getting Started Guide Printing using your computer Although the Compaq 1400P will print photo quality images, it is also an excellent everyday printer. Basic printing Basic printing is as easy as: 1 Load the paper. 2 Open the file you want to print. 3 Customize the printer settings. (For help, see the section below, “Using the printer software.”) 4 Print your document.
Printing b To learn more: > Explore the other tabs in the Printer Properties. > Explore the menus. > Click Help to view the printer software Help. From the File menu, click Exit when you are finished viewing the Help. c Click OK to apply the settings and close the Printer Properties. 4 In the Print Range area of the Print dialog box, select Current Page. 5 Click OK to print the current page of the Getting Started Guide. Printing photos To print the best looking photos: Printing 1 Use photo paper.
Getting Started Guide Printing multiple pages per sheet of paper You can print two, four, or nine “pages” of your document on a single sheet of paper. This will save you both print time and paper. Explore the Layout tab of the Printer Properties for these and many other layout options. Printing banners To print a banner, you should have banner paper and software that supports banner printing. > Place the banner paper behind the printer.
Saving Saving There are two ways you can save your photos using your Compaq 1400P: > Save photos using the Compaq 1400P control panel > Save photos using your computer Both methods require the printer to be attached to your computer. The Compaq 1400P printer software must also be installed. If you have not installed the software yet, See “Install the printer software” on page 7.
Getting Started Guide Step 3: Follow the wizard If you want to change any of the wizard options, use your mouse to make changes on the wizard screens. If you do not make any selections within thirty seconds, the PhotoSaver wizard will automatically continue with the default options. By default, your photos will be saved under your My Pictures directory, in a new folder created with the current date and time.
Help Help Your printer has been designed for ease of use. There may be occassions when you have questions or need general printing help. This section is designed to answer your most frequently asked questions. For additional help, press the Help button on the Printer Properties dialog. The installation screen did not appear 1 Make sure you click Cancel on any screens similar to page 7. in step 8 on 2 Make sure the Compaq printer software CD is in your CD-ROM drive.
Getting Started Guide > Check the printer port: a From the File menu of a software application, click Print or Printer Setup. b In the Where area, make sure your printer port is set to USB. > Make sure you have not installed multiple copies of the printer software: a From the Start menu, click Settings Printers. b In the Printers folder, make sure there is only one icon for your printer. c If you have two printer icons for the same printer, try printing a test page from each icon.
Help Paper Jams Try removing the paper from the sheet feeder. If the paper is lodged too far into the printer and can’t be removed: 1 Unplug the power cord from the printer. 2 Pull firmly on the paper to remove it. Lower the front cover and pull the paper from the front if necessary. 3 Close the front cover. 4 Plug the power cord back into the printer to turn it on. 5 Print your document again. Pages have poor print quality > Check the ink level graphic on the Cartridges tab of your Printer Properties.
Getting Started Guide Contacting Compaq Visit our Web site at www.compaq.com to: > Access publications for your printer. > Download software updates. > Search for solutions to common problems. > Learn new ways to use your printer. > Look for special offers and purchase inkjet supplies and media. To quickly navigate to the Compaq website, click: Start Program Files Compaq 1400P Compaq Online.
Compaq Warranty Information How do I obtain warranty service? What is not covered by this limited warranty? > Product purchased from anyone other than Compaq or a Compaq authorized reseller You may access product technical support on Compaq's website at www.compaq.com or you may call Compaq's Technical Support Center. Compaq's highly trained technicians will first try to resolve the problem through our online services or by telephone.
Getting Started Guide defects in materials or workmanship under normal use during the warranty period. The warranty period commences on the date of purchase. Please retain a copy of your sales receipt. Your sales receipt is your proof of the date of purchase. This warranty extends only to you, the original Purchaser. It is non- transferable. It excludes expendable parts.
of liability, however, will not apply to claims for personal injury. U.S.A. State Laws Some states do not allow limitation on how long an implied warranty lasts. In such states, the limitations or exclusions of this Limited Warranty may not apply to you. Some states do not allow the exclusion or limitation in incidental or consequential damages for consumer products. In such states, the exclusion or limitation of this Limited Warranty may not apply to you.
Getting Started Guide Notices This section contains information about: > Notices > Safety information Electronic emission notices Federal Communications Commission (FCC) compliance information statement This equipment has been tested and found to comply with the limits for a Class B digital device, pursuant to Part 15 of the FCC Rules.
European Community (EC) directives conformity This product is in conformity with the protection requirements of EC Council directives 89/336/EEC and 73/23/ EEC on the approximation and harmonization of the laws of the Member States relating to electromagnetic compatibility and safety of electrical equipment designed for use within certain voltage limits. A declaration of conformity with the requirements of the Directive has been signed by the assigned parties within Compaq Computer Corporation.
Getting Started Guide