Thank you for purchasing this Factory Service Manual CD/DVD from servicemanuals4u.com.
"Compaq.
"Compaq.com - Compaq Presario 1600 Series Maintenance and Service Guide - Models: 1650 and 1655 To report a technical problem, contact your Regional Support Center or IM Help Center. 1.800.AT.COMPAQ privacy and legal statement file:///C|/SERVICE%20MANUALS/COMPAQ%20_%20chec...201600%20SERIES%201650%20and%201655/index.
"Compaq.
"Compaq.com - Compaq Presario 1600 Series Maintenance and Service Guide - Models: 1650 and 1655 First Edition (June 1998) Compaq Computer Corporation 1.800.AT.COMPAQ privacy and legal statement file:///C|/SERVICE%20MANUALS/COMPAQ%20_%20chec...01600%20SERIES%201650%20and%201655/notice.
"Compaq.
"Compaq.com - Compaq Presario 1600 Series Maintenance and Service Guide - Models: 1650 and 1655 WARNING: Only authorized technicians trained by Compaq should repair this equipment. All troubleshooting and repair procedures are detailed to allow only subassembly/module level repair. Because of the complexity of the individual boards and subassemblies, the user should not attempt to make repairs at the component level or to make modifications to any printed circuit board.
"Compaq.
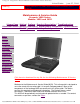
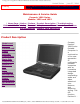
"Compaq.com - Compaq Presario 1600 Series Maintenance and Service Guide - Models: 1650 and 1655 based series of portable computers allows full desktop functionality and additional connectivity via the optional port replicator. 1.800.AT.COMPAQ privacy and legal statement file:///C|/SERVICE%20MANUALS/COMPAQ%20_%20chec...1600%20SERIES%201650%20and%201655/product.
"Compaq.
"Compaq.com - Compaq Presario 1600 Series Maintenance and Service Guide - Models: 1650 and 1655 If the problem is intermittent, check the NOTE: computer several times to verify that the problem is solved. 1.800.AT.COMPAQ privacy and legal statement file:///C|/SERVICE%20MANUALS/COMPAQ%20_%20chec...1600%20SERIES%201650%20and%201655/trouble.
file:///C|/SERVICE%20MANUALS/COMPAQ%20_%20checked%20ok/NOT...S/PRESARIO%201600%20SERIES%201650%20and%201655/illust.
file:///C|/SERVICE%20MANUALS/COMPAQ%20_%20checked%20ok/NOT...S/PRESARIO%201600%20SERIES%201650%20and%201655/illust.html 1.800.AT.COMPAQ privacy and legal statement file:///C|/SERVICE%20MANUALS/COMPAQ%20_%20check...201600%20SERIES%201650%20and%201655/illust.
Removal & Replace United States June 27, 2004 STORE | PRODUCTS | SERVICES | SUPPORT | CONTACT US | SEARCH COMPAQ Maintenance & Service Guide Presario 1600 Series Models: 1650 and 1655 | Home Page | Notice | Preface | Product Description | Troubleshooting Illustrated Parts Catalog | Removal & Replacement Procedures | Specifications Pin Assignments | Battery Pack Operations Removal and Replacement Procedures This section explains the removal and replacement procedures for the computer.
Removal & Replace Heatspreader Modem Processor Status Panel Interface Board Hard Drives Battery Charger Board CD Drive Display Panel Assembly Upper CPU Cover Speaker Assembly Diskette Drive Fan Assembly Audio Board System Board Memory Module 1.800.AT.COMPAQ privacy and legal statement file:///C|/SERVICE%20MANUALS/COMPAQ%20_%20chec...1600%20SERIES%201650%20and%201655/removal.
Specs United States June 27, 2004 STORE | PRODUCTS | SERVICES | SUPPORT | CONTACT US | SEARCH COMPAQ Maintenance & Service Guide Presario 1600 Series Models: 1650 and 1655 | Home Page | Notice | Preface | Product Description | Troubleshooting Illustrated Parts Catalog | Removal & Replacement Procedures | Specifications Pin Assignments | Battery Pack Operations Specifications This chapter covers the following specifications of Compaq Presario 1600 Series Portable Computers: ● Computer models ● Physi
Specs Dimensions Height Depth Width 1.97 in 12.20 in 10.08 in 4.95 cm 31.00 cm 25.40 cm Model 1650 Model 1655 7.326 Ib 7.326 Ib 3.33 kg 3.33 kg Stand-Alone (Battery Pack) Power Requirements NiMH Li-ion Nominal Operating Maximum Average Peak Operating W @ 9.6 V W @ 9.6 V W @ 9.6 V W @ 14.4 V W @ 14.4 V W @ 14.4 V Weight AC Power Requirements Operating Voltage Operating Current Operating Frequency Maximum Transient 100-240 V 0.8/0.
Specs IRQ4 Communication Port (COM1) IRQ5 Audio Controller IRQ6 Diskette Drive IRQ7 Parallel Port (LPT 1) (default) IRQ8 System CMOS/Real-Time Clock IRQ9 IRQ Holder for PCI Steering IRQ9 PCI-1131 CardBus Controller IRQ9 IRQ Holder for PCI Steering IRQ9 IRQ Holder for PCI Steering IRQ9 PCI-1131 CardBus Controller IRQ9 Video Controller IRQ11 Intel PCI to USB Universal Host Controller IRQ11 IRQ Holder for PCI Steering IRQ12 PS/2 TouchPad/Mouse IRQ13 Numeric data processor IRQ14
Specs 0040h-0043h System timer 0060h-0060h Keyboard Controller 0061h-0061h System speaker 0064h-0064h Standard 101/102-Key or Microsoft Natural Keyboard 0070h-0071h System CMOS/real time clock 0080h-0080h Motherboard resources 0081h-008Fh DMA Controller 00A0h-00A1h Programmable interrupt controller 00C0h-00DFh DMA 00ECh-00EFh Motherboard resources 00F0h-00FFh Numeric data processor 0170h-0177h Intel PCI Bus Master IDE Controller 0170h-0177h Secondary IDE Controller (dual fifo) 01F
Specs 0376h-0376h Intel PCI Bus Master IDE Controller 0378h-037Fh Printer Port (LPT1) 0388h-038Bh ES1869 Plug and Play AudioDrive 03B0h-03BBh Video Controller 03C0h-03DFh Video Controller 03F0h-03F5h Standard Floppy Disk Controller 03F6h-03F6h Intel PCI Bus Master IDE Controller 03F6h-03F6h Primary IDE controller (dual fifo) 03F7h-03F7h Standard Floppy Disk Controller 03F8h-03FFh Communications Port (COM1) 04D0h-04D1h Motherboard resources 0800h-0807h ES1869 Control Interface 0CF8h-
Specs System Memory Catalog System Memory Catalog Memory Address System Function 00000000h-0009FFFFh System board extension for PnP BIOS 000A0000h-000AFFFFh Graphics Controller 000B0000h-000BFFFFh Graphics Controller 000C0000h-000CBFFFh Graphics Controller 000DC000h-000FFFFFh System board extension for PnP BIOS 00100000h-03FFFFFFh System board extension for PnP BIOS 05000000h-05000FFFh PCI-1131 CardBus Controller 05001000h-05001FFFh PCI-1131 CardBus Controller 80000000h-803FFFFFh Intel P
Specs 12.1" (Diagonal) TFT Display U.S.
Specs Access Times Information not available Track-to-Track (ms) Average (ms) Setting Time (ms) Latency Average (ms) Cylinders (High/Low) Information not available Number of Read/Write Heads Information not available Hard Drive (Information not available) Hard Drives 5.0-GB 4.
Specs Battery Pack Nickel Metal Hydride (NiMH) Lithium Ion (Li ion) * Dimensions Height Length Width 0.8 in (20.3 mm) 5.7 in (145 mm) 3.1 in (78.7 mm) 0.8 in (20.3 mm) 5.7 in (145 mm) 3.1 in (78.7 mm) Weight 1.01 Ib (458.1 g) 0.90 Ib (408.2 g) Battery Pack Operating Time 2:30 hr 3:00 hr 9.6 V 3200mAH 40 W 14.
Pins Compaq.com United States Maintenance & Service Guide Presario 1600 Series Models: 1650 and 1655 | Home Page | Notice | Preface | Product Description | Troubleshooting Illustrated Parts Catalog | Removal & Replacement Procedures | Specifications Pin Assignments | Battery Pack Operations Connector Pin Assignments This appendix provides connector pin assignment tables for Compaq Presario 1600 Series Portable Computers. For more information on connectors, refer to the section on Rear Connectors.
Pins Connector Pin Signal 1 Carrier Detect 2 Receive Data 3 Transmit Data 4 Data Terminal Ready 5 Signal Ground 6 Data Set Ready 7 Ready to Send 8 Clear to Send 9 Ring Indicator Keyboard/Mouse Connector Pin Signal 1 Data 2 Not defined 3 Ground 4 +5 VDC 5 Clock 6 Not defined External VGA Monitor Connector Pin Signal file:///C|/SERVICE%20MANUALS/COMPAQ%20_%20chec...1600%20SERIES%201650%20and%201655/connec1.
Pins 1 Red Analog 2 Green Analog 3 Blue Analog 4 Not connected 5 Ground 6 Ground Analog 7 Ground Analog 8 Ground Analog 9 Not connected 10 Ground 11 Monitor Detect 12 DDC2B Data 13 Horizontal Sync 14 Vertical Sync 15 DDC2B Clock Universal Serial Bus Connector Pin Signal 1 Ground 2 D+ 3 D4 Power Port Replicator file:///C|/SERVICE%20MANUALS/COMPAQ%20_%20chec...1600%20SERIES%201650%20and%201655/connec1.
Pins Pin Signal Pin Signal Pin Signal Pin Signal 1 N.C. 21 Printer Data 0 41 N.C. 61 CTS 2 N.C. 22 Printer Data 1 42 N.C. 62 DCD 3 Kb Clk 1 23 Printer Data 2 43 Switch A 63 DSR 4 Joystick Data A 24 Printer Data 3 44 Switch B 64 TXD 5 Kb Data 1 25 Printer Data 4 45 Switch C 65 RTS 6 Joystick Data B 26 Printer Data 5 46 Switch D 66 N.C. 7 Kb Clk 2 27 Printer Data 6 47 N.C. 67 Detect 8 Joystick Data C 28 Printer Data 7 48 MIDI In 68 N.C.
Pins 1 Unused 2 Unused 3 Tip 4 Ring 5 Unused 6 Unused 1.800.AT.COMPAQ privacy and legal statement file:///C|/SERVICE%20MANUALS/COMPAQ%20_%20chec...1600%20SERIES%201650%20and%201655/connec1.
file:///C|/SERVICE%20MANUALS/COMPAQ%20_%20checked%20ok/NO...PRESARIO%201600%20SERIES%201650%20and%201655/battery.
file:///C|/SERVICE%20MANUALS/COMPAQ%20_%20checked%20ok/NO...PRESARIO%201600%20SERIES%201650%20and%201655/battery.html ● ● Set the power conservation levels in the Power Management utility to Maximum. Customize the timeout value to work more efficiently with the applications. The amount of battery life depends on the values selected.
file:///C|/SERVICE%20MANUALS/COMPAQ%20_%20checked%20ok/NO...PRESARIO%201600%20SERIES%201650%20and%201655/battery.html Disposal of a Used Battery Pack In the interest of safeguarding our environment. Compaq Computer Corporation recommends that nickel metal hydride (NiMH) and lithium ion (Li ion) battery packs be recycled. Battery packs should be handled in accordance with country, state, province, or local regulations. CAUTION: Never attempt to open or service a battery pack.
"Compaq.
"Compaq.com - Compaq Presario 1600 Series Maintenance and Service Guide - Models: 1650 and 1655 privacy and legal statement file:///C|/SERVICE%20MANUALS/COMPAQ%20_%20chec...01600%20SERIES%201650%20and%201655/models.
"Compaq.
"Compaq.com - Compaq Presario 1600 Series Maintenance and Service Guide - Models: 1650 and 1655 1.800.AT.COMPAQ privacy and legal statement file:///C|/SERVICE%20MANUALS/COMPAQ%20_%20chec...01600%20SERIES%201650%20and%201655/contrs.
"Compaq.
"Compaq.com - Compaq Presario 1600 Series Maintenance and Service Guide - Models: 1650 and 1655 1.800.AT.COMPAQ privacy and legal statement file:///C|/SERVICE%20MANUALS/COMPAQ%20_%20check...01600%20SERIES%201650%20and%201655/leftsid.
"Compaq.com - Compaq Presario 1600 Series Maintenance and Service Guide - Models: 1650 and 1655 United States June 27, 2004 STORE | PRODUCTS | SERVICES | SUPPORT | CONTACT US | SEARCH COMPAQ Maintenance & Service Guide Presario 1600 Series Models: 1650 and 1655 | Home Page | Notice | Preface | Product Description | Troubleshooting Illustrated Parts Catalog | Removal & Replacement Procedures | Specifications Pin Assignments | Battery Pack Operations Right Side Components Models and Features 1.
"Compaq.com - Compaq Presario 1600 Series Maintenance and Service Guide - Models: 1650 and 1655 United States COMPAQ June 27, 2004 STORE | PRODUCTS | SERVICES | SUPPORT | CONTACT US | SEARCH Maintenance & Service Guide Presario 1600 Series Models: 1650 and 1655 | Home Page | Notice | Preface | Product Description | Troubleshooting Illustrated Parts Catalog | Removal & Replacement Procedures | Specifications Pin Assignments | Battery Pack Operations Bottom of Unit Models and Features 1. Memory 2.
"Compaq.com - Compaq Presario 1600 Series Maintenance and Service Guide - Models: 1650 and 1655 United States June 27, 2004 STORE | PRODUCTS | SERVICES | SUPPORT | CONTACT US | SEARCH COMPAQ Maintenance & Service Guide Presario 1600 Series Models: 1650 and 1655 | Home Page | Notice | Preface | Product Description | Troubleshooting Illustrated Parts Catalog | Removal & Replacement Procedures | Specifications Pin Assignments | Battery Pack Operations Rear Connectors Models and Features 1.
"Compaq.
"Compaq.com - Compaq Presario 1600 Series Maintenance and Service Guide - Models: 1650 and 1655 Compaq Home Search Products Service Worldwide Compaq.com Comments? Legal Notices and Privacy Statement Revised: dd Month 1998 1.800.AT.COMPAQ privacy and legal statement file:///C|/SERVICE%20MANUALS/COMPAQ%20_%20chec...%201600%20SERIES%201650%20and%201655/port.
"Compaq.
"Compaq.
"Compaq.com - Compaq Presario 1600 Series Maintenance and Service Guide - Models: 1650 and 1655 CAUTION: While in Sleep mode, your computer will maintain system information and open files. Unsaved information will be lost if you turn off your system prior to system wake-up, or if you lose power while using the AC adapter. Hibernation Mode Hibernation helps conserve battery life and protects your data. Hibernation can be a routine power saving event, or can be the result of a low battery condition.
"Compaq.com - Compaq Presario 1600 Series Maintenance and Service Guide - Models: 1650 and 1655 (see battery section for instruction on removing battery). Rebooting After a Lockup Occasionally you may encounter a frozen keyboard or a locked screen. To reboot your computer (as if from a cold start) press and hold down the Power Button for at least four seconds, which will cause a manual shutdown. Then, restart it with a single press of the Power Button.
"Compaq.
"Compaq.com - Compaq Presario 1600 Series Maintenance and Service Guide - Models: 1650 and 1655 1.800.AT.COMPAQ privacy and legal statement file:///C|/SERVICE%20MANUALS/COMPAQ%20_%20chec...01600%20SERIES%201650%20and%201655/prelim.
"Compaq.
"Compaq.com - Compaq Presario 1600 Series Maintenance and Service Guide - Models: 1650 and 1655 1.800.AT.COMPAQ privacy and legal statement file:///C|/SERVICE%20MANUALS/COMPAQ%20_%20chec...1600%20SERIES%201650%20and%201655/ponpass.
"Compaq.
"Compaq.com - Compaq Presario 1600 Series Maintenance and Service Guide - Models: 1650 and 1655 XX000YZZ 201-Memory Error Probable Cause Recommended Action 301-Keyboard Error Probable Cause Recommended Action Keyboard failure 1. Ensure the keys are not depressed during POST. 2. Reconnect the keyboard with the computer off. 3. Replace the keyboard. 304-Keyboard or System Unit Error Probable Cause Recommended Action Keyboard or system board error 1. Replace the keyboard. 2.
"Compaq.
"Compaq.com - Compaq Presario 1600 Series Maintenance and Service Guide - Models: 1650 and 1655 the program.) 2. Turn on the external devices that you want to test. Connect the printer if you want to print a log of error messages. 3. Insert the Compaq Diagnostics diskette in drive A. 4. Turn on or restart the computer. The computer starts from drive A, and the Diagnostics Welcome screen appears. 5. Press Enter to continue. The Diagnostics menu appears. 6. Select Computer Checkup from the Diagnostics menu.
"Compaq.com - Compaq Presario 1600 Series Maintenance and Service Guide - Models: 1650 and 1655 The View System Information (INSPECT) utility provides information about the computer and installed or connected devices. You can display, print, or save the information. Follow these steps to run View System Information (INSPECT) from the Compaq Diagnostics diskette: 1. Turn on the external devices that you want to test. Connect the printer if you want to print the information. 2.
"Compaq.
"Compaq.com - Compaq Presario 1600 Series Maintenance and Service Guide - Models: 1650 and 1655 501 through 516 Video Test 2402 through 2456 2458 through 2480 3206 Audio Test 8601 through 8602 Touch Pad Pointing Device Test 3301 through 6623 CD Test Processor Test Error Codes Error Code Description Recommended Action 101-xx CPU test failed Replace the processor and retest. 102-xx Coprocessor or Weitek Error 1. Run the Configuration and Diagnostics Utilities. 2.
"Compaq.com - Compaq Presario 1600 Series Maintenance and Service Guide - Models: 1650 and 1655 215-xx Random address test failed Keyboard Test Error Codes 300-xx Failed ID Test 301-xx Failed Selftest/Interface Test 1. Check the keyboard connection. If disconnected, turn off the computer and connect the keyboard. 302-xx Failed Individual Key Test 2. Replace the keyboard and retest. 304-xx Failed Keyboard Repeat Test 3. Replace the system board and retest.
"Compaq.
"Compaq.
"Compaq.
"Compaq.com - Compaq Presario 1600 Series Maintenance and Service Guide - Models: 1650 and 1655 6600-xx ID test failed 6605-xx Read test failed 6608-xx Controller test failed 6623-xx Random read test failed 4. Replace the CD drive and retest. 5. Replace the system board and retest. Back to top 1.800.AT.COMPAQ privacy and legal statement file:///C|/SERVICE%20MANUALS/COMPAQ%20_%20chec...201600%20SERIES%201650%20and%201655/error.
"Compaq.
"Compaq.
"Compaq.com - Compaq Presario 1600 Series Maintenance and Service Guide - Models: 1650 and 1655 Computer is beeping and battery LED Battery charge is low. icon is blinking. Immediately save any open file(s). Then do any one of the following: ● ● Connect the computer to an external power source to charge the battery pack. Turn off the computer or initiate Hibernation until you can find another power source or charge the battery pack.
"Compaq.com - Compaq Presario 1600 Series Maintenance and Service Guide - Models: 1650 and 1655 Battery pack has partially selfdischarged. Condition the battery pack by fully charging, fully discharging, then fully recharging it. To maintain the charge, leave battery packs in the computer when it is connected to external power. If the computer is disconnected from external power for more than two weeks, remove battery packs from the computer to reduce the discharge rate.
"Compaq.com - Compaq Presario 1600 Series Maintenance and Service Guide - Models: 1650 and 1655 Drive error has occurred. Run Computer Checkup from the Compaq Diagnostics diskette. Diskette is not formatted. Format the diskette. At the system prompt, enter FORMAT A: Diskette drive cannot read a diskette. The wrong type of diskette is being used. Use the type of diskette required by the drive. Diskette has a bad sector. Copy files to hard drive or another diskette. Reformat bad floppy.
"Compaq.com - Compaq Presario 1600 Series Maintenance and Service Guide - Models: 1650 and 1655 Display is blank and the Suspend icon is flashing. System is in Suspend mode. Press any key or touch the Touch Pad. Internal display is blank and the screen on an external monitor displays information. Display function was switched to the external monitor. Use Fn + F2 to switch between LCD or CRT.
"Compaq.com - Compaq Presario 1600 Series Maintenance and Service Guide - Models: 1650 and 1655 This display panel has a continuous pattern across it (e.g., a "jailbars" pattern), has a single color on it, or has garbled graphics across the entire panel. This failure is for patterns across the entire panel (not just on one section). Improper display cable connections Reseat the display cable to the following until the problem is solved: 1. System board 2. Display assembly Defective display cable.
"Compaq.com - Compaq Presario 1600 Series Maintenance and Service Guide - Models: 1650 and 1655 Hard drive error occurs. Hard drive has bad sectors or has failed. Run Computer Checkup. Hard drive does not work. Hard drive is not seated properly. Turn off and unplug the computer, remove the battery pack, and remove and then reinstall the hard drive. Solving Hardware Installation Problems Some common causes and solutions for hardware installation problems are listed in the following table.
"Compaq.com - Compaq Presario 1600 Series Maintenance and Service Guide - Models: 1650 and 1655 Memory count during Power-On Self-Test (POST) is incorrect. Optional memory expansion card is installed incorrectly, is incompatible with the computer, or is defective. Ensure that the optional memory expansion card is installed correctly. "Out of Memory" message is displayed on the screen or insufficient memory error occurs during operation. System ran out of memory for the application.
"Compaq.
"Compaq.com - Compaq Presario 1600 Series Maintenance and Service Guide - Models: 1650 and 1655 IMPORTANT: Ensure that there is no diskette in the diskette drive and that there are no PC Cards in the PC slots. 4. Close the display and all exterior doors of the computer. 5. Pack the computer with sufficient packing material to protect it. Use the original packing box or similar packaging. 1.800.AT.COMPAQ privacy and legal statement file:///C|/SERVICE%20MANUALS/COMPAQ%20_%20che...
"Compaq.
"Compaq.com - Compaq Presario 1600 Series Maintenance and Service Guide - Models: 1650 and 1655 1.800.AT.COMPAQ privacy and legal statement file:///C|/SERVICE%20MANUALS/COMPAQ%20_%20chec...01600%20SERIES%201650%20and%201655/system.
"Compaq.
"Compaq.com - Compaq Presario 1600 Series Maintenance and Service Guide - Models: 1650 and 1655 8. System Board, w/o processor 9. Memory Module 16-MB 32-MB 64-MB 1.800.AT.COMPAQ privacy and legal statement file:///C|/SERVICE%20MANUALS/COMPAQ%20_%20chec...01600%20SERIES%201650%20and%201655/boards.
"Compaq.
"Compaq.
"Compaq.
"Compaq.
"Compaq.com - Compaq Presario 1600 Series Maintenance and Service Guide - Models: 1650 and 1655 1.800.AT.COMPAQ privacy and legal statement file:///C|/SERVICE%20MANUALS/COMPAQ%20_%20che...1600%20SERIES%201650%20and%201655/newp41.
"Compaq.
"Compaq.com - Compaq Presario 1600 Series Maintenance and Service Guide - Models: 1650 and 1655 1.800.AT.COMPAQ privacy and legal statement file:///C|/SERVICE%20MANUALS/COMPAQ%20_%20checked%20ok/NOTEBOOKS/PRESARIO%201600%20SERIES%201650%20and%201655/newp6.
"Compaq.
"Compaq.
ESD United States June 27, 2004 STORE | PRODUCTS | SERVICES | SUPPORT | CONTACT US | SEARCH COMPAQ Maintenance & Service Guide Presario 1600 Series Models: 1650 and 1655 | Home Page | Notice | Preface | Product Description | Troubleshooting Illustrated Parts Catalog | Removal & Replacement Procedures | Specifications Pin Assignments | Battery Pack Operations Electrostatic Discharge A sudden discharge of static electricity from a finger or other conductor can destroy staticsensitive devices or microcir
ESD Removing DIPS from vinyl trays 11,500 V 4,000 V 2,000 V Removing DIPS from Styrofoam 14,500 V 5,000 V 3,500 V Removing bubble pack from PCBs 26,000 V 20,000 V 7,000 V Packing PCBs in foam-lined box 21,000 V 11,000 V 5,000 V NOTE: 700 volts can degrade a product. Return to Removal & Replacement Procedures 1.800.AT.COMPAQ privacy and legal statement file:///C|/SERVICE%20MANUALS/COMPAQ%20_%20chec...1600%20SERIES%201650%20and%201655/electro.
Service Cons.
Service Cons. Return to Removal & Replacement Procedures 1.800.AT.COMPAQ privacy and legal statement file:///C|/SERVICE%20MANUALS/COMPAQ%20_%20chec...1600%20SERIES%201650%20and%201655/service.
Cable POs. United States June 27, 2004 STORE | PRODUCTS | SERVICES | SUPPORT | CONTACT US | SEARCH COMPAQ Maintenance & Service Guide Presario 1600 Series Models: 1650 and 1655 | Home Page | Notice | Preface | Product Description | Troubleshooting Illustrated Parts Catalog | Removal & Replacement Procedures | Specifications Pin Assignments | Battery Pack Operations Cables and Connectors Most cables used throughout the unit are ribbon cables. Cables must be handled with extreme care to avoid damage.
Cable POs. The ribbon cable position for the CD drive. The ribbon cable position for the diskette drive. The cable position for the speaker assembly. Plastic Parts Plastic parts can be damaged by the use of excessive force during disassembly and reassembly. When handling the plastic parts, use care. Apply pressure only at the points designated in the maintenance instructions. Back to Top of Page Return to Removal & Replacement Procedures Compaq Home Search Products Service Worldwide Compaq.
Preparing the Computer United States COMPAQ June 27, 2004 STORE | PRODUCTS | SERVICES | SUPPORT | CONTACT US | SEARCH Maintenance & Service Guide Presario 1600 Series Models: 1650 and 1655 | Home Page | Notice | Preface | Product Description | Troubleshooting Illustrated Parts Catalog | Removal & Replacement Procedures | Specifications Pin Assignments | Battery Pack Operations Preparing the Computer for Disassembly Electrostatic Discharge Before beginning removal and replacement procedures, complete
Preparing the Computer CAUTION: Do not crush, puncture, or incinerate the battery pack. Hard Drives Do not open a battery pack, as this damages the pack, makes it unusable, and exposes potentially harmful battery components. There are no field-serviceable parts located inside the battery pack. Battery Charger Board CD Drive Display Panel Assembly Upper CPU Cover Speaker Assembly The Compaq Presario 1600 Series Portable Computers have several screws of various sizes which are not interchangeable.
Battery P United States COMPAQ June 27, 2004 STORE | PRODUCTS | SERVICES | SUPPORT | CONTACT US | SEARCH Maintenance & Service Guide Presario 1600 Series Models: 1650 and 1655 | Home Page | Notice | Preface | Product Description | Troubleshooting Illustrated Parts Catalog | Removal & Replacement Procedures | Specifications Pin Assignments | Battery Pack Operations Removing the Battery Pack Electrostatic Discharge Service Considerations Cables and Connectors Preparing the Computer for Disassembly Batte
Battery P CD Drive Display Panel Assembly Upper CPU Cover Speaker Assembly Diskette Drive Fan Assembly Audio Board System Board To replace a new battery pack, complete the following steps: 1. Push forward on the battery pack with tab to insert the battery pack into the battery pack slot. 2. Slide the battery pack door up onto the opening for the battery pack door. Memory Module 1.800.AT.COMPAQ privacy and legal statement file:///C|/SERVICE%20MANUALS/COMPAQ%20_%20che...
Palmrest United States COMPAQ June 27, 2004 STORE | PRODUCTS | SERVICES | SUPPORT | CONTACT US | SEARCH Maintenance & Service Guide Presario 1600 Series Models: 1650 and 1655 | Home Page | Notice | Preface | Product Description | Troubleshooting Illustrated Parts Catalog | Removal & Replacement Procedures | Specifications Pin Assignments | Battery Pack Operations Removing the Palmrest Cover with Touch Pad Electrostatic Discharge Service Considerations Cables and Connectors Preparing the Computer for D
Palmrest CD Drive Display Panel Assembly Upper CPU Cover Speaker Assembly 2. Close the computer and turn the computer upside down. 3. Remove three screws from the bottom of the computer. Diskette Drive Fan Assembly Next Step Audio Board System Board Memory Module 1.800.AT.COMPAQ privacy and legal statement file:///C|/SERVICE%20MANUALS/COMPAQ%20_%20che...O%201600%20SERIES%201650%20and%201655/51.
Keyboard United States June 27, 2004 STORE | PRODUCTS | SERVICES | SUPPORT | CONTACT US | SEARCH COMPAQ Maintenance & Service Guide Presario 1600 Series Models: 1650 and 1655 | Home Page | Notice | Preface | Product Description | Troubleshooting Illustrated Parts Catalog | Removal & Replacement Procedures | Specifications Pin Assignments | Battery Pack Operations Removing the Keyboard Electrostatic Discharge Service Considerations Cables and Connectors Preparing the Computer for Disassembly Battery Pa
Keyboard Display Panel Assembly Upper CPU Cover Speaker Assembly Diskette Drive Fan Assembly Audio Board System Board Memory Module To remove a cable from a ZIF connector, lift both corners of the ZIF connector and slide simultaneously with constant light force. NOTE: Then remove the cable. Refer to the section on Cables and Connectors for more information on removing a cable from the ZIF connector. Next Step 1.800.AT.COMPAQ privacy and legal statement file:///C|/SERVICE%20MANUALS/COMPAQ%20_%20che...
Heatspreader United States COMPAQ June 27, 2004 STORE | PRODUCTS | SERVICES | SUPPORT | CONTACT US | SEARCH Maintenance & Service Guide Presario 1600 Series Models: 1650 and 1655 | Home Page | Notice | Preface | Product Description | Troubleshooting Illustrated Parts Catalog | Removal & Replacement Procedures | Specifications Pin Assignments | Battery Pack Operations Removing the Heatspreader Electrostatic Discharge Service Considerations Cables and Connectors Preparing the Computer for Disassembly Ba
Heatspreader Battery Charger Board CD Drive Display Panel Assembly the heatspeader, reverse the previous procedures. Upper CPU Cover Speaker Assembly Diskette Drive Fan Assembly Audio Board System Board Memory Module 1.800.AT.COMPAQ privacy and legal statement file:///C|/SERVICE%20MANUALS/COMPAQ%20_%20che...O%201600%20SERIES%201650%20and%201655/52.
Modem United States COMPAQ June 27, 2004 STORE | PRODUCTS | SERVICES | SUPPORT | CONTACT US | SEARCH Maintenance & Service Guide Presario 1600 Series Models: 1650 and 1655 | Home Page | Notice | Preface | Product Description | Troubleshooting Illustrated Parts Catalog | Removal & Replacement Procedures | Specifications Pin Assignments | Battery Pack Operations Removing the Modem Electrostatic Discharge Service Considerations Cables and Connectors Preparing the Computer for Disassembly Battery Pack Pal
Modem Upper CPU Cover shield and modem, lift off the shield, and pull the modem off the connector on the system board. Speaker Assembly Next Step Battery Charger Board CD Drive Display Panel Assembly Diskette Drive Fan Assembly Audio Board System Board Memory Module 1.800.AT.COMPAQ privacy and legal statement file:///C|/SERVICE%20MANUALS/COMPAQ%20_%20che...O%201600%20SERIES%201650%20and%201655/58.
Processor United States COMPAQ June 27, 2004 STORE | PRODUCTS | SERVICES | SUPPORT | CONTACT US | SEARCH Maintenance & Service Guide Presario 1600 Series Models: 1650 and 1655 | Home Page | Notice | Preface | Product Description | Troubleshooting Illustrated Parts Catalog | Removal & Replacement Procedures | Specifications Pin Assignments | Battery Pack Operations Removing the Processor Electrostatic Discharge Service Considerations Cables and Connectors Preparing the Computer for Disassembly Battery
Processor Battery Charger Board CD Drive Display Panel Assembly 6. Remove two screws securing the processor bracket. Next Step Upper CPU Cover Speaker Assembly Diskette Drive Fan Assembly Audio Board System Board Memory Module 1.800.AT.COMPAQ privacy and legal statement file:///C|/SERVICE%20MANUALS/COMPAQ%20_%20che...O%201600%20SERIES%201650%20and%201655/54.
"Compaq.
"Compaq.com - Compaq Presario 1600 Series Maintenance and Service Guide - Models: 1650 and 1655 Display Panel Assembly Upper CPU Cover Speaker Assembly Diskette Drive Fan Assembly Audio Board System Board Memory Module Compaq Home Search Products Service Worldwide Compaq.com Comments? Legal Notices and Privacy Statement Revised: dd Month 1998 1.800.AT.COMPAQ privacy and legal statement file:///C|/SERVICE%20MANUALS/COMPAQ%20_%20chec...01600%20SERIES%201650%20and%201655/status.
"Compaq.
"Compaq.com - Compaq Presario 1600 Series Maintenance and Service Guide - Models: 1650 and 1655 Battery Charger Board CD Drive Display Panel Assembly Upper CPU Cover Speaker Assembly Diskette Drive Fan Assembly Audio Board System Board Memory Module Compaq Home Search Products Service Worldwide Compaq.com Comments? Legal Notices and Privacy Statement Revised: dd Month 1998 1.800.AT.COMPAQ privacy and legal statement file:///C|/SERVICE%20MANUALS/COMPAQ%20_%20check...
Hard Drive United States COMPAQ June 27, 2004 STORE | PRODUCTS | SERVICES | SUPPORT | CONTACT US | SEARCH Maintenance & Service Guide Presario 1600 Series Models: 1650 and 1655 | Home Page | Notice | Preface | Product Description | Troubleshooting Illustrated Parts Catalog | Removal & Replacement Procedures | Specifications Pin Assignments | Battery Pack Operations Removing the 5.0-GB or 4.
Hard Drive Hard Drives Battery Charger Board CD Drive Display Panel Assembly mounting bracket and lift up the hard drive. Next Step Upper CPU Cover Speaker Assembly Diskette Drive Fan Assembly Audio Board System Board Memory Module 1.800.AT.COMPAQ privacy and legal statement file:///C|/SERVICE%20MANUALS/COMPAQ%20_%20che...O%201600%20SERIES%201650%20and%201655/55.
Battery Charger United States COMPAQ June 27, 2004 STORE | PRODUCTS | SERVICES | SUPPORT | CONTACT US | SEARCH Maintenance & Service Guide Presario 1600 Series Models: 1650 and 1655 | Home Page | Notice | Preface | Product Description | Troubleshooting Illustrated Parts Catalog | Removal & Replacement Procedures | Specifications Pin Assignments | Battery Pack Operations Removing the Battery Charger Board Electrostatic Discharge Service Considerations Cables and Connectors Preparing the Computer for D
Battery Charger Hard Drives Battery Charger Board CD Drive Display Panel Assembly Upper CPU Cover Speaker Assembly Diskette Drive Fan Assembly Audio Board System Board Memory Module and lift out of the chassis. To replace the battery charger board, reverse the previous procedures. When replacing the battery charger board, ensure NOTE: the pins are aligned with the connector on the system board. 1.800.AT.COMPAQ privacy and legal statement file:///C|/SERVICE%20MANUALS/COMPAQ%20_%20che...
CD United States COMPAQ June 27, 2004 STORE | PRODUCTS | SERVICES | SUPPORT | CONTACT US | SEARCH Maintenance & Service Guide Presario 1600 Series Models: 1650 and 1655 | Home Page | Notice | Preface | Product Description | Troubleshooting Illustrated Parts Catalog | Removal & Replacement Procedures | Specifications Pin Assignments | Battery Pack Operations Removing the CD Drive Electrostatic Discharge Service Considerations Cables and Connectors Preparing the Computer for Disassembly Battery Pack Pal
CD Battery Charger Board CD Drive Display Panel Assembly Upper CPU Cover Speaker Assembly Diskette Drive Fan Assembly 5. Remove the stiffener bracket. 6. Remove the battery charger board. 7. Remove two screws located at the back CD drive. Audio Board System Board Next Step Memory Module 1.800.AT.COMPAQ privacy and legal statement file:///C|/SERVICE%20MANUALS/COMPAQ%20_%20che...O%201600%20SERIES%201650%20and%201655/56.
Display United States COMPAQ June 27, 2004 STORE | PRODUCTS | SERVICES | SUPPORT | CONTACT US | SEARCH Maintenance & Service Guide Presario 1600 Series Models: 1650 and 1655 | Home Page | Notice | Preface | Product Description | Troubleshooting Illustrated Parts Catalog | Removal & Replacement Procedures | Specifications Pin Assignments | Battery Pack Operations Removing the Display Panel Assembly Electrostatic Discharge Service Considerations Cables and Connectors To remove the display panel assembl
Display Display Panel Assembly Upper CPU Cover Speaker Assembly Diskette Drive Fan Assembly Carefully remove the display IMPORTANT: panel assembly hinge covers. Next Step Audio Board System Board Memory Module 1.800.AT.COMPAQ privacy and legal statement file:///C|/SERVICE%20MANUALS/COMPAQ%20_%20che...O%201600%20SERIES%201650%20and%201655/59.
CPU United States COMPAQ June 27, 2004 STORE | PRODUCTS | SERVICES | SUPPORT | CONTACT US | SEARCH Maintenance & Service Guide Presario 1600 Series Models: 1650 and 1655 | Home Page | Notice | Preface | Product Description | Troubleshooting Illustrated Parts Catalog | Removal & Replacement Procedures | Specifications Pin Assignments | Battery Pack Operations Removing the Upper CPU Cover To remove the Upper CPU cover complete the following steps: Electrostatic Discharge Service Considerations Cables a
CPU Status Panel Interface Board Hard Drives Battery Charger Board CD Drive Display Panel Assembly Upper CPU Cover Speaker Assembly Diskette Drive Fan Assembly Audio Board System Board Memory Module cover with touch pad. 4. Remove the keyboard. 5. Remove the heatspreader. 6. Remove the display panel assembly. 7. Remove three screws located on the top and release the snap located in the left corner of the Upper CPU cover. To replace the Upper CPU cover, reverse the previous procedures. 1.800.AT.
Speakers United States COMPAQ June 27, 2004 STORE | PRODUCTS | SERVICES | SUPPORT | CONTACT US | SEARCH Maintenance & Service Guide Presario 1600 Series Models: 1650 and 1655 | Home Page | Notice | Preface | Product Description | Troubleshooting Illustrated Parts Catalog | Removal & Replacement Procedures | Specifications Pin Assignments | Battery Pack Operations Removing the Speaker Assembly To remove the speaker assembly, complete the following steps: 1. Prepare the computer for disassembly. 2.
Speakers Keyboard Heatspreader Modem Processor Status Panel Interface Board Hard Drives Battery Charger Board CD Drive Display Panel Assembly Upper CPU Cover Speaker Assembly Diskette Drive Fan Assembly Audio Board System Board drive. 9. Disconnect the speaker cables from the system board and remove the speaker assembly from the chassis. The speaker cables must be properly routed when replacing the speaker assembly. Place the cables in such a manner NOTE: that they cannot be caught or snagged by screws.
Speakers privacy and legal statement file:///C|/SERVICE%20MANUALS/COMPAQ%20_%20che...%201600%20SERIES%201650%20and%201655/511.
DisketteD United States June 27, 2004 STORE | PRODUCTS | SERVICES | SUPPORT | CONTACT US | SEARCH COMPAQ Maintenance & Service Guide Presario 1600 Series Models: 1650 and 1655 | Home Page | Notice | Preface | Product Description | Troubleshooting Illustrated Parts Catalog | Removal & Replacement Procedures | Specifications Pin Assignments | Battery Pack Operations Removing the Diskette Drive Electrostatic Discharge To remove the diskette drive, complete the following steps: 1.
DisketteD Hard Drives Battery Charger Board CD Drive Display Panel Assembly Upper CPU Cover Speaker Assembly Diskette Drive Fan Assembly Audio Board System Board Memory Module 1.800.AT.COMPAQ privacy and legal statement file:///C|/SERVICE%20MANUALS/COMPAQ%20_%20che...%201600%20SERIES%201650%20and%201655/512.
Fan United States June 27, 2004 STORE | PRODUCTS | SERVICES | SUPPORT | CONTACT US | SEARCH COMPAQ Maintenance & Service Guide Presario 1600 Series Models: 1650 and 1655 | Home Page | Notice | Preface | Product Description | Troubleshooting Illustrated Parts Catalog | Removal & Replacement Procedures | Specifications Pin Assignments | Battery Pack Operations Removing the Fan Assembly To remove the fan assembly, complete the following steps: Electrostatic Discharge Service Considerations Cables and Co
Fan Battery Charger Board CD Drive Display Panel Assembly Upper CPU Cover Speaker Assembly Diskette Drive Replace the fan gasket, place the fan at a 15 IMPORTANT: degree angle, and push forward to replace the fan assembly. Fan Assembly Audio Board System Board To replace the fan assembly, reverse the previous procedures. Memory Module 1.800.AT.COMPAQ privacy and legal statement file:///C|/SERVICE%20MANUALS/COMPAQ%20_%20che...%201600%20SERIES%201650%20and%201655/513.
System Bd.
System Bd. Hard Drives 12. Remove the CD drive. Battery 13. Remove the display panel assembly. Charger Board CD Drive 14. Remove the Upper CPU Cover. Display Panel Assembly 15. Remove the diskette drive. Upper CPU Cover 16. Remove the fan. Speaker Assembly 17. Remove the audio board. Diskette Drive 18. Disconnect the speaker assembly cables. Fan Assembly Audio Board Next Step System Board Memory Module 1.800.AT.COMPAQ privacy and legal statement file:///C|/SERVICE%20MANUALS/COMPAQ%20_%20che..
Memory United States COMPAQ June 27, 2004 STORE | PRODUCTS | SERVICES | SUPPORT | CONTACT US | SEARCH Maintenance & Service Guide Presario 1600 Series Models: 1650 and 1655 | Home Page | Notice | Preface | Product Description | Troubleshooting Illustrated Parts Catalog | Removal & Replacement Procedures | Specifications Pin Assignments | Battery Pack Operations Removing the Memory Module Electrostatic Discharge Service Considerations Cables and Connectors Preparing the Computer for Disassembly Battery
Memory CD Drive door, and slide the memory module door to the right. Display Panel Assembly Next Step Hard Drives Battery Charger Board Upper CPU Cover Speaker Assembly Diskette Drive Fan Assembly Audio Board System Board Memory Module 1.800.AT.COMPAQ privacy and legal statement file:///C|/SERVICE%20MANUALS/COMPAQ%20_%20che...%201600%20SERIES%201650%20and%201655/515.