Chuck Point Copyright Notice Check Point Copyright Notice ® 2020 Check Point Software Technologies Lud. All rights reserved. This product and related documentation are protected by copyright and distributed under licensing restricting their use, copying, distribution, and recompilation. No part of this product or related documentation may be reproduced in any form or by any means without prior written authorization of Check Point.
1570TH Appliance RB0.20.05 Gelling Stared Guide Important Information Latest Software ‘We recommend that you install the most recent software release to stay up-to-date with the {test functional improvements, stability fixes, security enhancements and protection against new and evolving attacks. Certifications For third party independent certification of Check Point products, see the Check Point Certifications page. Check Point R80.20.
Table of Contents Table of Contents Introduction Shipping Carton Moments Connecting the Cables Upsetting Appliance Mounting Options Using DC Power Field Wiring for DC Mains First Time Deployment Options Appliance Diagrams and Specifications Front Panel ee Back Panel scansion anon Side Panel bm SR 4 Using the First Time Configuration Wizard Welcome sis PR cis .
Table of Contents Health and Safety Information 56 InformationsurlaSantéetlaSéeurité 64 Support 71 1570R Appliance R80.20.
Introduction Introduction Thank you for choosing Check Point's Internet Security Product Suite. Check Paint products provide your business with the most up to date and secure solutions available today. Check Point also delivers worldwide technical services including educational, professional, and support services through a network of Authorized Training Centers, Certified Support Partners, and Check Point technical support personnel to ensure that you get the most out of your securely investment.
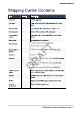
Shipping Carton Contents Shipping Carton Contents Item Appliance LAN cable Console cable Power adapter Power cord for adapter Rubber feet Wall mount kit Mini ISB WIFI dangle DIN rail kit Antenna Industrial power supply P42 kit Guides License Agreement egy 1 1 Bey 1570R appliance Fam Rb lo Rich, Cather, shielded, 8TF, black carol 1m, USB type-C to USE-2.
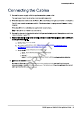
Connecting the Cables Connecting the Cables 1. Connect the power supply unit to the appliance and to a power outlet. The appliance Is med on when the power supply is connected. 2. When the appliance Is muted on, the Power LED on the front panel lights up In red for a short period. The LED then turns blue and starts to blink. This shows a boot Is In progress and firmware Is being installed. When the LED turns a solid blue, the appliance is ready for login. Note The LED is red if there is an alert or error.
Selling up the Appliance Setting up the Appliance 1. Remove the Check Point 1570R appliance from the shipping carton and place ton a tabletop. For other mounting options, ses below. 2. Optional Remove the transparent protective sticker from the front panel of the appliance. 3. Identify the network interface marked as LANE. This interface is reconfigured with the IP address 182.168.1.1. Mounting Options e Desktop No special hardware or mounting instructions necessary.
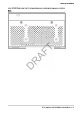
Selling up the Appliance In the 1570R Wired model, the DIN rail mount holes are located on the back panel or bottom: Back co OGD Oo0vo 2 40 | (Fae B BBB RR 6 000 Pols B00 O00, GUO GOT OVO 0V00 PRO GR CHEESEBOARD Geo 070700070 % 0% 0 eee eee Te eS Te Tell {agi fte ite Jif O00 0 00.020 000.0 9.0.0 Q QED GIRO Sen 0 D0 00.000 0. 0 00 076%6%6%0%% 0 0 00626000 900 0 00060 0 ie 076% 0.0.0 0.0.0 000.00. 0.0.00, COC es 688 00 00:00 BEG ISM i = 1570R Appliance 80.20.
Selling up the Appliance In the 1570R W IF-LTE model, use the DIN rail mount holes located on the bottom panel: Er 1. Attach the DIN rail kit (with and preference). 1570R Appliance 80.20.
Selling up the Appliance To mount the appliance to the wall: 1. Place the wall-mount sticker on the wall and drill two holes for the screws. 2. Attach the 2 screws in the accessory kit (M4°8) to the wall, 3. Mount the appliance and verify the 2 screws are fastened well to the appliance. 1570R Appliance 80.20.
Using DC Power Using DC Power To use the DC terminal block: 1. Insert the positive and negative wires into the V+ and Contacts on the terminal block connector. 2. Tighten the wire-clamps screws to prevent the DC wires coming loose. Before wiring the device, make sure that: u The terminal block is suitable for 18 AWG (64). Torque value is 5 In-in. e The cross sectional area of the earthing conductors should be at least 18AWG. e The temperature rating of the input connection cable should be higher than 95°C.
Using DC Power Field Wiring for DC Mains Only trained service personnel are authorized to install and remove the £12 £72 volt DC Mains, and make the connections to and disconnections from the £12 £72 volt DC Mains. The customer is responsible for ensuring that only trained service personnel install or remove the £12 £72 volt power cable. See the IPC documentation for detailed instructions for installing DC Power supplies in the IPC.
Using DC Power To veld a shock hazard: = Do not connect or disconnect any cables or perform Installation, maintenance, or reconfiguration of this product during an electrical storm. Connect all power cords to proper wired sources. = Connection properly wired power sources any equipment that will be attached to this product. u When possible, use one hand only to connect or disconnect signal cables. Never turn on any equipment when there is evidence of fire, water, or structural damages.
First Time Deployment Options First Time Deployment Options Hers are different options for first time deployment of your gateways: u "Using the First Time Configuration Wizard” on page 29 ® "Zero Touch Cloud Service" on page 54 ® "USB Drive"on page 55 1570R Appliance 80.20.
Appliance Diagrams and Specifications Appliance Diagrams and Specifications This section describes the different features in the front, back, and side panels of these 1570R models: u Wired u LET-WIFi Mots Depending on which model appliance you have, some of the specifications below may vary. 1570R Appliance 80.20.
Zi & § ios Appliance Diagrams and Specifications Pag “eg; to, 0 0, 00, 0 hig Dy Cr Ton Tha og iy Sug Cpe Ye, a Eng Bo Mi S00 0 105, Sep Ton, Dia Uo Cp Ca Dap Veg ey Sa Bey Cap Vi Sn, Os P00 Upon i voy ny ne Sis bog . lst thy oye 5 Re ng Tag ay, Sug! Cote ltt a ere Te ty : 1570R Appliance 80.20.
Appliance Diagrams and Specifications WiFi-LTE % ate Fe 00 Sgt ego ool te ty 1570R Appliance 80.20.
Front Panel Front Panel Mote There is only one set of LESS. These LE] fife rent colors depending on what activity is concurring. input 3 Ground BO raw 4 Power cord socket 5 USB port 3.0 ® WiFi = Management w Internet u Power Connects lo the power supply units cable, Protective earthing terminal. Plug the power adapter cord in here, USE port 3.0 for 8W download and external dongle as WiFi, 1570R Appliance RE0.20.
Front Panel Seaport Plug in the serial cable here. Console Plug in the serial console cable here. Baud rate: 115200. LAN ports LAN ports 1-8. 10100/1000MbE Two SANDMEN combo ports The DMZ is a combo port of SFP and RJ45 {on the right}. Only one can operate a time once plugged in and connected. 10/100/1000MbE The Management LED shows the status of the retries mechanism: Management LED an Zero Touch is running.
Front Panel The table below describes the network LED (RJ45 WAN and LAN ports and the SF. Each port uses a bi color LED to reflect the link/activity and speed, from 10M to gibe. LED (Amber) RJ45 and 1G SFP LED] (Green) No link g 1G link o = 1G Act 100M link 100M Act 10M fink 10M Act 1570R Appliance 80.20.
Back Panel Back Panel eats 262 008 0 OND: GIOTTO GOT 00 AO INI F G0 QOD 0Ie NIN 9.8, DOO 0 Re GD GOO QO GID GO GIOTTO OG GTO 00.0 Ql 00 OQ GIOTTO GGT QUO TOE 070 HG fire flchiailoattoiisRo ie hte) 8 Ie 000 DO OH Ca76"6% 50% 9% % OTE QM O00 1570R Appliance 80.20.
Back Panel WiFi-LTE ooo o "a o ooo Db & 2002020020 67a Gog Quy Qo 00a «© Gy C0) C30 £0 Cog ogy DGG folklore GGG 0 QO GEC 00D a TOT gooey Gig ofa G WC COD 020707070700 Insert anti-theft cable here. Use Pennington and Unbox TL-623M cable as a reference. Anti-theft slot M3 DIN tall mount 1570R Appliance 80.20.
Side Pans! Side Panel Goa Cea BOGS 08 R08 goa on COOL a Ded GG DTO Ee Gio £3 £2 fates G0 fed SLE ata & E050 0 Masada 0 els Hs | teleological thews BGO 000 moe UL SE Bla o ooo 00s paean S00 00% eo oe e096 620% 805020 0% 570% 26% 2% 70% P9875 00 5 060 tne a 670 60" 7% & 026%" 967% @ £2 DDG a PnP R0 5,0, 00 BS OILCLOTH ERE 0 0.0 O00 GQ 1 QLD a OOO LoD O00 G00 On 8 8 Baa a CUP BOS 002 LOO O80 Gol EBS GORE RU S00 £0 BGO CHAR BONGO (OEE Paar, 1570R Appliance 80.20.
Side Pans! Description Short press resets the system but dis nol remove any user parameters. Insert mice-S0 card here, Press the button continuously for 12 seconds to restore the appliance to is factory default. All user parameters previously configured are removed. Insert BIM card here (WIFELESS model only). 1570R Appliance 80.20.
Using the First Time Configuration Wizard Using the First Time Configuration Wizard Configure the Check Point appliance with the First Time Configuration Wizard. To vise the wizard and save configured settings, click Quit Note In the First Time Configuration Wizard, you may not see all the pages described in this guide. The pages that show in the wizard depend on your appliance mode! and the options you select. 1570R Appliance 80.20.
Welcomes Wail come The Welcome page introduces the product and shows the name of your appliance. Welcome to the Check En int 1570R Appliance First Time Configuration Wizard HOLSTER RRA EE Bae es Le va You can connect to the Zero To To change the language of the Weblog! application: Select the language link at the top of the page. Mote Only English is allowed as the input language.
Welcomes To connect to the Ere Touch server: 1. In the Welcome page, click Fetch Settings from the cloud. 2. In the window that opens, click OK to confirm they you want to proceed. 3. The Internet connection page opens. Configure your Internet connection and dick Connect. 4 . The Fetching stings from the cloud window opens and shows the Connecting to the service provider status. This process may lake several minutes. 5. you fail io connect, an error message appears.
Authentication Details Authentication Details In the Authentication Details page, enter the required details to log in to the Check Point 1570R Appliance Website application or If the wizard terminates abnormally: Administrator Name We recommend that you change the default “admin” login name of the administrator. The name is case sensitive. ® Password A strong password has a minimum of 8 characters with at least one capital letter, one lower case letter, and a special character.
Se melanin Te Engels Authentication Details Check Point Si telescope Back We 1570R Appliance 80.20.
Appliance Date and Time Findings Appliance Date and Time Settings In the Appliance Date and Time Bet lings page, configure the appliance's date, time, and time zone settings manually or use the Network Time Protocol option. ‘When you set the time manually, the host computer's nurselings are used for the default date and time values. If necessary, change the time zone sifting to show your correct location. Daylight Savings Time is automatically enabled by default.
Appliance Name Appliance Name In the Appliance Name page, enter a name to identify the appliance, and enter a domain name {optional}. ‘When the gateway performs DNS resolving for a specified object's name, the domain name is appended to the object name. This lets hosts in the network look up hosts by their internal names. Replant Bae 1570R Appliance 80.20.