
Installation guide

Compro TN2200 - Quick Installation Guide
5
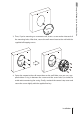
Product Overview
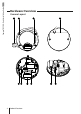
No. Name Description
1 Ethernet port For connection to the network
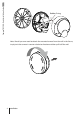
2 Socket head screw (4
in total )
To remove the top cover, unscrew the 4 socket head
screws with the supplied L-shaped wrench
3 Microphone pinhole For receiving ambient sound
4 Screw holes for wall
mount base/ceiling
mounting
For installing the wall mount base; for ceiling mouting
the camera without the use of wall mount base
5 microSD card slot Push the memory card in order to release it
6 Composite video jack For connecting to a standad TV and helping you adjust
camera during installation
7 Lens Fixed iris, F 2.0, f 1.96mm
8 Reset button Press and hold the button to reset the camera back to
factory defaults
9 Tilt adjustment screw 2 tilt adjustment screws hold the tilting position of the
camera
10 Pan adjustment
screw
For holding the panning position of the camera