
Instructions / Assembly


8
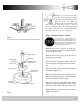
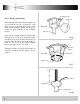
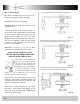
Slide the ceiling canopy up into place over the
ceiling mounting bracket (see figure 11). The
two screws on the mounting bracket face
should slip through the key hole slots in the
canopy. Rotate the canopy slightly and then
tighten both screws.
Step 4 Install the ceiling fan
If you are using the Flush Mount System, skip
this step.
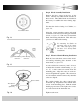
Depending on how deep the
electrical junction box was
installed in the ceiling, you
might have a slight gap
between the ceiling canopy
and the ceiling. Junction
boxes are commonly installed at different
depths in the ceiling, so we have designed the
mounting bracket and ceiling canopy to allow
for this.
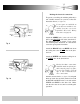
Attach each fan blade to a blade arm with three
washer head screws and three screw pads (see
figure 12). Each screw is passed through the
screw pad, then the blade and screwed into the
blade arm.
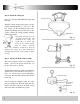
Screws should be tightened until the screw
pads are compressed. Hold the blade arm dec-
orative side down and place the blade on top
with your choice of finish facing down.
Step 5 Blade And Blade Arm Assembly
This fan is supplied with a reversible blade
finish. Choose the blade finish that you
prefer and attach as follow:
Fig. 11
Fig. 12
Support Rod
Canopy Screws
Ceiling Canopy
Screws and Pads
(3 per blade)
Motor Housing
Pre-Installed
Screws to
Blade Arm
Fig. 13